How Expenses are Created and Submitted
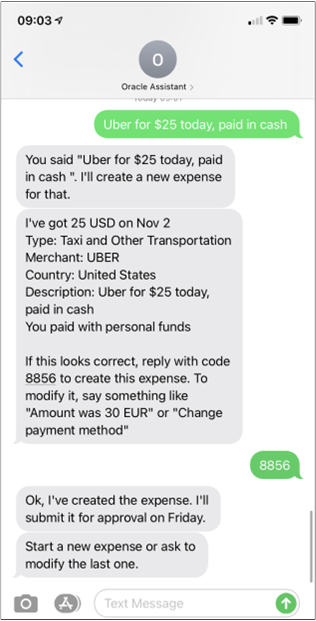
After you review the extracted expense details and enter the four-digit code to confirm expense creation, the Assistant creates the expense and makes it ready for submission if all the details are fine.
You get a message confirming by when the expense will be submitted.
Here's a screenshot of how the Assistant confirms creation of an expense.
Now, you can't delete the expense in the Assistant, but you can still modify it. To delete such an expense, you need to use the Expenses web application.
Matching an Expense with Corporate Card Charges
If you've paid for an expense using your personal funds, then the expense is ready to be submitted for approval and further processing soon after it's created. Generally, Expense Assistant informs you about the date when the expense will be submitted.
For expenses paid using corporate cards, the application first tries to match the expense to the existing credit card charge data received from the corporate card company. Here are possible outcomes of the matching process:
-
If the application finds an exact match, Expense Assistant informs you about the match and date when the expense will be submitted.
-
If the application finds a potential match, Expense Assistant informs you about the potential corporate card charge match and waits for your confirmation.
-
If you confirm the potential match, the application merges the expenses and makes it ready for submission. Expense Assistant informs you about the date when the expense will be submitted.
-
If you reject the potential match, the application creates the expense but it can't be submitted. The application waits for new credit card charge data from the corporate card company. Expense Assistant updates the Expenses web application with the automatic submission date when a matching corporate card charge for the expense is found.
-
-
If the application finds several potential matches, the expense is created but it can't be submitted. Expense Assistant informs you about the several corporate card charges that could match the expense. In this case, you must resolve the match using the Expenses web application.
-
If the application can't find a matching corporate card charge, it creates the expense but the expense can't be submitted. Expense Assistant informs you that the expense can be submitted after it matches a corporate card charge.
Automatic Submission of Expenses
After an expense item is created in Expense Assistant, it needs to be submitted for approval and further processing. If your administrator has enabled automatic submission of expenses, then at periodic intervals, expenses that are ready for submission are automatically submitted for approval as part of an expense report.
For corporate card expenses, the application looks for a matching corporate card charge. If the match is found, the application merges the expense and makes the expense ready for submission. If the application doesn't find a matching corporate card charge, it waits for a match indefinitely. In some cases, the application may match a corporate card charge to multiple expenses and sometimes it's the other way around. In such cases, you must resolve the match using the Expenses web application.
If you don't have a corporate card, these are the expense items that are eligible for automatic submission:
-
Expense items that were created using the digital assistant.
-
Expense items with no missing information.
-
Expense items that have required receipts.
-
Expense items that have justification for policy violations.
If you have a corporate card, these are the expense items that are eligible for automatic submission:
-
Expense items that were created using the digital assistant and corporate card wasn't used. Instead, payment was made using personal funds.
-
Expense items that were created using the digital assistant and exactly matched to corporate card charges.
-
Tip charges on corporate card from merchants, such as Uber and Lyft, where a receipt was sent for the base fare.
Here are the expense items created from Expense Assistant that aren't eligible for automatic submission:
-
Expense items with missing information.
-
An expense item without an exact match or requires match confirmation.
-
An expense item that matches multiple corporate card charges.
-
A corporate card charge that matches with multiple expenses.
-
Expenses that violate company policies.
To make these expense items eligible for automatic submission, you may have to resolve the issues using the Expenses web application.
After your expenses are submitted automatically, you receive an email informing you about the submission. If you want to withdraw the submission of expenses, you can do that directly from the email.
Manual Submission of Expense Reports from Expense Assistant
There may be instances when you may want to submit multiple expenses together in a single report. In such as case, you can choose to submit your expenses manually from the Expense Assistant. However, if automatic submission of expenses is enabled, you must first turn off the automatic submission by using conversations. Here are some examples of phrases you can use to turn off the automatic submission of expenses:
-
Manual submit
-
Let me decide when to submit
-
Don't submit yet
-
Stop auto submit
After the automatic submission is turned off and all your required expenses are ready for submission, you can submit expense reports using phrases such as:
-
Submit expense
-
Submit my report
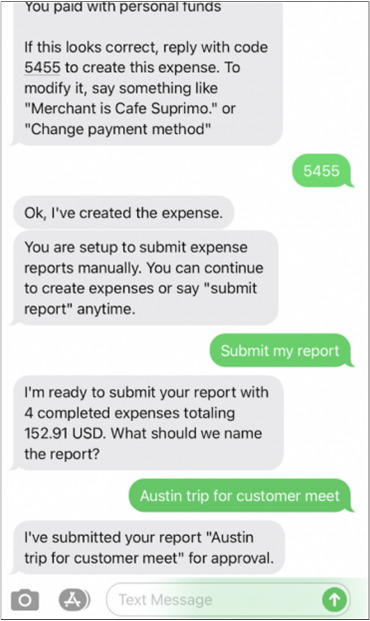
Expense Assistant identifies all expenses that are ready for submission, tells you the total number of expenses and amount. It also asks you to provide a name for the expense report. If you provide a report name, the Assistant submits the report. If you're not sure of the report name, you can let the Assistant assign a name and submit the report. Here are examples of phrases you use to let Expense Assistant assign a name and submit the report:
-
I don't have a name
-
I don't care
Here is a screenshot that shows how you can submit an expense report manually.
To cancel a manual expense report submission that's in progress, enter a phrase such as "Cancel".
After the manual expense report submission is complete, you can easily turn on the automatic submission again by using these phrases:
-
Turn on auto submit
-
Auto Submit
-
Submit for me
-
Switch to auto