Modify the Integration Orchestration for a New Attachment Field
This procedure shows you how to modify the existing integration to handle your new attachment.
Here's how you modify the integration in Oracle Integration to handle your new attachment.
First, make sure the integration recipe name "OFS B2BSVC Attachment" is active.
Regenerate the Endpoint
Create a new version of the orchestration integration "OFS B2BSVC Activity Updated" and open it for editing.
For more information on creating new versions, see Create a Draft of an Integration in the Using Integrations in Oracle Integration guide.
To get custom fields to appear in the mapper, you must regenerate the endpoint. Do
this by clicking on the OFS trigger onActivityEvent and clicking
Regenerate.
Click Regenerate in the dialog box.
This regenerates the WSDL and any dependent artifacts. You may see errors and warnings caused by the new WSDL. You need to fix these manually. They're most likely just namespace errors.
| Primary | Tracking Field | Tracking Name | Tracking Variable |
|---|---|---|---|
| Primary | apptNumber |
appt Number |
tracking_var_1 |
| NA | eventType |
event Type | tracking_var_2 |
| NA | user | user | tracking_var_3 |
For more information on regenerating endpoints, see Regenerate a WSDL File for Integrations in the Using Integrations in Oracle Integration guide.
Modify the Integration
You can now add a section to the integration to handle your new attachment.
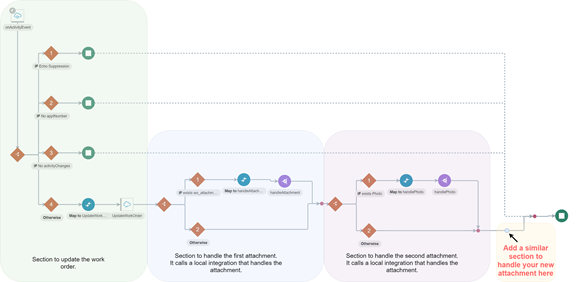
- Add a switch activity to the end of the orchestration.
Two branches are automatically created:
- Undefined branch:
- Click Edit on the routing expression to start the Expression
Builder.
For more information on using the Expression Builder, see the Create Routing Expression Logic in Both Expression Mode and Condition Mode topic in the Using Integrations in Oracle Integration guide.
Note: Be sure you're in Expression Mode and not Condition Mode. - In the Expression Builder, enter a value for Expression Name. For example, exists <property label>.
- Find your new attachment property in the Source area. It should
be in the tree under the following:
→ notify_POST → events.definitions.activityEvent → activityChanges → <property label> - Drag the new attachment property element from the Source area to
the first text box of the new condition.
It should be the text box with the
xpathexpression of the element. - Enclose the text with "boolean(<element for your new attachment property>)" to convert it to boolean.
- Set the condition operator to the equal sign "=".
- In the text box after the operator, enter "true()".
- Click Validate to validate the expression.
- Click the Done Editingbutton.Note: You may need to click the >> overflow icon to expand the menu.
The expression should be displayed: boolean(<element for your new attachment property>) = true()
- Click Close.
- Click Edit on the routing expression to start the Expression
Builder.
- Otherwise (second) branch:
This branch is taken if the routing expression for the initial branch doesn't resolve to true. Leave it blank.
The first branch will call a "local integration", that will handle the attachment.
For more information on local integrations, see Invoke a Co-located Integration from a Parent Integration in the Using Integrations in Oracle Integration guide.
- Click Actions to expand the panel.
- Drag Integration to the location in the integration canvas where
you want to call another integration. (Immediately after the
routing expression on the first branch.
The Configure Local Integration Service wizard is displayed.
- Specify the details as shown in the following table.
Local Integration Details (1)
Element Description What do you want to call your local integration invocation? Specify a name. This can be any name such as handleMyAttachment.What does this local integration invocation do? Specify a description. - Click Next.
- Specify the details shown in the following table.
Local Integration Details (2)
Element Description Integration Select the co-located integration. Only active integrations are displayed. In this case, it is OFS B2BSVC Attachment. Identifier Displays the identifier of the selected integration. Description Displays the description of the selected integration. - Click Next.
- Select the operation for the co-located integration. In this case select POST.
- Click Next.
- Review your selections.
- Click Done.
- Undefined branch:
- A new map should be created just before the local integration invocation. Give
it any descriptive name such as Map to
handleMyAttachment.For more information about how to use the Oracle Mapper, see Using the Oracle Mapper with Oracle Integration guide.
- Edit the map. This map is used to provide inputs to the local integration
invocation. The following table shows the detail for sources, target, and
instructions.
Map Details
Sources Target Instructions OnActivityEvent Request-->events.definitions.activityEvent-->activityDetails-->wo_numberTemplateParameters→ wo_numberMap this by finding and dragging the Source to the Target. OnActivityEvent Request-->events.definitions.activityEvent-->activityChanges→<property label>QueryParameters→ attachmentPropertyValueMap this by finding and dragging the Source to the Target. Note: If the mapper doesn't let you drag the source element to the target, then create the target node forattachmentPropertyValueand drag the element to the text box at the bottom. Click Save.OnActivityEvent Request-->events.definitions.activityEvent-->activityDetails-->activityIdQueryParameters→ activityIdMap this by finding and dragging the Source to the Target. NA QueryParameters→ propertyLabelSet this to the literal string value of your property label. For example, "my_attachment". You can do this by creating the target node (right-click the node and click on "Create Target Node") for
propertyLabel, entering the text in the expression text box at the bottom, then clicking on the Set Text button followed by Save.Note: The value you enter must match the name of the custom attachment property you created in OFS.NA QueryParameters→ descriptionSet this to the literal string value of a description that appears in the Work Order attachments UI. For example, " MyAttachmentimported from Oracle Field Service."Do this by creating the target node for description, entering the text in the expression text box at the bottom, then clicking on Set Text followed by Save .
NA QueryParameters→ categoryNameSet this to the literal string value the attachment's category name. For example, "MY_ATTACHMENT". Do this by creating the target node forcategoryName, entering the text in the expression text box at the bottom, then clicking on the Set Text button followed by the Save button.Note: The value you enter must match the attachment category name of the attachment category you created in Fusion Service.NA QueryParameters → ConnectivityPropertiesIgnore this element. - On the mapper, click Validate.
- Click Close.
- Save the integration.
- Close the integration.
- Activate the integration.
- Test your new attachment field.