Activate and Configure AI Similarity Service
The AI Similarity Administration page gives you quick access the Similarity Administration UI without going into the IDCS console to retrieve the URL of the host.
- Log in to the Fusion application as a user with the Administer Adaptive Intelligence Applications privilege.
- From the Tools menu, you can access the AI Apps
Administration option, as shown in the following
screenshot:

- Click AI Apps Administration.
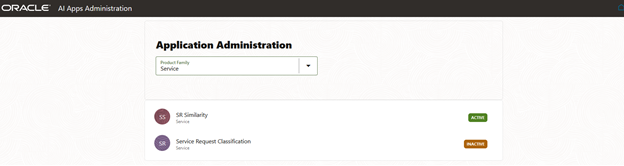
A new browser window opens displaying all of your AI applications.
- Select Service from the Product Family menu, and then
click SR Similarity.
-
If the feature isn't yet activated, the Activate button will be displayed, along with the option to add the connection details at this point or later on (Ingestion Configuration switch). If you choose to only start the activation process, click the Activate button and wait until completed.

-
If you choose to add the connection details at the Activate step, then click on the switch and enter the username, password, and URL needed to connect to the application, and afterwards click Activate.
Username is the one having access to BI Publisher (extraction tool), and the URL is your application host. For example, if the application link is
https://host-fusionappsqa.fa.ocs.oc-test.com/homePage/faces/FuseWelcome, then the URL to enter on the page ishttps://host-fusionappsqa.fa.ocs.oc-test.com.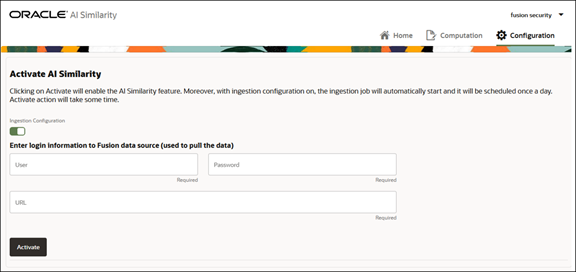
-
After the activation is completed, click Home > Similarity Configuration.

-
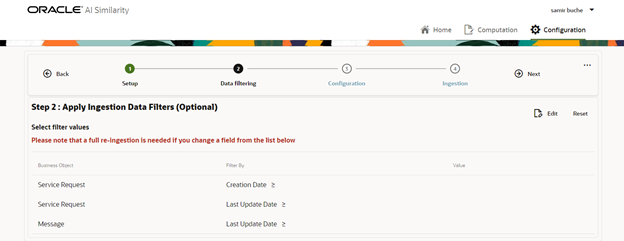
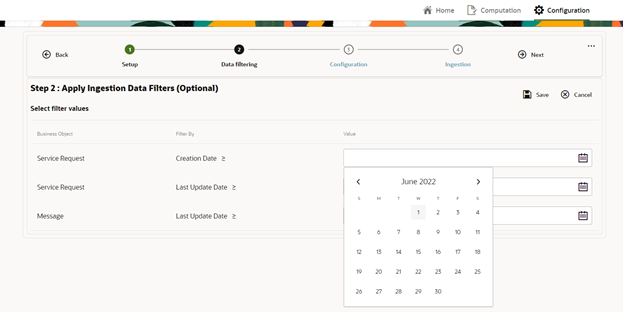
If you already activated the feature, in Step 2 you'll see the three fields added to allow you to filter the ingested data.
-
To add a filter, click Edit and add a date in the field, then when you're done, click Save.Note: Any changes in this page will require full reingestion.
-
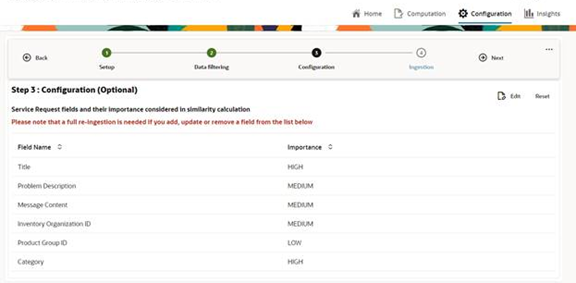
In the Configuration step, by default, the ready-to-use fields considered in the similarity calculation are displayed, along with their importance. Importance implies how much significance a field has in the calculation, and consequently has a bearing on what similar SRs are returned and the ranked order of their display in the results list.
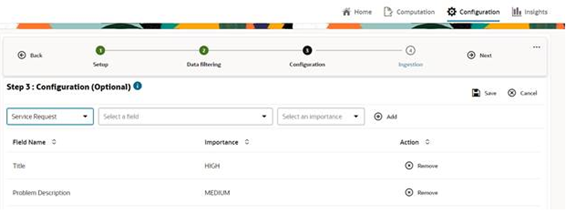
- If you want custom or other standard fields to be ingested and taken into
account by the algorithm, do the following:
- Click Edit.
- From the Add Field drop-down list, select the Service Request or Message object.
- Start typing or select a field from the drop-down list.
You can select the ready-to-use or customer fields.
- Select an importance from the drop-down list.
- Click Add. Note: Adding or removing fields from the configuration impacts the accuracy of the results (similar SRs list). Add additional fields only if those fields contain relevant information that would make the list of similar SRs more accurate. As a recommendation, a few more fields added or replaced should be enough to influence the precision. Do not add multiple fields with the hope of improving the accuracy. On the contrary, it may have an adverse impact on accuracy, since an additional field means it's cannibalizing the importance of other fields.
- Double click the row if you want to change the importance of an already
added field in the table.
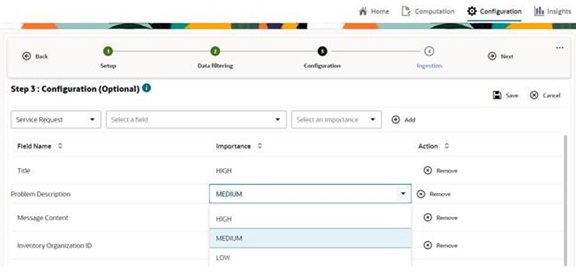
- Save the changes when ready. A full reingestion is needed for the changes to take effect.Note: Changing the importance of a field alone doesn't need to full reingestion. An incremental ingestion is enough.
- If reingestion if required, choose a time interval, then select
Perform full reingestion from the dialog box and
click Schedule.
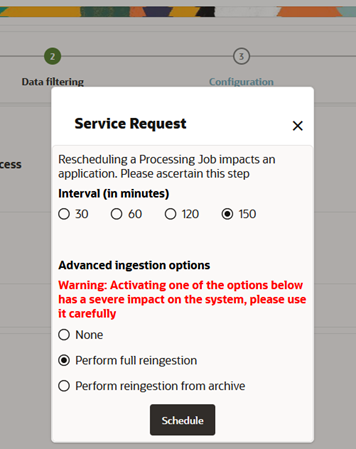
The reingestion job will run according to the schedule you set.
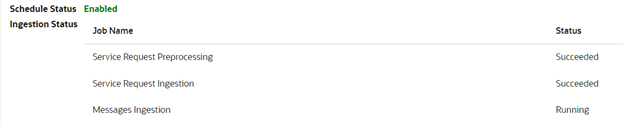
Review Ingestion Job Status
In addition job start and schedule times, you can review a job’s status during the ingestion of SR and Message data. Statuses show whether the job is in pre-processing stage, is running, or has successfully completed.