Create Additional Custom Content Types
Content types define the various types of articles in your knowledge base. When you define content type, it serves as an authoring template for articles that serve a specific purpose.
Out-of-the-box content types may not meet your knowledge base requirements. Therefore, you might want to create additional content types that are customized to your knowledge base requirements.
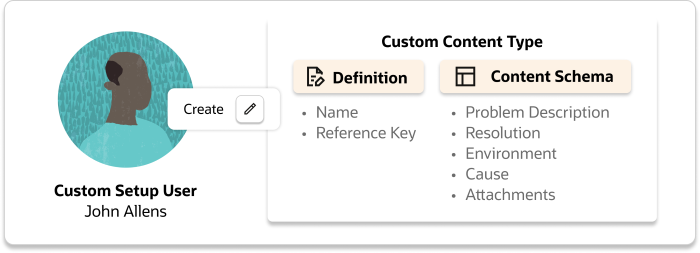
This diagram shows how the custom setup user, John Allens, can go about creating a custom content type.
To create a content type, you need to:
Define the Content Type
Signed in as a setup user, such as John, you can create and define the custom content type by following these steps:
- Select Setup and Maintenance, and from the Setup menu, select the Service offering.
- Select the Knowledge Management functional area and select Manage Knowledge Content Types Redwood.
- Click Create Content Type to begin creating the content type.
- For Name, enter a name of your choice. For example, Troubleshooting.
-
For the Reference Key retain the autogenerated key or enter a unique key of your choice. For example, TROUBLESHOOTING.
Note: Make a note of the reference key. You will need to provide this reference key when you define a Data Security Policy for a role. -
For the Article ID Prefix, provide a prefix. For example, TRBL.
Note: You need to think carefully when choosing a prefix for the content type, as it will be visible to your users in the UI. The application automatically prefixes this prefix ID to the article ID, when an author creates an article of this content type. For example, when an author creates an article of this content type, the article ID will appear like TRBL41. - Select Department for the content type. For example, Service.
- (Optional) Click the Translate icon to enter translated names and descriptions for the available locales.
- Enable the Allow unrestricted JavaScript and HTML option if you want to allow businesses to accept the security risk in favor of being able to create content beyond what is supported directly by the rich text area.
Define the Content Schema
The content schema describes the structure of the articles in the content type. You define the schema by defining the individual elements that make up an article. For example, you might define the elements of a troubleshooting content type to include fields such as Problem Description, Resolution, Environment, and Cause.
Define the schema for the custom content type:
- Under the Content Schema section, click the + icon to add and define the fields for your content type.
- For the Name, enter a title. For example, Troubleshooting Title.
- Enter a description for the title field. For example, "Provide a title for your
troubleshooting article."
This is displayed as ghost text when an author creates an article of this content type.
- For the Reference Key, retain the autogenerated key or provide a unique key of your choice. For example, TROUBLESHOOTING_TITLE.
- Select the field type. For example, Text Field.
- Mark the field as required.
- (Optional) Click the Translate icon to enter translated names and descriptions for the available locales.
- Click the + icon to add and define additional fields. For
example, you can add the following fields for your troubleshooting content type:
Name Description Reference Key Field Type Required Visibility Translate Problem Description Provide the problem description PROBLEM_DESCRIPTION Full Rich Text Area Yes All Required locales Resolution Provide the resolution to the problem RESOLUTION Full Rich Text Area Yes All Required locales Environment Provide environment details ENVIRONMENT Full Rich Text Area No All Required locales Cause Provide the cause for the problem CAUSE Full Rich Text Area No All Required locales Each field has the following parameters:
- Name: Provide the name of the field. This name is displayed as the title of the field when an author creates an article.
- Description: Provide the description. This description is displayed as ghost text for this field when an author creates an article.
- Reference Key: Provide a unique key.
- Field Type: Select the formatting option for the
field. The available options are:
- Full Rich Text Area: Enables authors to format the content.
- Text Area: Enables authors to enter the content as plain text.
- Required: Select this check box to specify that authors must enter content in this field.
- Visibility: Click the visibility icon to restrict this field to specific user groups.
- Translate: Click the Translate icon to enter translated names and descriptions for the available locales.
- You can use Move Up and Move Down buttons to change the order of these fields.
- Enable the Enable File Attachments? option to allow authors to attach files to the article.
-
Click Create.
This creates our custom content type called Troubleshooting.