Insert Conditional Text Into an RTF Form Template
You can specify that certain text is only shown when a particular condition is met. Both simple conditions and multiple conditions are supported in RTF form templates. Conditional text can be achieved by:
Tip: Conditional text in forms is demonstrated in the Healthy Eating, Insurance Picker, myBenefits, Parental Leave Calculator and Safety Inspection example projects installed with Policy Modeling.
Insert conditional text using the Conditional Region dialog
The Conditional Region dialog can be used when the condition is that an attribute equals a value. It can also be used for greater/less than comparisons for number attributes provided you select 'Number' from the drop-down list.
To insert conditional text using the Conditional Region dialog:
- In your template, select the text that you would like displayed under certain conditions.

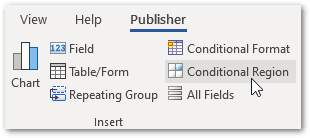
- Click on the Conditional Region button on the Publisher ribbon:
- In the Conditional Region dialog, on the Properties tab in the General box:
- In the Data field drop-down list, select the attribute whose value you want to base the condition on.
- Select the attribute type from the drop-down list. Note: These are Analytics Publisher types so use "Number" for Intelligent Advisor number attributes and "Date/Text" for Booleans and for all other attribute types including currency.

- In the Data field drop-down list, select the attribute whose value you want to base the condition on.
- In the Condition 1 box:
- In the Data field drop-down list, select the condition that applies to the attribute.
- Type in the condition value (formatted).

- In the Data field drop-down list, select the condition that applies to the attribute.
- Click OK. The following Analytics Publisher fields will appear around the conditional text in your template (C stands for Condition, EC stands for End Condition).

- (Optional) To make it evident in the form template what the condition is (without having to open up the Properties dialog), you can change the display text. To do this:
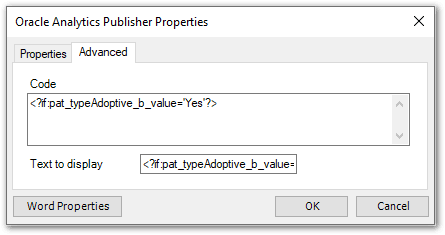
- Double-click on the C (condition) in the template to open the Oracle Analytics Publisher Properties dialog box. (If double-clicking the field does not open the dialog, re-load your XML.)
- Click on the Advanced tab.
- Select the code text and copy it (Ctrl+C), then paste it (Ctrl+V) into the Text to display field.
- Click OK.
- Repeat this process for the E (end condition).
The conditions are now shown around the conditional text in your template.

An example of conditional text inserted into a template is:

The resulting form when the paternity leave application is for an adoptive parent would look like this:

The resulting form when the paternity leave application is for a natural parent would look like this:

Insert conditional text manually
You can manually define your own conditional region by following the format described below.
Simple conditions take the following format:
<?if:condition?>Display text when condition met<?end if?>
Multiple conditions take this format:
<?choose:?><?when:condition?>Display text when condition met<?end when?><?otherwise:?>Alternate display text<?end otherwise?><?end choose?>
Tip: Multiple conditions in forms are demonstrated in the Healthy Eating, myBenefits and Safety Inspection example projects installed with Policy Modeling.
Note that the conditions in these elements use Unformatted Attribute Values and need to follow a particular syntax (see examples Analytics Publisher code for Policy Modeling for more information).
To manually insert simple conditional text:
- Create the start of the condition. To do this:
- Insert a field for the condition attribute value into your template.

- Double-click on the field in the template.
- In the Oracle Analytics Publisher Properties dialog box:
- On the Advanced tab, enter the code for the start of the condition (for example,
<?if:).attribute_name/value='value'?>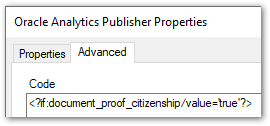
- Select the code text and copy it (Ctrl+C).
- On the Properties tab, paste it (Ctrl+V) into the Text to display field.
- Click OK. The start condition is now shown in your template.

- On the Advanced tab, enter the code for the start of the condition (for example,
- Insert a field for the condition attribute value into your template.
- Add the text that you want displayed conditionally. To do this:
- After the start condition in your template, enter the text that you want to be displayed when the condition is met.

- After the start condition in your template, enter the text that you want to be displayed when the condition is met.
- Create the end of the condition. To do this:
- After the display text, insert another field for the condition attribute value into your template.
- Double-click on the field in the template.
- In the Oracle Analytics Publisher Properties dialog box:
- On the Advanced tab, enter the code for the end of the condition, that is,
<?end if?>.
- Select the code text and copy it (Ctrl+C).
- On the Properties tab, paste it (Ctrl+V) into the Text to display field.
- Click OK. The end condition is now shown in your template.

- On the Advanced tab, enter the code for the end of the condition, that is,
An example of conditional text inserted into a template is:
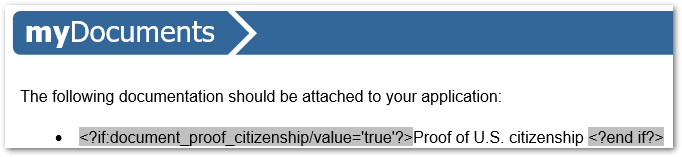
The resulting form when the condition is true would look like this:
Formatting of conditional text
By default, the conditional text will appear on a new line because Analytics Publisher applies the instructions to the block. If you want the conditional text to appear on the same line as the text that precedes it, you need to include @inlines in your if syntax.
For example, <?if:@inlines:improvements/value='true'?>.
For more information, see Use Conditional Formatting in Designing and Publishing Pixel-Perfect Reports in Oracle Analytics Server.