About Exporting and Importing Assets

Export and import assets to copy them from one instance to another. You can also export assets to edit them in bulk. You can then import back the updated assets into the same instance.

For example, you can create a few fully configured assets and export them to a csv (comma-separated value) file. You can now add the rest of the assets to the csv file, specify the attribute values and device associations, and import back the updated set of assets into your application.

You can also use asset export and import to move your assets from a test instance to a production instance. Each export batch can contain selected assets of a single asset type. The importing instance must already contain the asset type for the assets you are importing.

When you perform an export, the exported assets are added to an AssetType.csv file. Here, AssetType is the asset type name for the exported assets. The AssetType.csv file is added to a zip archive (*.zip) that you can save to your hard disk. If you are exporting hierarchical assets, then the child assets are also included in the ChildAssetType.csv file, where ChildAssetType is the asset type name for the associated child assets.

The AssetType.csv file details include the asset names, descriptions, locations, asset statuses, sensor attributes, and custom attributes, together with any asset alerts and function actions. For hierarchical parent assets, the associated child asset references are also included.

Export Assets

Export asset data to a file to bulk-edit assets, or to import them into another instance.

  1. Click Menu (Menu icon), and then click Design Center.
  2. Select Asset Inventory from the Design Center sub-menu.
  3. Under All Assets, filter the list of assets according to your criteria.
    You can only export assets of the same asset type.
    1. Click Filter Filter icon to specify the filter criteria.
    2. Build your filter using the Select Filter and Select Search Criteria fields.
      For example, you can filter based on asset tags and type.
      To specify additional criteria, you can click Add Search Filter to add additional filters.
  4. Click the Asset Inventory Menu Asset Inventory Menu Icon and select Export Assets to launch the Export Assets wizard.
  5. If your list of assets contains assets of more than one type, select an Asset Type to export and click Continue.
    This dialog appears only if your filtered list of assets includes more than one asset type. Only assets with the same asset type can be exported together.
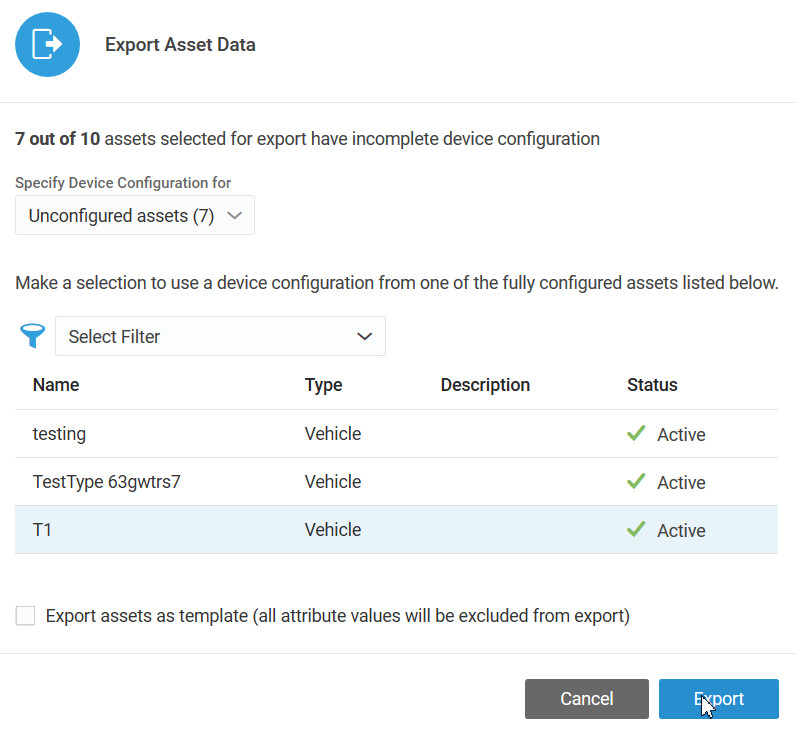
  6. Select an asset with complete device configuration, so that an asset template can be created for the exported assets.
    You must have at least one asset with complete device configuration to successfully export the assets.
    If you have some assets that are not associated with devices, Oracle IoT Asset Monitoring Cloud Service uses the fully-configured asset that you select to create the device model and device attribute template for your unconfigured assets.
    Export Asset Data dialog with one fully-configured asset selected

    Note:

    The Specify Device Configuration for field appears only if you have Draft (unconfigured) assets in the list.
    1. If you choose All Exported Assets under Specify Device Configuration for, then the existing device associations for configured assets are lost.
      Use All Exported Assets for cases where you want to create new device associations for all exported assets. Say, you wish to import your assets into another instance of Oracle IoT Asset Monitoring Cloud Service with fresh device associations.
  7. (Optional) If you select Export Assets as Template, then none of the asset attribute values are included in the export.
    Use this option if you wish to manually create a list of assets and attribute values based on the exported template.
  8. Click Export to export the list of assets.
    The Export button is enabled only after you have selected any one fully configured asset from the list.
  9. Select a disk location for the exported assets file and save the file.

    The exported zip archive (*.zip) contains the AssetType.csv file. The AssetType.csv file contains the asset names, descriptions, locations, asset statuses, sensor attributes, and custom attributes, together with any asset alerts and function actions. For hierarchical parent assets, the associated child asset references are also included.

Optionally Edit the Exported Assets File

You can choose to add or edit asset attribute values in the exported csv (comma-separated value) file before importing the assets back into the same, or another, instance. You can also add additional asset rows in the file and import.

  1. Open the exported *.zip file on your disk.
    This is the assets file that you exported from Oracle IoT Asset Monitoring Cloud Service.
  2. Open the AssetType.csv file in a spreadsheet or text editor.
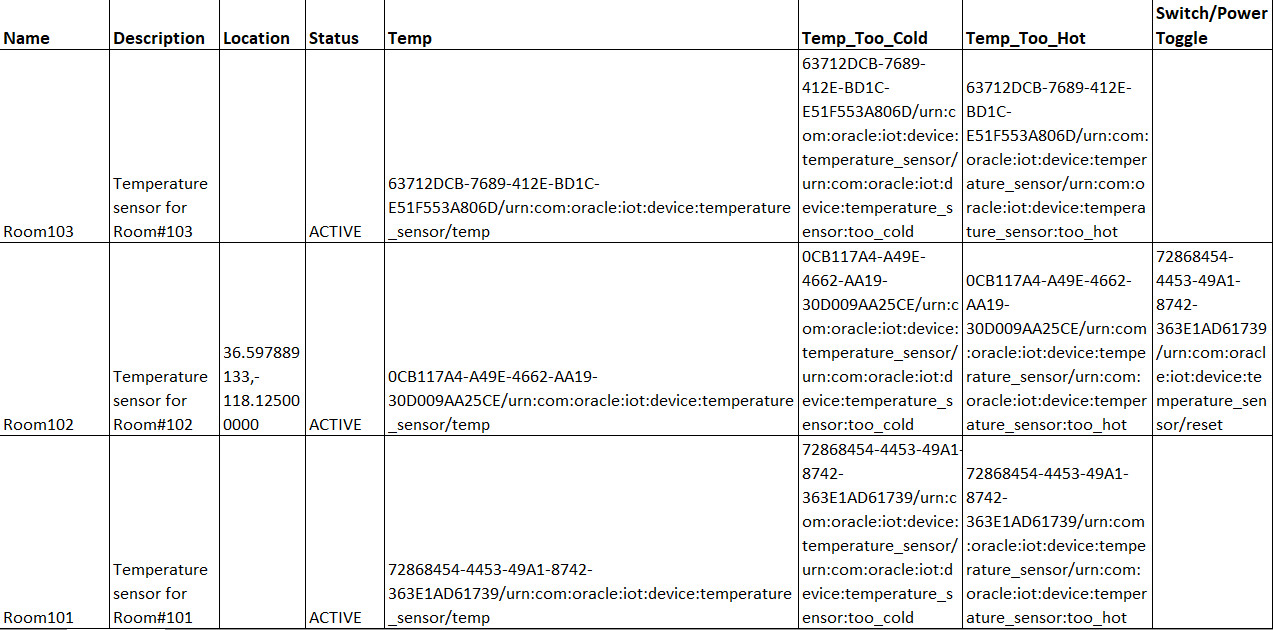
    The AssetType.csv file fields appear in the following order:
    1. Name: The name of the exported asset.
    2. Description:The description of the asset.
    3. Location: The location co-ordinates of the asset.
    4. Status: The current status of the asset (ACTIVE/DRAFT).
    5. SensorAttributeName:

      Various sensor attributes for the asset.

      SensorAttributeName1, SensorAttributeName2,…,SensorAttributeNamen contain the sensor attribute references for the asset.

      For sensor attributes, the field values are in the following format:
      deviceID/deviceModelURN/deviceSensorAttribute

      For example, E4125DEF-9691-486E-B229-18333A6177C4/urn:com:oracle:iot:device:pressure_sensor/pressure.

    6. Custom Attribute Names:

      Various custom attributes for the asset.

      CustomAttributeName1, CustomAttributeName2,…,CustomAttributeNamen contain the values for the values custom attributes.

      For example, the ModelNumber custom attribute may contain the value T400.

    7. AlertName:

      Any alerts defined for the asset type.

      AlertName1,AlertName2,…, AlertNamen contain the alert attribute references for the asset.

      For asset alerts, the field values are in the following format:
      deviceID/deviceModelURN/deviceAlert

      For example, 198D319A-2DED-409C-B5BD-A72EB918BDC7/urn:com:oracle:iot:device:temperature_sensor/urn:com:oracle:iot:device:temperature_sensor:too_cold.

    8. FunctionName/ActionName:

      Actions and action functions.

      FunctionName1/ActionName1,FunctionName2/ActionName1,… contain the action references for the asset.

      For asset actions, the field values are in the following format:
      deviceID/deviceModelURN/deviceAction

      For example, 101743FB-A310-4BEF-B4C4-8D82BA48CE04/urn:com:oracle:iot:device:temperature_sensor/reset.

    The following image shows a sample AssetType.csv extract:


    Sample AssetType.csv file extract

  3. Edit the AssetType.csv file to add or edit rows, as required.

    Note:

    The details on the device IDs and URNs can be found in the Oracle Internet of Things Cloud Service management console. Navigate to Menu > Devices > Management and click Edit against a device to see its device ID and device model URN.

Import Assets

Import the assets data into an Oracle IoT Asset Monitoring Cloud Service instance to add assets, or to update existing assets.

Note:

The importing instance must already contain the asset type for the assets you are importing.

If an asset being imported already exists in your Oracle IoT Asset Monitoring Cloud Service instance, then the asset is updated with the attribute data from the imported file. If an asset being imported does not already exist in your Oracle IoT Asset Monitoring Cloud Service instance, the asset gets added.
  1. Click Menu (Menu icon), and then click Design Center.
  2. Select Asset Inventory from the Design Center sub-menu.
  3. Click the Asset Inventory Menu Asset Inventory Menu Icon and select Import Assets.
  4. Click Choose File in the Import Assets dialog and select the previously exported *.zip assets file.
  5. Click Import.
    You get an information message that the import task has started.
  6. To check the status of the import at any time, click the Activity tab.
    The activity log contains information on the import status and the number of assets that were successfully imported.
    You can also use search filters to filter the activity log.
  7. Examine your assets under the All Assets tab on the Asset Inventory page to look for new or updated assets.
    You can use the search filters to narrow down your search.