Locate Your Assets in the Map View

Use the map view to quickly locate the physical locations of your assets. Your assets can appear independently, or clustered together, depending on your zoom level in the map.
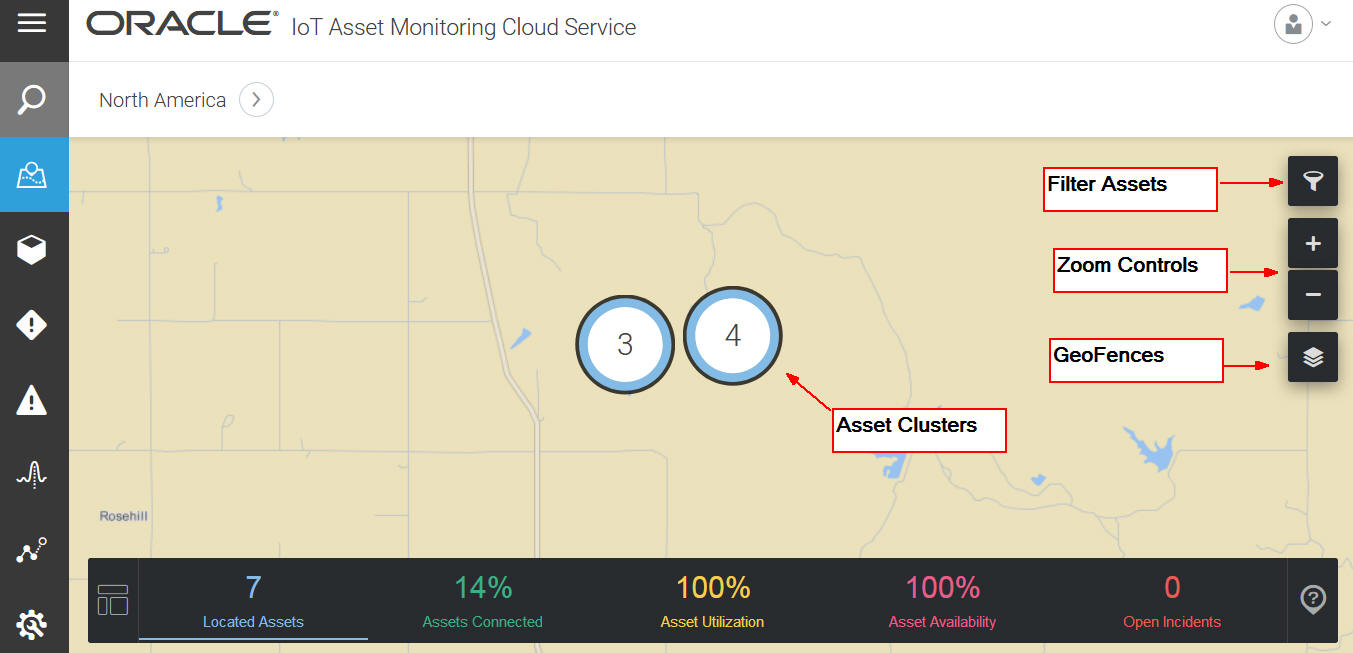
Map view with Filter icon, Geo-Fences icon, zoom controls, and asset cluster.

  1. In the Operations Center, click Map Map icon in the menu bar.

    Note:

    If you are already on an asset page, you can return to the map view by clicking the organization name in the breadcrumb navigation.
  2. Use the zoom buttons (+ and -) to zoom in or out in the map view.
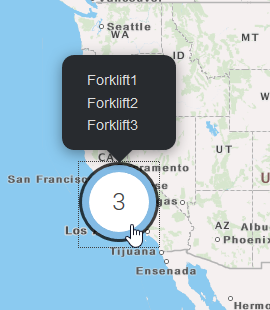
  3. Click an asset cluster to show the list of individual assets.

    Asset Group Heads-Up Display Preview

  4. Click the asset cluster again to separate out the individual assets. Alternatively, zoom in further to separate the clustered assets.

    Note:

    You can also double-click a cluster to separate out the individual assets.

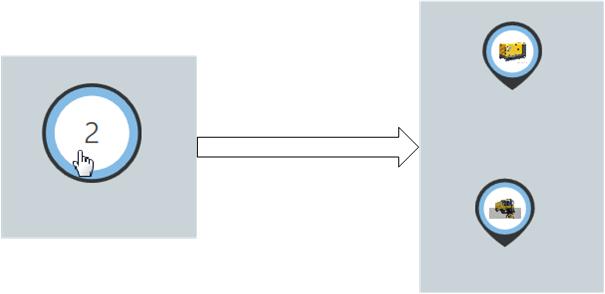
    The following image shows how double-clicking a cluster with two assets separates the assets:


    Cluster to Assets

  5. Click an individual asset to view the asset details.
    If you have configured visualization options, then clicking the asset shows a preview of select attributes in a heads-up display. Click the asset again to open the asset default view.
    See Customize Asset Visualization Options for more information on setting visualization options for an asset type.

    Note:

    You can always double-click an asset to directly open the default view for the asset.
  6. (Optional) Click the Filter (filter icon) icon to search for individual assets based on asset attributes such as name, description, location, and type.
    You can also filter the assets in your view based on custom asset attributes set by your organization. For example, if your assets use attributes such as manufacturer name, model number, and warranty status, you can look for assets using the manufacturer, model, or warranty status value.
  7. Click the GeoFences (Geofences icon) icon to show geofences on the map.

Use Third-Party Map Providers

Oracle IoT Intelligent Applications let you integrate with third-party map providers. You can customize your Map page to use the maps and search facility included by your map provider. When you select a third-party map provider, the built-in maps get replaced with the maps provided by your map provider.

You can also choose to override the map provider for an individual organization from the organization settings.

To use a third-party map provider:

  1. In the Operations Center, click Menu (Menu Icon) and choose Settings .

    Note:

    If you wish to change the map provider for an individual organization only, navigate to Menu > Settings > IoT Organizations > Organization Name.
  2. Click Map Provider.
  3. Select a map provider.
    We currently support HERE Maps, as a third-party map provider.
  4. Select one of the time options in the Refresh Time list. This determines the time interval at which the map data is refreshed in the application.
    If you select Custom, enter the number of seconds in Value.
  5. If you selected HERE Maps, complete these fields:

    Note:

    • From 22.4.1 release onward, Oracle recommends that you configure HERE maps using OAuth mechanism. In other words, instead of using HERE maps login credentials, generate an access token for authenticating to HERE maps. And to generate the access token, you must first generate OAuth credentials (access key ID and access key secret) as described in the HERE Developer portal at https://developer.here.com.

    • The Application ID and Application Code fields are displayed only if you have previously configured HERE maps.

    • Application ID: Enter your HERE Technologies application ID.
    • Application Code: Enter your HERE Technologies application code.
    • Access Key ID: This is the access key credential used for authenticating to HERE maps using OAuth mechanism. Generate and enter the access key from the https://developer.here.com website.
    • Access Key Secret: This is the secret credential used for authenticating to HERE maps using OAuth mechanism. Generate and enter the access key secret from the https://developer.here.com website.
    • Access Token URL: Accept the default value or enter the access token URL. The access token URL defines the API used to generate access tokens for authenticating to HERE maps using OAuth mechanism.
    • Base URL: Accept the default value or enter the base URL. The base URL defines the API used to render the map tiles.
    • Route URL: Accept the default value or enter the route URL. A route URL defines the API used to determine the route to be covered by a trip or shipment in map view.
    • Geocode URL: Accept the default value or enter the geocode URL. The geocode URL defines the API used to convert a human-readable address into geographic coordinates.
    • Reverse Geocode URL: Accept the default value or enter the reverse geocode URL. A reverse geocode URL defines the API used to convert geographic coordinates into a human-readable address.
    • Batch Reverse Geocode URL: Accept the default value or enter the batch reverse geocode URL. A batch reverse geocode URL defines the API used to convert multiple geographic coordinates into human-readable addresses.
    • Aerial URL: To display satellite imagery in the map view, accept the default value or enter the aerial URL An aerial URL defines the API used to display satellite imagery.
    • Traffic URL: To display real-time traffic data in the map view, accept the default value or enter the traffic URL A traffic URL defines the API used to display traffic data.
    • Map Tiles Language: Select the language in which you want the map tiles to be displayed in map view. Note that map tiles for a selected language is displayed only if the corresponding language data is available in HERE maps. If HERE maps doesn't have the corresponding language map tile, then it defaults to displaying the map tiles in English.
  6. Click Validate Credentials. After you receive a success message, click Save and close the window to return to the Settings page.
The Map page now starts using maps from your specified map provider in place of the built-in maps. With HERE Maps, you can choose to display the satellite or terrain view as well. Choose from amongst the following options on the map:
  • Classic

  • Satellite

  • Terrain

  • Traffic

The option to see points of interest is also available in all the HERE Maps layers.

If you wish to revert to using the built-in Oracle maps, you can choose Oracle Maps from the Map Provider page.