Use Predictions to Identify Asset Risks

Predictions use historical and transactional data to predict future asset parameters, and to identify potential risks to your assets.

You can either use internal Oracle Internet of Things Intelligent Applications Cloud data or import and use external device data to help make predictions for your asset.

Note:

Before predictions can work, the data source must have at least 72 hours of historical data in it. This requirement may be larger if you have selected a forecast window greater than 72 hours. For example, if you choose to forecast for 7 days ahead, the system must have at least 7 days of historical data before predictive analytics can start training the system.

You may have to wait until the system completes the training for the predictions to start showing.

Predictions help warn you of impending asset failure in advance. Preventive maintenance can help save the costs associated with asset breakdown or unavailability.

By default, Oracle IoT Asset Monitoring Cloud Service uses the most appropriate built-in training model to train the prediction. However, if your data scientists have externally trained models for your specific environment, you can use these to replace the training in Oracle IoT Asset Monitoring Cloud Service. Oracle IoT Asset Monitoring Cloud Service then performs the prediction scoring using your pre-trained model. You can use training models supported by PMML4S (PMML Scoring Library for Scala), such as the neural network. When creating a new prediction, upload your PMML file to replace the built-in models used by Oracle IoT Asset Monitoring Cloud Service.

All detected predictions appear on the Predictions Predictions icon page accessible from the Operations Center or Asset Details page of individual assets. The predictions displayed in the Operations Center depend on your current context (organization, group, and subgroup).

The following image shows some predictions for the organization in the Operations Center view. Predictions for different assets are shown in the same page. You can change your context using the breadcrumbs in the Operations Center.
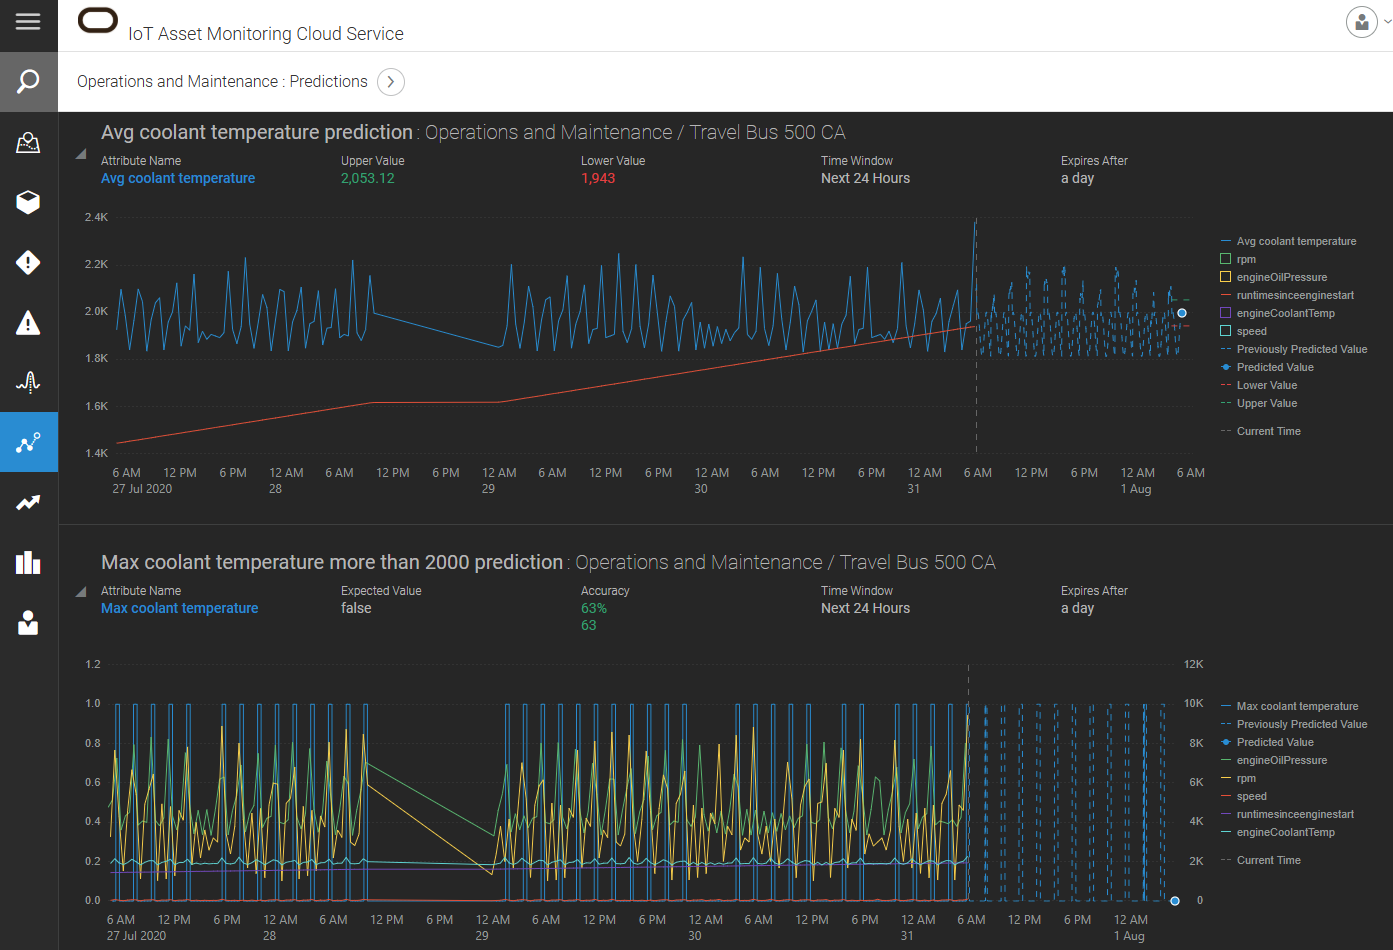

Predictions Page, described in text.

Use the breadcrumbs to change your context in the organization. You can filter your view for a group, subgroup, or individual asset.

Note:

If you are using simulated sensor data to test your predictions, refer to the following sections for more information on the data characteristics of simulated data:

Create a Prediction

Create a prediction to identify risks to your assets.
  1. Click Menu (Menu icon), and then click Design Center.
  2. Select Asset Types from the Design Center sub-menu.
  3. Select an asset type from the Asset Types list.
    You can also search for an asset type.
  4. Click Predictions.
  5. Click the Create New (Create New icon) icon.
    The Prediction Editor appears for the selected asset type.
    The prediction settings that you define apply to all assets of the chosen asset type.
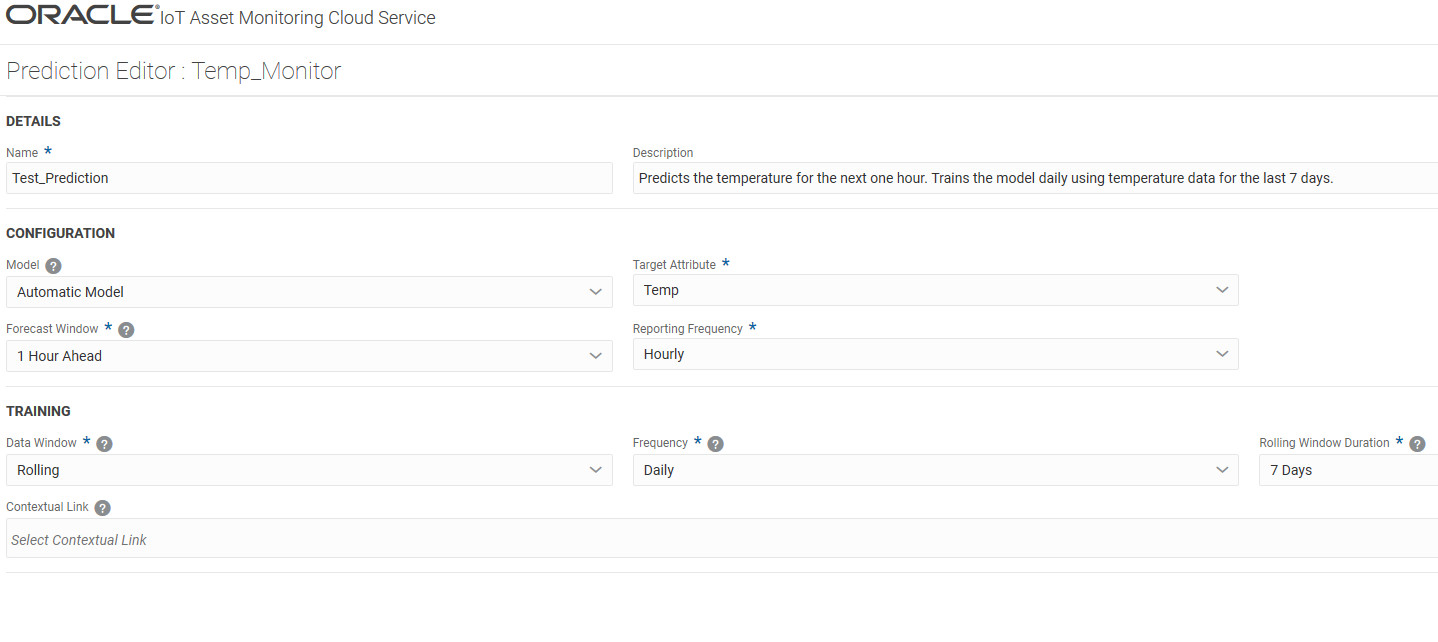
  6. Enter a name for the prediction in the Name field.
  7. Enter an optional description for the prediction in the Description field.
  8. In the Configuration section, leave Automatic Model selected under Model.
  9. Select the Target Attribute for which you are creating the prediction.
    The list includes both sensor attributes and metrics (KPIs).
  10. Under Forecast Window, select one of the options:
    • 1 Hour Ahead: Select this option to create a prediction for the next one hour.
    • 24 Hours Ahead: Select this option to create a prediction for the next 24 hours.
    • 7 Days Ahead: Select this option to create a prediction for the next 7 days.
    • 30 Days Ahead: Select this option to create a prediction for the next 30 days.

    Note:

    The options that appear depends upon the data life span settings for your device data and metric data. These settings can be managed under Menu > Settings > Storage Management.
    If you choose a forecast window of greater than 72 hours, the system will need to collect data equal to the forecast window size before it can start training the prediction. For example, if you choose to forecast 7 days ahead, then the system must have historical data for at least 7 days before the prediction can be trained.
  11. Select a Reporting Frequency for the prediction.
    For example, if you choose a Forecast Window of 24 Hours Ahead and a Reporting Frequency equal to Hourly, then the prediction for 24 hours ahead is made every hour.
  12. Under Training, select the Data Window.

    The Data Window identifies the historical data that is used to train the system for making predictions.

    • All Available Data: Uses the entire available historical data to train the prediction model.
    • Rolling: A rolling data window uses data from a rolling time window to pick the most recent data for training. For example, you can choose to train your prediction model with a rolling data window of the last 7 days, and choose to perform the prediction training daily.


      Prediction Editor as described in surrounding text.

      When you use a rolling window, the training model is re-created periodically, as determined by the frequency that you choose.

      • Frequency: You can optionally change the frequency of the prediction model training. For example, if you choose Daily, then the training happens every day at 00:00 hours (midnight), UTC time by default.
      • Rolling Window Duration: The duration of the rolling window going back from the model training time. For example, if you select 7 Days, then the last 7 days of target attribute data is used to train the prediction model.
    • Static: Uses a static data window to train your prediction model. Select the Window Start Time and Window End Time for your static window period.

      The static window duration must be at least three times the Forecast Window, and a minimum of 72 hours.

      The static data window provides data for a one-time training of your prediction model. If your prediction accuracy changes in the future, you should edit the prediction to choose a different static window.

  13. (Optional) Select one or more contextual links from the Contextual Link list.
    A contextual link is used to provide additional data to the prediction for training the system. If you have existing contextual data connections that you would like to use as additional data sources for the prediction, you can optionally add them to the prediction.
  14. Click Save to complete configuring the prediction.
    The system now schedules training for the new prediction model.
    Note: Predictive analytics may need to collect at least 72 hours of data or data equal to the forecast window size, whichever is higher, before it can start to train the system. Your predictions start showing after the initial training is complete.
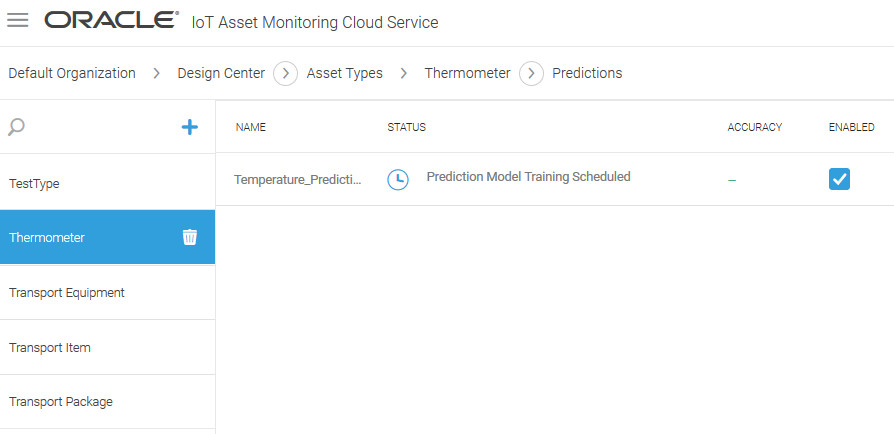
The prediction is added to the Predictions page. The Training Status column shows the latest training status for the prediction model. Once training is complete, the application starts making predictions.
Predictions page showing scheduled prediction model training

The application reports completed model trainings along with their timestamps. If training fails, the application includes pertinent information related to the failure. For example, the chosen training data set's statistical properties might not be suitable for predictions. The Feedback Center is also used to notify the Asset Manager about failures.

The application also reports skipped trainings along with an explanation for the same. For example, the system may be waiting to accumulate the minimum amount of data that is required for successful training.

You can enable or disable a prediction from within the Prediction Editor. If a prediction has been disabled by the system, a relevant message appears inside the Editor. The message also appears on the Predictions page in Operations Center.

Create a Prediction Using an Externally Trained Model

If you have a PMML file containing your externally trained model, you can use the PMML file to score your prediction in Oracle IoT Asset Monitoring Cloud Service.
By default, Oracle IoT Asset Monitoring Cloud Service uses the most appropriate built-in training model to train the prediction. However, if your data scientists have externally trained models for your specific environment, you can use these to replace the training in Oracle IoT Asset Monitoring Cloud Service. Oracle IoT Asset Monitoring Cloud Service then performs the prediction scoring using your pre-trained model.
  1. Click Menu (Menu icon), and then click Design Center.
  2. Select Asset Types from the Design Center sub-menu.
  3. Select an asset type from the Asset Types list.
    You can also search for an asset type.
  4. Click Predictions.
  5. Click the Create New (Create New icon) icon.
    The Prediction Editor appears for the selected asset type.
    The prediction settings that you define apply to all assets of the chosen asset type.
  6. Enter a name for the prediction in the Name field.
  7. Enter an optional description for the prediction in the Description field.
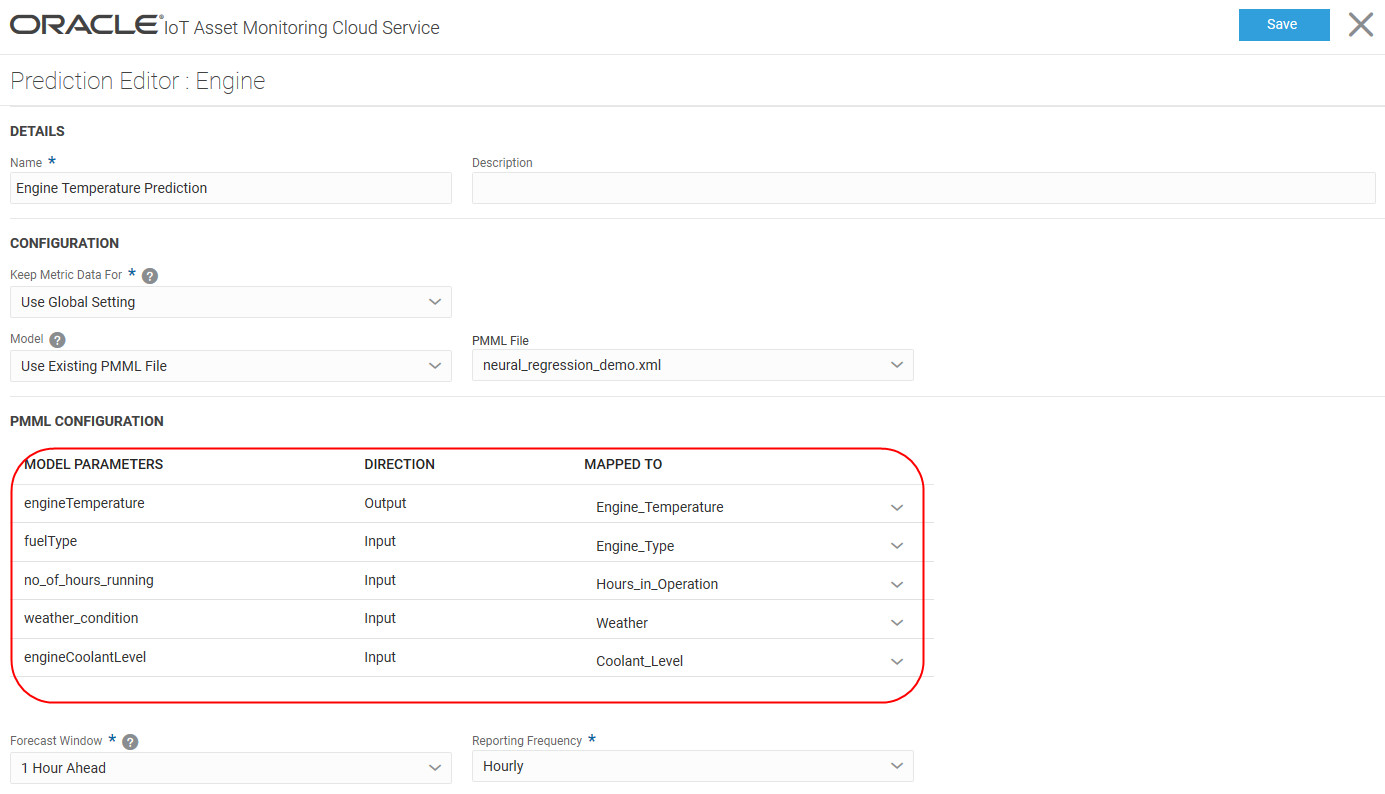
  8. Under Prediction Model, select Upload PMML File to upload a PMML xml file that contains your exported trained model. Alternatively, select Use Existing PMML File to use a previously uploaded PMML file.
    For example, you may have completed external training using libraries like PySpark pipeline or R pipeline, and exported the trained model to a PMML file.
    You can only use training models supported by PMML4S (PMML Scoring Library for Scala), such as the neural network. For a list of supported model types in PMML4s, see https://www.pmml4s.org/#model-types-support.
  9. Map the PMML model parameters to your asset type sensor attributes and metrics (KPIs).
    The default mapping is performed for you. Verify and change any mappings to match the attributes in your PMML file.
    Map PMML Attributes to Sensor Attributes and Metrics

  10. Under Forecast Window, select one of the options:
    • 1 Hour Ahead: Select this option to create a prediction for the next one hour.
    • 24 Hours Ahead: Select this option to create a prediction for the next 24 hours.
    • 7 Days Ahead: Select this option to create a prediction for the next 7 days.
    • 30 Days Ahead: Select this option to create a prediction for the next 30 days.
  11. Select a Reporting Frequency for the prediction.
    For example, if you choose a Forecast Window of 24 Hours Ahead and a Reporting Frequency equal to Hourly, then the prediction for 24 hours ahead is made every hour.
  12. Click Save to complete configuring the prediction.

Edit a Prediction

Edit a prediction to change the prediction settings. You can also tweak your prediction model to add or remove features, and re-train the prediction model for your environment.

  1. Click Menu (Menu icon), and then click Design Center.
  2. Select Asset Types from the Design Center sub-menu.
  3. Select an asset type from the Asset Types list.
    You can also search for an asset type.
  4. Click Predictions.
  5. Select a prediction from the list.
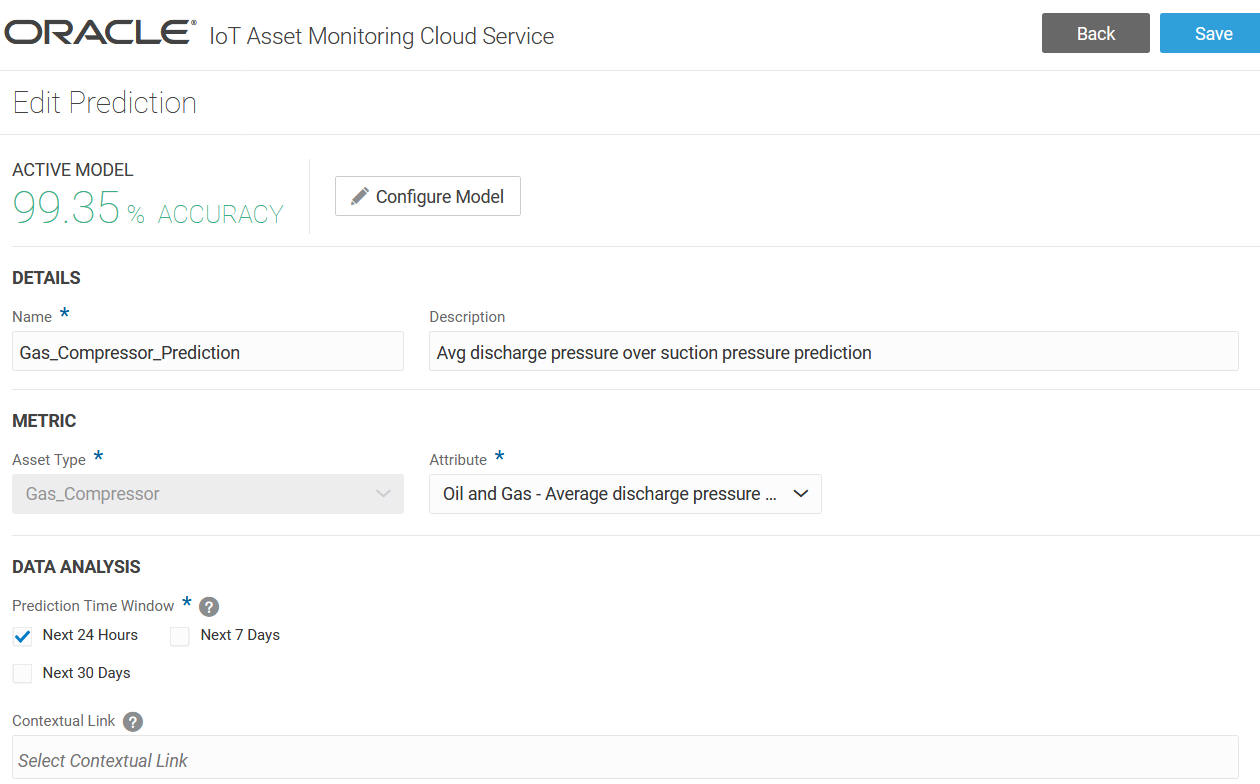
    If the initial training for the prediction has completed, you should see an accuracy percentage for the prediction. The accuracy percentage reflects the scoring accuracy history of your prediction model measured against actual data.
    Prediction entry with accuracy of 99.35%

  6. Click the Edit (Edit icon) icon.
  7. (Optional) Under Prediction Model, click Configure Model if you wish to re-configure the current prediction model for your prediction.

    Note:

    The Configure Model option to re-configure the current prediction model is available only for metric-based predictions, and not direct sensor-based predictions.

    Configure Model button on Edit Prediction page.

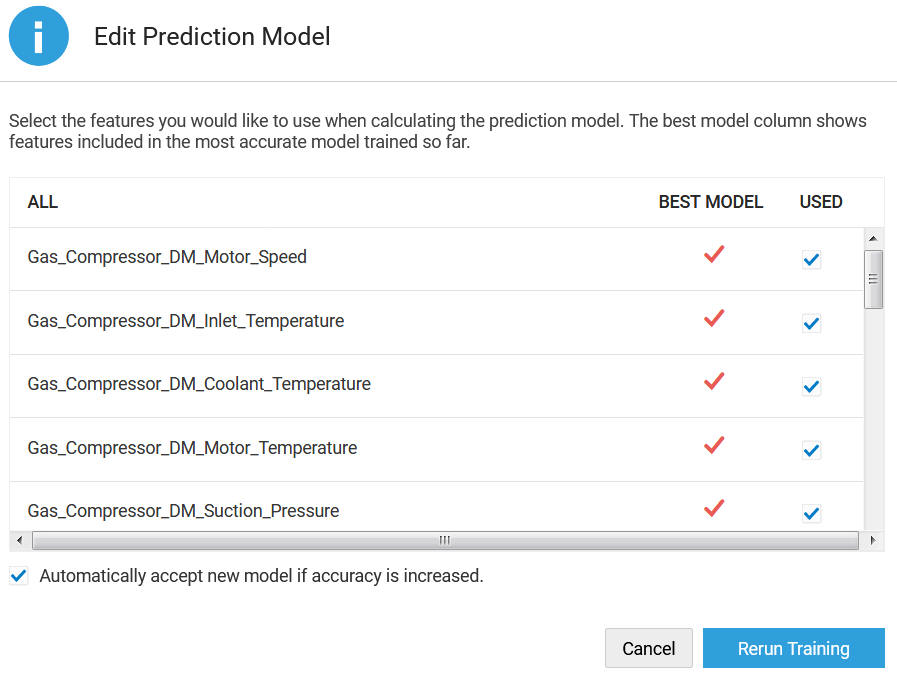
    This setting is available if the training for your prediction has completed, and a scoring accuracy is available. You can add or remove features or attributes currently associated with your prediction to select a feature-set that you believe is most relevant for your environment and will result in better scoring accuracy. Your changed feature-set is then used to re-train the prediction model. You may also wish to re-train the prediction model if golden data has arrived post the initial training of the prediction.
    1. Select or deselect features, or attributes, as required under the Used column.

      Edit Prediction Model dialog with feature list.

      If an attribute shows selected under the Best Model column, it means that the attribute is part of the best prediction model to date.
    2. Select Automatically accept new model if accuracy is increased to automatically switch the active model to your new model if the scoring accuracy is better.
      If you do not select this option, then after the training is complete, you can see both the currently active model and new model scores. You can then choose to switch to the new prediction model if you wish.
    3. Click Rerun Training to re-train the prediction with the chosen features and cumulative data.
      Clicking Cancel discards your changes.
  8. Edit other prediction settings, as required.
  9. Click Save.

Delete a Prediction

Delete a prediction when it is no longer required.

  1. Click Menu (Menu icon), and then click Design Center.
  2. Select Asset Types from the Design Center sub-menu.
  3. Select an asset type from the Asset Types list.
    You can also search for an asset type.
  4. Click Predictions.
  5. Select a prediction from the list.
  6. Click the Delete (Delete icon) icon.
  7. Click Yes.