Use the Mobile App as a Third Party Carrier's Driver

To enable tracking of third party carriers' trips or shipments, the third party carrier's driver installs the IoT Fleet Monitoring mobile app and then configures the mobile device. This configuration allows the mobile device to send trip's or shipment's location information to the Oracle IoT Fleet Monitoring server application.

In the following topics, you'll learn how to install the app, configure your mobile device settings to send the location info consistently, and start shipments. The settings may slightly vary with the model and make of your mobile device.

To know the workflow of a third party carrier trip or shipment see About Third-Party Carrier Trips.

Install and Launch the Mobile App

As a third party carrier's driver, install the Oracle IoT Fleet Monitoring mobile app and launch it on your mobile device.

Complete these steps on your mobile device if you are a third party carrier's driver. If you are a private fleet driver, see Use the Mobile App as a Private Fleet Driver.
  1. Install the Oracle IoT Fleet Monitoring mobile app:
    1. On your mobile device, open the Apple App Store or Google Play apps for an iOS or Android device respectively.
    2. Search for Oracle IoT Fleet Monitoring.
    3. Install the Oracle IoT Fleet Monitoring application on your mobile device.
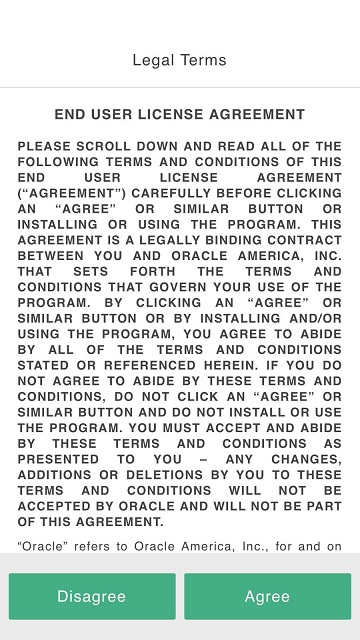
  2. Open the Oracle IoT Fleet Monitoring mobile app and then read and agree to the legal terms. You'll see the End User License Agreement screen at the first launch of the app.
  3. To set the location permission and storage permission for your app, see one of the following:
To start a shipment in Oracle IoT Fleet Monitoring mobile app, see Start and Complete Trips or Shipments

Configure an Android Device of a Third-Party Carrier's Driver

As a third-party carrier's driver, you configure your Android device to send location info of the trip or shipment consistently and seamlessly to the Oracle IoT Fleet Monitoring server application.

As a third-party carrier's driver, you should have installed the Oracle IoT Fleet Monitoring mobile app on your Android device. See Use the Mobile App as a Private Fleet Driver. The following steps to configure your Android device are applicable for Google Pixel 5 and may vary slightly based on the make and model of your Android device.
  1. Complete these steps to set location and storage permissions on your device:
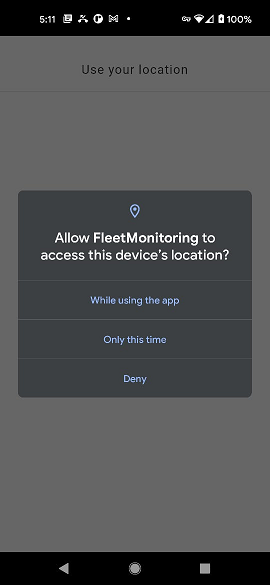
    1. Location permission enables the Fleet Monitoring app on your device to send location info to the server when the app is in use and also when the app is running in the background. At the first launch, if the app doesn’t request for the location permissions, then go to the device's Settings option, search for FleetMonitoring, and tap Permissions, and then Location. Select While using the app.

      Provide Location Permissions When In-Use

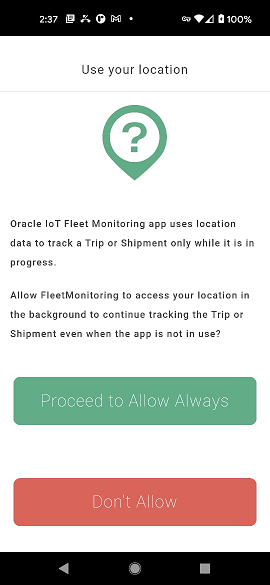
    2. Review the disclosure to understand why the location information is required and how it is used. Select Proceed to Allow Always .

      Review the In-App Disclosure

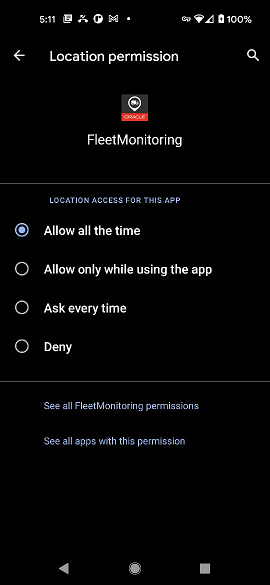
    3. On the following Location Permission screen, select Allow all the time.

      Location Permission

      Ensure that you don't set the location permission to Deny or Ask every time. If you select Allow only while using the app, no location info will be sent when the app is running in the background. In addition, you will not be able to start a trip or a shipment.
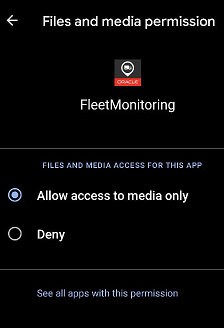
    4. Provide storage permissions to the Fleet Monitoring app to store provisioning info in the app's storage. At the first launch of the app, if it doesn't request for storage permission, then go to the device's Settings option, search for FleetMonitoring, and tap Permissions, and then Files and Media. Select Allow access to media only.

      Provide Storage Permissions

  2. Complete these steps to configure various settings, such as location mode, wifi, and battery usage:

    Note:

    You will not be able to start a trip or shipment if you do not configure these settings.
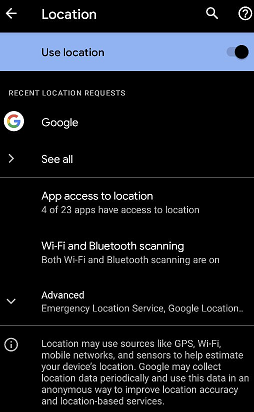
    1. Enable the location mode so that the Fleet Monitoring app can send location info from the device to the Oracle IoT Server application. If the location mode isn't enabled by default, then go to the device's Settings option. Under Location set Use Location to On.

      Set Location Mode

    2. Enable access to network either by Wi-Fi or mobile data on your device for the Fleet Monitoring app. If it isn't enabled by default then go to the device's Settings option, tap Network and Internet, and tap Wi-Fi, and then enable Use Wi-Fi.

      Enable Wi-Fi

      To enable mobile data, in the device's Settings option, tap Network and Internet, and tap Mobile network, and then enable Mobile data.

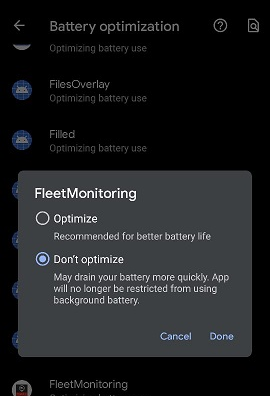
    3. Disable the battery optimization option in your device to ensure that the Fleet Monitoring app can continuously send the location info to the server application. The battery optimization feature of your device's operating system may put the Fleet Monitoring app to sleep, which may prevent it to send the location info. To switch off this feature, go to the device's Settings option, search for Battery Optimization, switch to All Apps and locate FleetMonitoring. Tap the Fleet Monitoring app, select Don't Optimize, and then select Done.

      Disable Battery Optimization

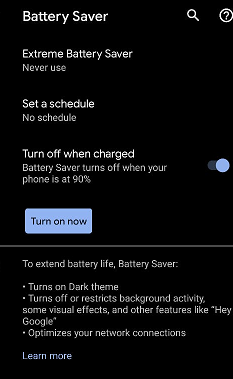
    4. Disable the battery saver mode so that the Fleet Monitoring app doesn’t stop sending location info to the server application. Go to the device's Settings option, search for Battery Saver, and disable this feature.

      Disable Battery Saver

      If the battery saver mode is enabled, whenever the device has low battery power, it can disable location mode, which prevents the Fleet Monitoring app to send location info. This may also happen if the device is locked or if the Fleet Monitoring app is running in the background.

    Note:

    You can view and set a few or all of these options from their shortcuts on the notification slider of your device.
As a third-party carrier's driver, you have ensured that the FleetMonitoring app on your Android device can consistently send the location info of your trip or shipment to the application's server.

Configure an iOS Device of a Third-Party Carrier's Driver

As a third-party carrier's driver, you configure your iOS device to send location info of the trip or shipment, consistently and seamlessly to the Oracle IoT Fleet Monitoring server application.

As a third-party carrier's driver, you should have installed the Oracle IoT Fleet Monitoring mobile app on your iOS device. See Use the Mobile App as a Private Fleet Driver. Complete the following steps to configure your mobile device.
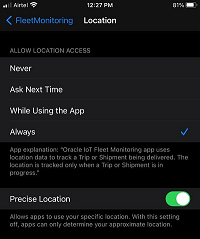
  1. Complete this step to set location permissions on your device. Location permission enables the Fleet Monitoring app on your device to send location info to the server even when the app is running in the background. At the first launch, if the app doesn’t request for the location permissions, then in the device's Settings option, search for FleetMonitoring, and tap Location. Select Always .

    Provide Location Permissions

    Ensure that you don't set the location permission to Never or AskNext Time. If you select While Using the App, no location info will be sent when the app is running in the background.
  2. Complete these steps to configure settings, such as location mode and wifi:
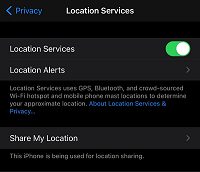
    1. Enable the location mode so that the Fleet Monitoring app can send location info from the device to the Oracle IoT Server application. If the location mode isn't enabled by default, then go to the device's Settings option. Under Privacy set Location Services to On.

      Set Location Mode

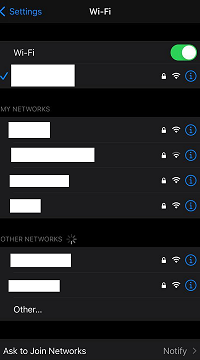
    2. Enable access to network either by Wifi or mobile data on your device. If it isn't enabled by default then go to the device's Settings option, and for Wifi, tap to enable it.

      Enable Wifi

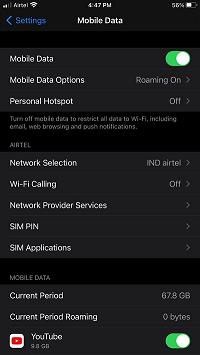
      To enable mobile data, in the device's Settings option, forMobile data tap to enable it.

      Enable Mobile Data

    Note:

    You can view and set a few or all of these options from their shortcuts on the notification slider of your device.
As a third-party carrier's driver, you have ensured that the Fleet Monitoring app on your iOS device can consistently send the location info of your trip or shipment to the application's server.

Start and Complete Trips or Shipments

As a third party carrier's driver, you can start a trip or a shipment and complete it from your mobile device.

Note:

The Shipment business object will be deprecated in a future release. Hence it is recommended to use Trips for real-time monitoring of in-transit movements.

You've downloaded and installed the Oracle IoT Fleet Monitoring mobile app on your mobile device from the Apple Store or the Play Store. See Install and Launch the Mobile App.

As a third party carrier's driver, if you've been assigned a shipment or trip, then you've received an email containing a link to the trip URL or the shipment URL. Additionally, the email also provides you the answers to the security questions, which help you log-in to the Fleet Monitoring mobile app.
  1. To open the Oracle IoT Fleet Monitoring mobile app, select the trip or shipment URL available in the email.
  2. If the app launches for the first time on your device, the screen displays the end user license agreement. select Agree.
    End User License Agreement Screen

    The image displays the End User License Agreement (EULA) screen.

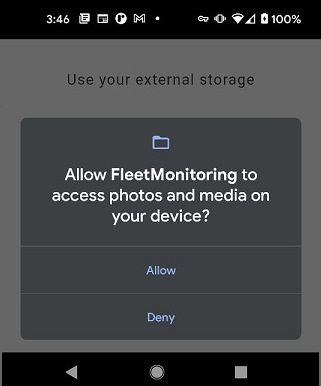
  3. For an Android device, the Storage Permission screen appears. Select Allow. For an iOS device skip to the next step.
    Storage Permission Screen

    The image displays the permission screen to allow the Fleet Monitoring mobile app to access photos and media on your device.

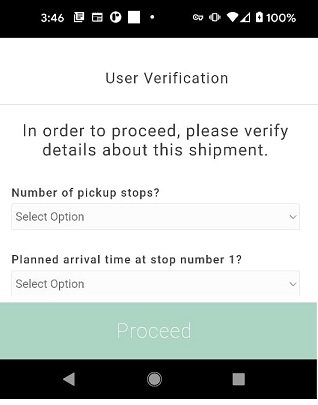
  4. On the User Verification screen, select or enter the answers to the questions, which you've received in an email. Select Proceed.
    User Verification Screen

    The image displays the user verification screen with two questions about the current shipment, which the driver needs to select from the drop-downs accurately in order to proceed further.

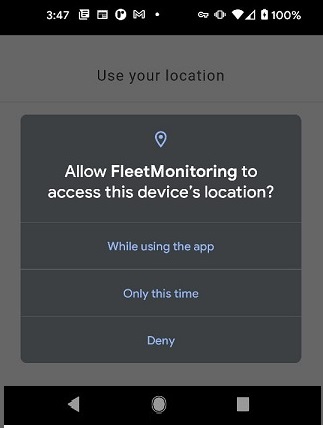
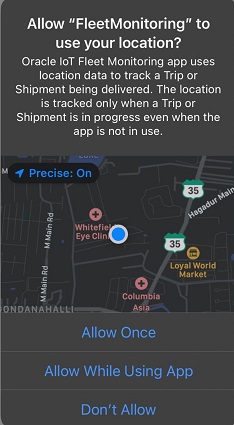
  5. Set the location permission by selecting While using this app for an Android device and Allow While Using App for an iOS device.
    location permission screen in an Android device

    The images display the permission screens for Android and iOS devices respectively, to allow the Fleet Monitoring mobile app to access your device's location either while using the app or only this time.

    location permission screen in an iOS device
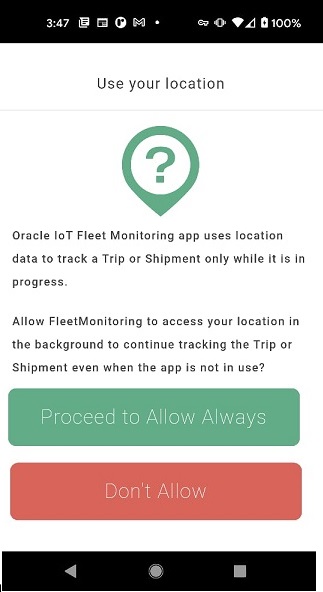
  6. On the App Location Disclosure screen, review the disclosure content, and tap Proceed to Allow Always.
    location disclosure screen

    The image displays the permission screen to allow the Fleet Monitoring mobile app to access your device's location always even when the app is not in use.

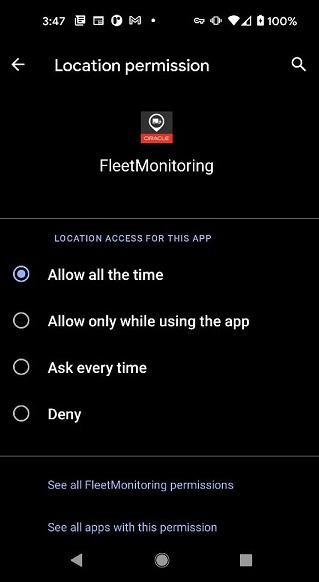
  7. On the Location Permission screen, select Allow all the time. Note that if you do not select this option, then you will not be able to start the trip or shipment. You will be prompted to allow permission for background location access.
    location permission screen

    The image displays the permission screen to allow the Fleet Monitoring mobile app to access your device's location all the time.

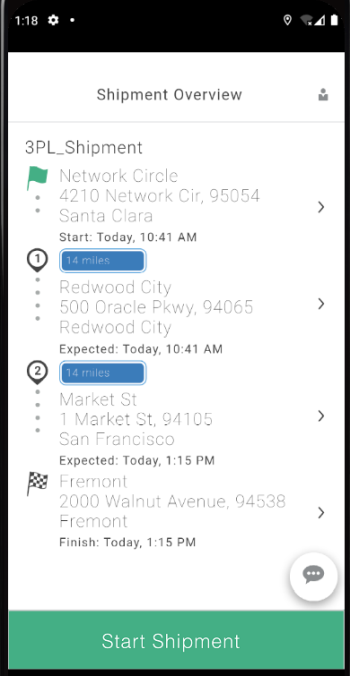
  8. On the Trip Overview or Shipment Overview screen, view the stops of the trip or shipment and their details. Then select Start Trip or Start Shipment.
    shipment overview screen

    The image displays the shipment overview screen that displays three stops with their names, expected time to start and finish.

    Note:

    In case of a Trip, if the trip has been started from the Fleet Monitoring web UI, then on the Trip Overview screen, the Assign Trip button is displayed instead of Start Trip. After you tap Assign Trip, the button changes to Complete . The rest of the process remains the same, as described in this procedure.
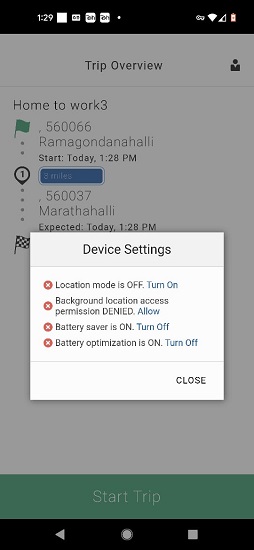
  9. If you are using an Android device and one or more phone or app settings such as location mode, background location access, battery saver, or battery optimization are not appropriately set, then you will be not be able to start the trip or shipment. You will receive the following dialog and will be prompted to fix the settings in order to start your trip or shipment:

    Device settings dialog

    Ensure that your location setting is ON, Battery Saver and Battery Optimization settings are OFF, and the permission for background location access is set to Allow all the time. See Steps 1.c and 2 of Configure an Android Device of a Third-Party Carrier's Driver for details on configuring the required settings.

    Note that clicking the links Turn On, Turn Off, and Allow in the Device Settings dialog will take you to the appropriate settings respectively. After fixing the settings, you can use the back arrow button to return to the FleetMonitoring app to start your Trip or Shipment. Until all the settings are fixed, the Device Settings dialog will be displayed each time you try to start a trip or a shipment.

  10. (Optional) To manually enter and confirm the exact arrival and departure times for a Shipment Stop:
    1. Tap the More iconicon for the required shipment stop to see the stop details.
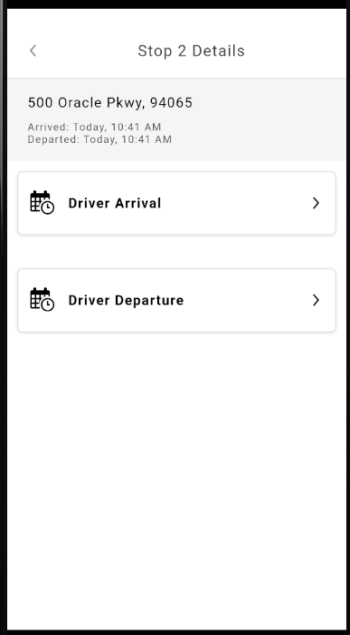
    2. On the Stop Details screen, tap the Driver Arrival or Driver Departure buttons.

      Driver arrival and driver departure date-time editor

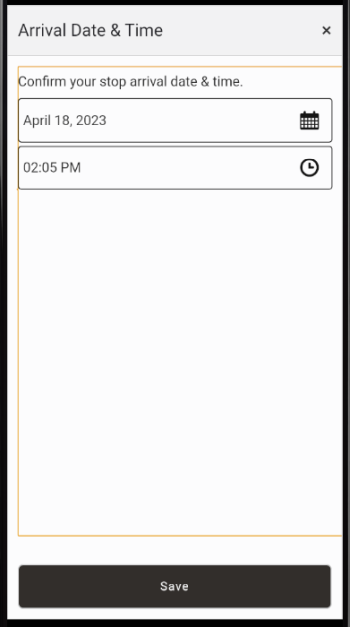
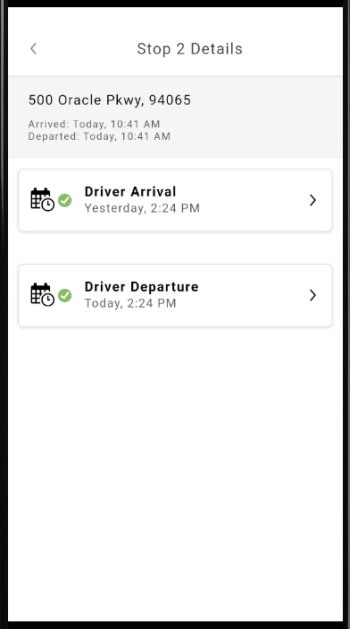
    3. On the Arrival Date & Time or Departure Date & Time screens, the current date time is shown by default. Tap Save to confirm the default date and time or specify the exact arrival or departure date and time, if required, and then tap Save. The Stop Details screen is displayed with the driver specified date and time along with a green check mark.

      Driver arrival date-time picker


      Driver specified time with green tick mark.

    4. Tap the back arrow button to return to the Shipment Overview screen.
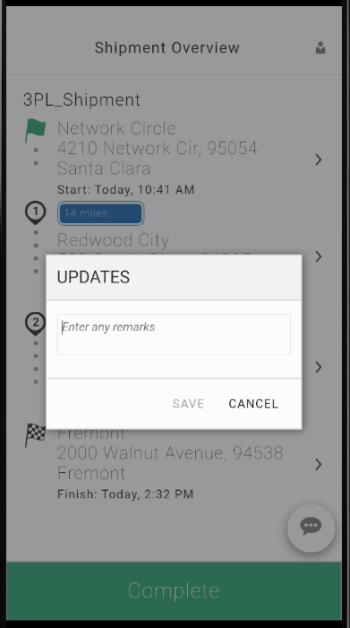
  11. To enter a comment when you are en-route, select the Remark button and enter your comments.
    You can enter comments such as "Reached Stop <stop name> on time".
    shipment overview screen with an update area to enter comments

    The image displays the shipment overview screen that displays an UPDATES dialog box, where you can enter comments about a given stop or shipment. It has Save and Cancel buttons.

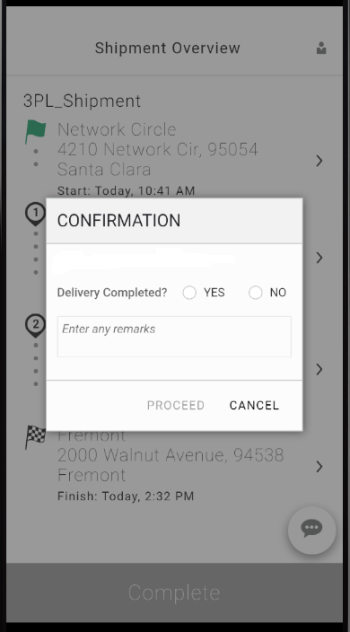
  12. After reaching the last stop, you can tap Complete to indicate the trip is complete. If required, you can force complete a trip that is en-route anytime by tapping Complete.
  13. On the Confirmation screen, if the delivery is complete, select YES. Otherwise, select No. If the trip or shipment was force completed en-route, then in addition to the YES or NO options for delivery completed, an alert stating "Destination not reached" is displayed on the Confirmation screen.

    Enter remarks, if any, in the text area and then tap Proceed.

    confirmation screen

    The image displays a confirmation dialog with the YES and NO options and a remarks box. It also has the PROCEED and CANCEL buttons

    Without reaching the last stop, you can tap Complete and on the confirmation screen select NO and enter appropriate remarks, and then tap Proceed.
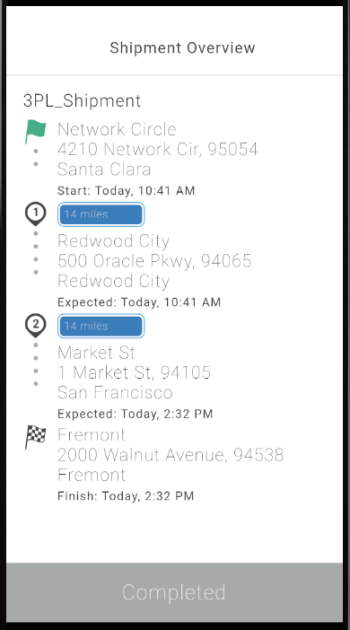
On the Shipment Overview screen, the shipment appears as completed.

Shipment Completed screen

The screen displays the shipment overview screen with the status as completed. The overview screen displays the stop details such a its address, start time, expected time, or finish time.