8 Create and Manage Rules

Create rules to warn workers of work hazards and monitor their location.

Use System Rules to Detect and Respond to Emergency Alerts

As a project manager or supervisor, you want to know if an employee has fallen, or if there is a potential man-down condition. Oracle IoT Connected Worker Cloud Service system rules automatically detect accident-related device alerts, create incidents, and trigger messages to the superiors and to other workers at the location.

Smart wearable devices, or devices with accelerometer and gyroscope, can detect employee motion and falls, and generate device alerts for potential falls or man-down conditions. Oracle IoT Connected Worker Cloud Service system rules detect and respond to these alerts.

The following pre-existing system rules are available:
  • Man Down Rule: The worker's sensor device raises an alert (urn:com:oracle:iot:cw:motion:man_down_detected) if it detects no motion for a worker for a configurable time period. In response to the alert, the system rule creates an accident-type incident and triggers high priority messages to the supervisor and project manager.
  • Employee Fallen Over Rule: The worker's sensor device raises an alert (urn:com:oracle:iot:cw:motion:fall_detected) if it detects that the worker has fallen from a height. In response to the alert, the system rule creates an accident-type incident and triggers high priority messages to the supervisor and project manager.

Configure Accident Detection Settings and Emergency Numbers

Oracle IoT Connected Worker Cloud Service uses predefined rules to respond to accidents, such as a worker falling or remaining motionless.

Use the Configurable Parameters page to configure accident detection settings, such as auto fall detection or man-down conditions where workers report no motion for a minimum specified period.

You can also configure emergency contact numbers for these conditions. If an accident condition is detected, the corresponding emergency phone number is auto-dialed from the worker's mobile device, and the device is put on speaker phone.

  1. Click Menu Menu iconand then click Design Center.
  2. Click the Configurable Parameters Configurable Parameters tab icon tab.
  3. Select whether the settings apply globally, or to an individual project:
    Global: Applies the settings to all projects.
    Project: Applies the settings to the chosen project. All projects inherit the global settings by default. However, you can change the settings inherited by an individual project.
  4. If you selected Project in the previous step, then choose the name of your project.
  5. Specify the emergency phone numbers to be auto-dialed for the following events:
    • Fall Detection
    • Man Down Detection
    • Restricted Location Violation

    You may prefix the country code (for example +1 for USA) to the number if required.

  6. Specify the Fall detection height (meters).
    An altitude fall equal to or greater than the Fall Detection Height in meters triggers a fall alert.
  7. Under No motion time for man down detection (seconds), specify the number of seconds after which a man-down alert is triggered in case no motion is detected for a worker during the specified period.
  8. Click Save to save your configuration settings.

Create a Project Rule

Create a project rule to generate a location notification, an alert, or a device message when a worker assigned to a project meets or exceeds the rule criteria. Project rules can also use environmental location sensors attached to the project location to detect and report hazards, such as low light conditions or high temperature.

  1. Click Menu Menu iconand click Rules.
  2. Click Create a rule Create a rule icon.
  3. Enter a name for the rule in the Name field.
  4. (Optional) To set a time limit for the rule, specify a weekly or monthly schedule during which the rule is in force.
    A rule is active at all times, by default. You can change this behavior to choose a custom schedule for the rule.
    1. Under Rule Schedule, select Custom.
    2. Select Repeat Weekly to create a weekly schedule. Alternatively, select Repeat Monthly to create a monthly schedule.
    3. Click or drag inside the rows to select a data window.
      You can click an incorrectly selected cell to deselect it. Alternatively, click Clear to start afresh.
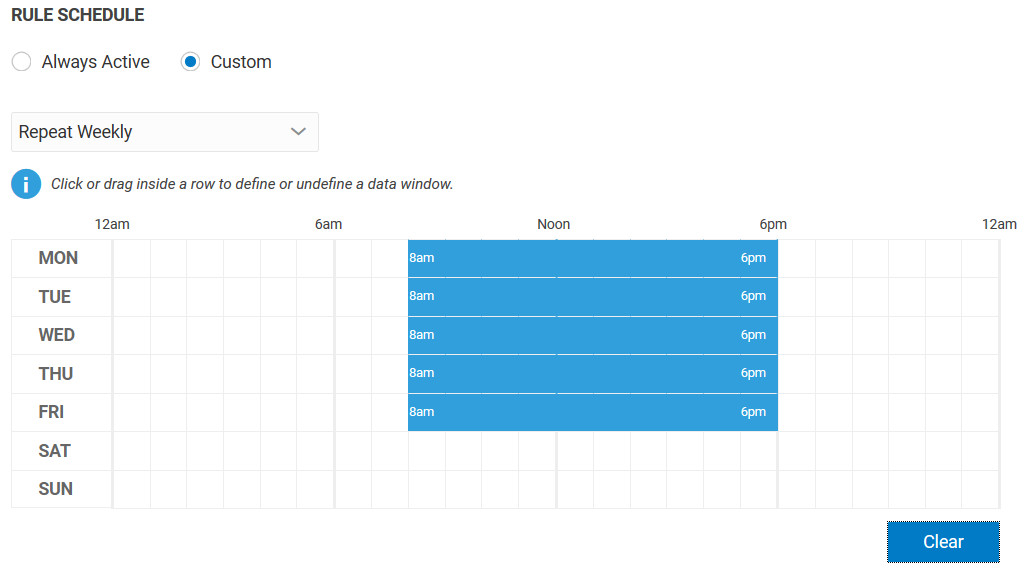
    The following example shows a weekly schedule for a rule that it is active from 8:00 a.m. to 6:00 p.m. on weekdays.
    Rule Schedule

  5. Under Source Type, select whether your rule is based on sensors associated with workers, such as employee location and motion detectors, or sensors associated with locations, such as temperature and humidity sensors.
    • Select Employee to create a rule based on sensors associated with workers.
    • Select Location to create a rule based on environmental sensors associated with a location.

      Location source type rules are applied to locations or projects. If a project is chosen, then the rule applies to all locations in the project.

      You can use location rules to create incidents, alerts, messages, or automatic hazards when an environmental attribute, such as humidity or temperature, crosses the rule threshold.

  6. Select one of these options in the Apply To list:
    • All Projects: To assign the rule to all projects, select this option.
    • Specific Projects: To assign the rule to a specific project, select this option and then select one or more projects.
  7. Select one of these options in the Condition area:
    • All Conditions Apply: Select this option to generate a location notification, an alert, or a device message when all of the conditions are met or exceeded.
    • Any Conditions Apply: Select this option to generate a location notification, an alert, or a device message when any of the conditions are met or exceeded.
  8. Select one of these options in the Type list:
    • Alert: Select this option to activate the rule when an alert message of the selected type is received.

      For example, a time restriction violation alert (urn:com:oracle:iot:cw:location:time_restriction_violation) is raised if an employee exceeds the maximum contiguous time period allowed for a location.

      If you are using asset integrations for your project, you can also select asset location related alerts. For example, an asset vicinity violation alert (urn:com:oracle:iot:cw:location:asset_vicinity_violation) is raised if a worker violates the vicinity radius for the asset.

    • Location: Select this option to generate an incident, alert, or a message when the location conditions are met.
    • Device Message: Select this option to generate an alert, incident, or a message when the device rule conditions are met.
    • Attribute: Select this option to generate an alert, incident, or a message when the rule conditions for the attribute are met. For example, you can use the employee.devices.offline.time attribute to trigger an incident if all devices for an employee have been marked offline for the specified number of seconds. This helps take action in case of disconnected employees.

      If the Source Type of your rule is Location, you can also use the Attribute value to create a location-based hazard. For example, you can create a hazard corresponding to high temperature at a location.

      If you are using asset integrations for your project, you can also specify asset sensor attribute related conditions. For example, you can create a hazard corresponding to pressure values of a boiler exceeding its threshold.

  9. Complete the configuration settings for the option you selected in the Type list.
  10. (Optional) Add additional alert, location, attribute, or device message conditions.
  11. Select one of these options:
    • Create Incident: Select this option to create an incident report when the rule conditions are met.
    • Create Alert: Select this option to generate an alert message when the rule conditions are met.
    • Send Message: Select this option to send a push-notification to the user’s mobile device when the rule conditions are met.
    • Trigger Employee Alert: Select this option to generate an alert and trigger supported device actions on the user's device. You can use employee alerts to trigger visual and haptic feedback supported by your device models.

      For example, you can configure a rule to trigger employee alerts to all employees at a location in case an employee has fallen. The employees' MetaWear LED sensors would blink and their android devices would display the alert notification.

    • Create Hazard: Select this option to create an automatic hazard condition when the rule conditions are met.

      This option is only available if the Source Type of your rule is Location, which corresponds to environmental sensors associated with a location.

  12. Complete the mandatory and optional fields that appear when you made your selection in step 10. The mandatory and optional fields include:
    • Summary: Enter a summary of the incident or alert.
    • Type: Select the incident or alert type.
    • Priority: (Optional) Select the incident, message, or employee alert priority.
    • Tags: (Optional) Enter tags that can help you identify incidents in the logs.
    • Description: (Optional) Enter a description of the incident.
    • Severity: (Optional) Select the alert message severity.
    • Suppression: (Optional) Enter a wait time, in minutes, to wait before another alert or warning is generated for unresolved issues.
    • Message: Enter a message to send to workers.
    • Recipients: Select the recipients of the message. For example, if you select LOCATION, then the message is sent to all employees present at the location.
    • Sender: Select the sender of the message.
    • Action: Specify an action corresponding to a location hazard.
  13. Click Save.
  14. Click Back to return to the Rules list.

Create a Project Hazard Rule

Create a project hazard rule to generate a location notification, an alert, or a device message for all members of a project when a specific hazard is activated.

  1. Click Menu Menu iconand click Rules.
  2. Click Create a rule Create a rule icon.
  3. Enter a name for the rule in the Name field.
  4. (Optional) To set a time limit for the rule, specify a weekly or monthly schedule during which the rule is in force.
    A rule is active at all times, by default. You can change this behavior to choose a custom schedule for the rule.
    1. Under Rule Schedule, select Custom.
    2. Select Repeat Weekly to create a weekly schedule. Alternatively, select Repeat Monthly to create a monthly schedule.
    3. Click or drag inside the rows to select a data window.
      You can click an incorrectly selected cell to deselect it. Alternatively, click Clear to start afresh.
    The following example shows a weekly schedule for a rule that it is active from 8:00 a.m. to 6:00 p.m. on weekdays.
    Rule Schedule

  5. Under Source Type, select Employee.
  6. Select Specific Hazard in the Apply To list.
  7. Select a project in the second list.
  8. Select a hazard in the third list.
  9. Select one of these options in the Condition area:
    • All Conditions Apply: Select this option to generate a location notification, an alert, or a device message when all of the conditions are met or exceeded.
    • Any Conditions Apply: Select this option to generate a location notification, an alert, or a device message when any of the conditions are met or exceeded.
  10. Select one of these options in the Type list:
    • Alert: Select this option to activate the rule when an alert message of the selected type is received.

      For example, a time restriction violation alert (urn:com:oracle:iot:cw:location:time_restriction_violation) is raised if an employee exceeds the maximum contiguous time period allowed for a location.

    • Location: Select this option to generate an incident, alert, or a message when the location conditions are met.
    • Device Message: Select this option to generate an alert, incident, or a message when the device rule conditions are met.
    • Attribute: Select this option to generate an alert, incident, or a message when the rule conditions for the attribute are met. For example, you can use the employee.devices.offline.time attribute to trigger an incident if all devices for an employee have been marked offline for the specified number of seconds. This helps take action in case of disconnected employees.
  11. Complete the configuration settings for the option you selected in the Type list.
  12. (Optional) Add additional alert, location, or device message conditions.
  13. Select one of these options:
    • Create Incident: Select this option to receive an incident notification when the rule conditions are met.
    • Create Alert: Select this option to generate an alert message when the rule conditions are met.
    • Send Message: Select this option to send a push-notification to the user’s mobile device when the rule conditions are met.
    • Trigger Employee Alert: Select this option to generate an alert and trigger supported device actions on the user's device. You can use employee alerts to trigger visual and haptic feedback supported by your device models.

      For example, you can configure a rule to trigger employee alerts to all employees at a location in case an employee has fallen. The employees' MetaWear LED sensors would blink and their android devices would display the alert notification.

  14. Complete the mandatory and optional fields that appear when you made your selection in step 12. The mandatory and optional fields include:
    • Summary: Enter a summary of the incident or alert.
    • Type: Select the incident or alert type.
    • Priority: (Optional) Select the incident, message, or employee alert priority.
    • Tags: (Optional) Enter tags that can help you identify incidents in the logs.
    • Description: (Optional) Enter a description of the incident.
    • Severity: (Optional) Select the alert message severity.
    • Suppression: (Optional) Enter a wait time, in minutes, to wait before another alert or warning is generated for unresolved issues.
    • Message: Enter a message to send to workers.
    • Recipients: Select the recipients of the message. For example, if you select LOCATION, then the message is sent to all employees present at the location.
    • Sender: Select the sender of the message.
  15. Click Save.
  16. Click Back to return to the Rules list.

Create a Worker Rule

Create a worker rule to generate a location notification, an alert, or a device message for all workers or a specific worker.

  1. Click Menu Menu iconand click Rules.
  2. Click Create a rule Create a rule icon.
  3. Enter a name for the rule in the Name field.
  4. (Optional) To set a time limit for the rule, specify a weekly or monthly schedule during which the rule is in force.
    A rule is active at all times, by default. You can change this behavior to choose a custom schedule for the rule.
    1. Under Rule Schedule, select Custom.
    2. Select Repeat Weekly to create a weekly schedule. Alternatively, select Repeat Monthly to create a monthly schedule.
    3. Click or drag inside the rows to select a data window.
      You can click an incorrectly selected cell to deselect it. Alternatively, click Clear to start afresh.
    The following example shows a weekly schedule for a rule that it is active from 8:00 a.m. to 6:00 p.m. on weekdays.
    Rule Schedule

  5. Under Source Type, select Employee.
  6. Select one of these options in the Apply To list:
    • All Workers: To assign the rule to all workers, select this option.
    • Specific Workers: To assign the rule to a specific worker, select this option and then select a worker.
  7. Select one of these options in the Condition area:
    • All Conditions Apply: Select this option to generate a location notification, an alert, or a device message when all of the conditions are met or exceeded.
    • Any Conditions Apply: Select this option to generate a location notification, an alert, or a device message when any of the conditions are met or exceeded.
  8. Select one of these options in the Type list:
    • Alert: Select this option to activate the rule when an alert message of the selected type is received.

      For example, a time restriction violation alert (urn:com:oracle:iot:cw:location:time_restriction_violation) is raised if an employee exceeds the maximum contiguous time period allowed for a location.

      If you are using asset integrations for your project, you can also select asset location related alerts. For example, an asset vicinity violation alert (urn:com:oracle:iot:cw:location:asset_vicinity_violation) is raised if a worker violates the vicinity radius for the asset.

    • Location: Select this option to generate an incident, alert, or a message when the location conditions are met.
    • Attribute: Select this option to generate an alert, incident, or a message when the rule conditions for the attribute are met. For example, you can use the employee.devices.offline.time attribute to trigger an incident if all devices for an employee have been marked offline for the specified number of seconds. This helps take action in case of disconnected employees.

      You can also use attributes to track the time workers spend on duty or on break. Use the attributes employee.onBreak.time, employee.onDuty.time, and employee.checkedIn.time to define rule conditions for the employees. For example, you can trigger an incident if an employee's checked-in duration is less than the lower threshold.

      If you are using asset integrations for your project, you can also specify asset sensor attribute related conditions. For example, you can create a hazard corresponding to pressure values of a boiler exceeding its threshold.

    • Device Message: Select this option to generate an alert, incident, or a message when the device rule conditions are met.
  9. Complete the configuration settings for the option you selected in the Type list.
  10. (Optional) Add additional alert, location, attribute, or device message conditions.
  11. Select one of these options:
    • Create Incident: Select this option to receive an incident notification when the rule conditions are met.
    • Create Alert: Select this option to generate an alert message when the rule conditions are met.
    • Send Message: Select this option to send a push-notification to the user’s mobile device when the rule conditions are met.
    • Trigger Employee Alert: Select this option to generate an alert and trigger supported device actions on the user's device. You can use employee alerts to trigger visual and haptic feedback supported by your device models.

      For example, you can configure a rule to trigger employee alerts to all employees at a location in case an employee has fallen. The employees' MetaWear LED sensors would blink and their android devices would display the alert notification.

  12. Complete the mandatory and optional fields that appear when you made your selection in step 10. The mandatory and optional fields include:
    • Summary: Enter a summary of the incident or alert.
    • Type: Select the incident or alert type.
    • Priority: (Optional) Select the incident, message, or employee alert priority.
    • Tags: (Optional) Enter tags that can help you identify incidents in the logs.
    • Description: (Optional) Enter a description of the incident.
    • Severity: (Optional) Select the alert message severity.
    • Suppression: (Optional) Enter a wait time, in minutes, to wait before another alert or warning is generated for unresolved issues.
    • Message: Enter a message to send to workers.
    • Recipients: Select the recipients of the device message. For example, if you select LOCATION, then the message is sent to all employees present at the location.
    • Sender: Select the sender of the device message.
  13. Click Save.
  14. Click Back to return to the Rules list.

Create a Location Rule

Create a location rule to generate a notification, an alert, or a device message for all locations or a specific location.

  1. Click Menu Menu iconand click Rules.
  2. Click Create a rule Create a rule icon.
  3. Enter a name for the rule in the Name field.
  4. (Optional) To set a time limit for the rule, specify a weekly or monthly schedule during which the rule is in force.
    A rule is active at all times, by default. You can change this behavior to choose a custom schedule for the rule.
    1. Under Rule Schedule, select Custom.
    2. Select Repeat Weekly to create a weekly schedule. Alternatively, select Repeat Monthly to create a monthly schedule.
    3. Click or drag inside the rows to select a data window.
      You can click an incorrectly selected cell to deselect it. Alternatively, click Clear to start afresh.
    The following example shows a weekly schedule for a rule that it is active from 8:00 a.m. to 6:00 p.m. on weekdays.
    Rule Schedule

  5. Under Source Type, select whether your rule is based on sensors associated with workers, such as employee location and motion detectors, or sensors associated with locations, such as temperature and humidity sensors.
    • Select Employee to create a rule based on sensors associated with workers.
    • Select Location to create a rule based on environmental sensors associated with a location.

      Location source type rules are applied to locations or projects. If a project is chosen, then the rule applies to all locations in the project.

      You can use location rules to create incidents, alerts, messages, or automatic hazards when an environmental attribute, such as humidity or temperature, crosses the rule threshold.

  6. Select one of these options in the Apply To list:
    • All Locations: To assign the rule to all locations, select this option.
    • Specific Locations: To assign the rule to a specific location, select this option and then select a location.
  7. Select one of these options in the Condition area:
    • All Conditions Apply: Select this option to generate a location notification, an alert, or a device message when all of the conditions are met or exceeded.
    • Any Conditions Apply: Select this option to generate a location notification, an alert, or a device message when any of the conditions are met or exceeded.
  8. Select one of these options in the Type list:
    • Alert: Select this option to activate the rule when an alert message of the selected type is received.

      For example, a time restriction violation alert (urn:com:oracle:iot:cw:location:time_restriction_violation) is raised if an employee exceeds the maximum contiguous time period allowed for a location.

      For locations with employee count restrictions, an employee count violation alert (urn:com:oracle:iot:cw:location:employee_count_time_violation) is raised if the employee count exceeds the maximum employee count allowed for the location.

      If you are using asset integrations for your project, you can also select asset location related alerts. For example, an asset vicinity violation alert (urn:com:oracle:iot:cw:location:asset_vicinity_violation) is raised if a worker violates the vicinity radius for the asset.

    • Location: Select this option to generate an incident, alert, or a message when the location conditions are met.
    • Attribute: Select this option to generate an alert, incident, or a message when the rule conditions for the attribute are met.

      For example, you can use the employee.devices.offline.time attribute to trigger an incident if all devices for an employee have been marked offline for the specified number of seconds. This helps take action in case of disconnected employees.

      If you are using asset integrations for your project, you can also specify asset sensor attribute related conditions. For example, you can create a hazard corresponding to pressure values of a boiler exceeding its threshold.

      If the Source Type of your rule is Location, you can use the Attribute value to define a condition on the number of employees (location.employeesCount) that can be present at the location.

      You can also use the Attribute value to create a location-based hazard. For example, you can create a hazard corresponding to high temperature at a location.

    • Device Message: Select this option to generate an alert, incident, or a message when the device rule conditions are met.
  9. Complete the configuration settings for the option you selected in the Type list.
  10. (Optional) Add additional alert, location, attribute, or device message conditions.
  11. Select one of these options:
    • Create Incident: Select this option to receive an incident notification when the rule conditions are met.
    • Create Alert: Select this option to generate an alert message when the rule conditions are met.
    • Send Message: Select this option to send a push-notification to the user’s mobile device when the rule conditions are met.
    • Trigger Employee Alert: Select this option to generate an alert and trigger supported device actions on the user's device. You can use employee alerts to trigger visual and haptic feedback supported by your device models.

      For example, you can configure a rule to trigger employee alerts to all employees at a location in case an employee has fallen. The employees' MetaWear LED sensors would blink and their android devices would display the alert notification.

    • Create Hazard: Select this option to create an automatic hazard condition when the rule conditions are met.

      This option is only available if the Source Type of your rule is Location, which corresponds to environmental sensors associated with a location.

  12. Complete the mandatory and optional fields that appear when you made your selection in step 10. The mandatory and optional fields include:
    • Summary: Enter a summary of the incident or alert.
    • Type: Select the incident or alert type.
    • Priority: (Optional) Select the incident, message, or employee alert priority.
    • Tags: (Optional) Enter tags that can help you identify incidents in the logs.
    • Description: (Optional) Enter a description of the incident.
    • Severity: (Optional) Select the alert message severity.
    • Suppression: (Optional) Enter a wait time, in minutes, to wait before another alert or warning is generated for unresolved issues.
    • Message: Enter a message to send to workers.
    • Recipients: Select the recipients of the device message. For example, if you select LOCATION, then the message is sent to all employees present at the location.
    • Sender: Select the sender of the device message.
    • Action: Specify an action corresponding to a location hazard.
  13. Click Save.
  14. Click Back to return to the Rules list.

Edit a Rule

Edit a rule to change the rule settings including the rule name, rule type and add or remove conditions, incidents, alerts, or device messages.

  1. Click Menu Menu iconand click Rules.
  2. Select a rule in the Rules list.
  3. Click Edit Edit icon.
  4. (Optional) Edit the rule name.
  5. (Optional) Edit the time limitations for the rule, or select Rule Time Limit to apply time limitations to the rule.
  6. (Optional) Edit the Source Type for the rule.
    You can choose between sensors associated with employees and those associated with a location.
  7. (Optional) Select an option in the Apply To area.
  8. (Optional) Edit the settings in the Condition area.
  9. (Optional) Select an option in the Type list.
  10. (Optional) Edit the settings in the Create Incident area.
  11. (Optional) Edit the settings in the Create Alert area.
  12. (Optional) Edit the settings in the Send Message area.
  13. (Optional) Edit the settings in the Create Hazard area.
  14. Click Save.
  15. Click Back to return to the Rules list.

Duplicate a Rule

Duplicate a rule to quickly copy the settings of an existing rule to a new rule.

  1. Click Menu Menu iconand click Rules.
  2. Select a rule in the Rules list.
  3. Click Duplicate Duplicate icon.
  4. Enter a name for the rule in the Name field and then modify the other rule settings including the apply to, condition, type, create incident, create alert, and send message values.
  5. Click Save.
  6. Click Back to return to the Rules list.

Activate or Deactivate a Rule

Activate an existing rule to generate an incident or alert report when the incident rule criteria are met. Deactivate a rule to stop incident or alert report generation.

  1. Click Menu Menu iconand click Rules.
  2. Select a rule in the Rules list.
  3. Select one of these options:
    1. To deactivate a rule, clear the Enabled checkbox.
    2. To enable a rule, select the Enabled checkbox.
Delete a Rule

Delete a rule when it is no longer required.

  1. Click Menu Menu iconand click Rules.
  2. Select a rule in the Rules list.
  3. Click Delete Delete icon.
  4. Click Yes.