Engagement Scenario Settings
When you create or modify an engagement scenario, you configure several settings that impact both your associate's and your customers' experiences when they use Live Experience.
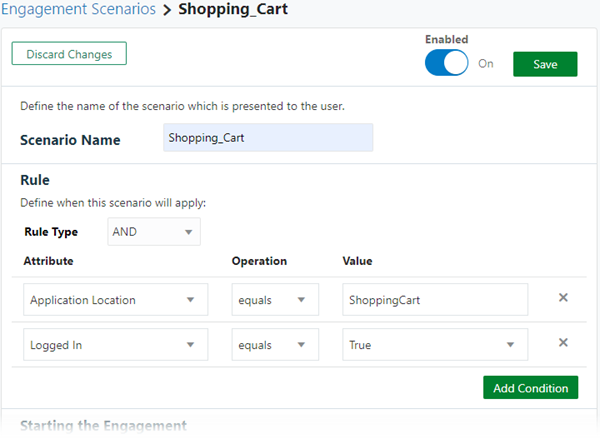
Start by giving your engagement scenario a name or changing its name. The name needs to be unique. It's helpful if the name is descriptive. For example, you can name a scenario "Shopping Cart" for a scenario intended to display the widget to customers who are viewing their shopping cart while shopping on your website.
The Enabled toggle, which is also available when viewing the list of engagement scenarios, allows you to enable or disable the engagement scenario.
Rule Section
The first section you see when you create or edit an engagement scenario is the Rule section. Use the Rule section to create rules that control or restrict when this engagement scenario is triggered, based on the context attributes you've defined.
The Rule Type list allows you to create an AND rule or an OR rule. If you set Rule Type to AND, then all the conditions need to be true in order for the rule to apply. If you set Rule Type to OR, then any one of the conditions needs to be true for the rule to apply.
The list you see is a list of conditions. Each condition uses a context attribute, an operation, and a value. Add one or more conditions and configure them with a context attribute and specify the desired value to build a sophisticated rule to determine when the engagement scenario will apply to an engagement.
The Add Condition button allows to add and configure another condition to the rule.
Starting the Engagement Section
Use the Starting the Engagement section to specify the starting behavior for engagements.
- Tap and wait for an associate: When the customer taps on the widget to start the engagement and is placed in a call queue as determined by your routing rules. Then they are connected with the first available associate.
- Tap and register for a callback: When the customer
taps on the widget they are immediately offered a callback. If the customer
accepts, Live Experience records the callback request and routes it to a
call queue as determined by your routing rules. The callback request is
presented to the first available associate, who can proceed to call the
customer back.
For callback to work, you need to configure Live Experience with a way to make outbound calls. See Engage Your Customers by Calling Them Directly.
- Tap and read out a short code: When the customer taps on the widget, they are shown a six-character code, which they provide to the associate they want to connect with. Use the short code feature when you want to provide your customers with a way to connect with a specific associate. For example, short codes allow an associate to guide a customer from a PSTN phone call to Live Experience video or screen-sharing engagement.
- Join by URL: Customers are sent a URL to join an engagement with a specific associate. Clicking the URL launches a Live Experience meeting. Meetings bypass call routing. Associates can start a meeting immediately, or they can schedule a meeting for a future date and send the URL to one or more participants.
General Options Section
| Option | Description |
|---|---|
| Use External Audio | Select this option to design an engagement scenario for situations when audio isn't needed. For example, if the associate and customer are already talking on the phone, you need an engagement scenario that doesn't duplicate the audio connection. |
| Enable ID Verification | Select this option to have the widget guide your customer through the process of scanning their identity documents to prove their identity. See Customer Identity Verification. |
| Allow Call Transfer |
Select this option to allow an associate to transfer an engagement to another associate. When the transfer is complete, the original associate is removed from the engagement. This option is only available for audio engagements. Note: The Live Experience call transfer is completed without
allowing the two associates an opportunity to talk to
each other.
|
| Allow Add Participant | Select this option to allow an associate to add another
available associate to an in-progress audio or video engagement.
When this option is enabled, it's not possible to allow screen sharing or use the annotation feature during a call. Associates can use the add participant feature to add another associate to an ongoing engagement, pause the customer, discuss things in private, and then the first associate can leave the engagement. |
| Allow Callback | Select this option to allow you to offer the callback option
to your customers. After a customer waits in the call queue for
15 seconds, they are offered the opportunity to leave a callback
instead of waiting. If they refuse, they remain in the call
queue. If they accept, your customer hangs up and waits to be
called back while Live Experience routes a callback request to
the next available associate. For callback to work, you need to configure Live Experience with a way to make outbound calls. See Engage Your Customers by Calling Them Directly. |
| Allow Alternate Callback Number | Select this option to allow the customer to enter a different phone number than the one on file where they want to receive the callback. |
| Allow In-Channel Messaging | Select this option to allow associates to send short bits of text, a maximum of 140 characters, directly to customers. Using in-channel messaging doesn't require SMS integration. It's perfect for sending links or brief bits of information. |
| Use Co-browse for Customer screen sharing | Select this option to allow your associates to use your
Oracle Co-browse account for screen sharing. Note: When Co-browse is enabled for an engagement scenario,
Co-browse replaces Live Experience's own screen sharing
functionality. Live Experience can't record the
customer's screen when it's shared using Co-browse. For
Co-browse to work, you need to configure your Co-browse
settings. See Configure Co-browse.
|
Customer Experience and Associate Experience Sections
The last sections you see when you create or edit an engagement scenario are the Customer Experience and Associate Experience sections. Use them to configure the initial communication channel and channel upgrade options.
| Option | Description |
|---|---|
| Engagement | Enter a short message to display to customers next to the widget. |
| Initial Channels | This option allows you to select the channel the engagement starts with. Select an initial channel for the customer and for the associate. |
| Can Share | This option allows you to select what channels can be shared voluntarily. Select channels for the customer and for the associate. |
| Can Request End User | Select this option to give the associate the ability to request the customer to share additional channels. |
Configure one or more engagement scenarios to meet your business needs. When you are done, add Live Experience to your mobile app or website. More specifically, you need to add the Live Experience widget to one or more web or app pages and configure the widget so that when your customers tap on it, the correct engagement scenario is triggered. See Adding and Configuring the Live Experience Widget for your iOS App, Adding and Configuring the Live Experience Widget for your Android App, and Add and Configure the Live Experience Widget for your Website.