6Managing Oracle Loyalty Users
This chapter contains the following:
Resetting Oracle Loyalty User Passwords
Setup users, who are provisioned with the IT Security Manager job role, can use the Users tab in the Security Console work area to reset passwords for all application users. Users who can't access to the Security Console can reset only their own passwords using the Set Preferences link in the Settings and Actions menu available by clicking their user name in the application or by using the Forgot Password link on the sign-in page.
To reset a user's password in the Security Console, do the following:
-
From the implementation project, open the Manage Application Security Preferences task. Also you can open Setup and Maintenance and search for this task by name.
You can close any warnings regarding the scheduling of the Import Users and Roles Application Security Data job.
-
Click the Users tab.
-
Search for the user using one of the following:
-
First or last name, but not both
-
User name
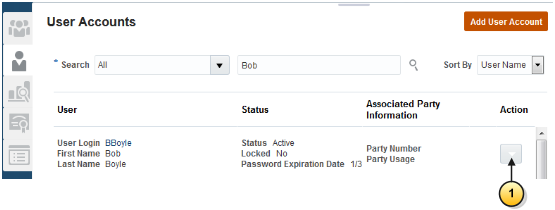
The following figure shows the User Accounts page that appears when you click the Users tab in the Security Console work area.
-
-
From the Action menu (callout 1 in the preceding figure), select Reset Password.
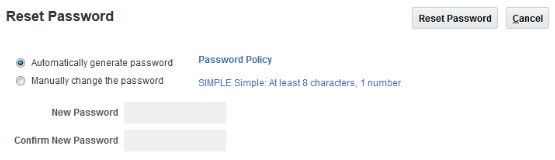
The following figure shows the Reset Password window.
The window displays the password strength policy, which is set on the Security Console Administration tab.
-
If you want the application to send an e-mail to users with a URL that they can use to create their own passwords, then select the Automatically generate password option.
-
To reset the password yourself, do the following:
-
Select the Manually change the password option
-
Enter the new password twice.
Note: The option to reset a password to an automatically generated value is always available. For the manual-reset option, you must select the Administrator can manually reset password option on the Security Console Administration tab. -
-
Click Reset Password.
Changing Oracle Loyalty User Resource Roles When Job Assignments Change
If an employee takes on a different role within the company, for example, if the user is promoted, then you must update the resource role assigned to the employee as described in this topic.
Changing the resource role assigned to an employee involves:
-
Assigning a new resource role to the user that corresponds to the new assignment.
-
Setting an end date for the old resource role.
Perform the steps in the following procedure to change a user's resource role.
-
Open Setup and Maintenance and search for the task Manage Resources.
-
Select the Manage Resources task from the search results list.
-
On the Manage Resources page, search for and select the resource.
The Resource page for the individual opens.
-
Click the Roles tab, then click Add and add the new resource role for the user.
-
In the Roles list, select the current role assigned to the user, and enter an end date in the To Date field.
The value you enter is the date the user's assignment in the current role ends.
-
Click Save and Close.
-
To automatically provision any roles that you have set up using the role provisioning rule for the new resource role you just assigned the user, do the following:
-
In Setup and Maintenance, search for and select the task Manage Users.
-
On the Manage Users page, search for and select the relevant user.
-
On the Edit User page for the user, click the Autoprovision Roles button in the Resource Information section.
In the Current Roles section, you can remove any individual role if it is no longer required.
-
Terminating Oracle Loyalty User Accounts
This topic describes how to terminate a user account when an employee leaves your company. You can't delete a user account. However, when an employee leaves your company, you can suspend the user account by completing the following steps:
-
Do one of the following tasks:
-
Inactivate the user's account.
-
Remove the user's roles.
-
-
Set an end date for the resource.
The process outlined in this topic applies if you're using only Oracle Loyalty. If your company uses Oracle CX HCM along with Oracle Loyalty, then a different process applies.
Inactivating a User Account
When an employee leaves your company, in most cases it's recommended that you inactivate the user account. Inactivating the user's account prevents the user from being able to log in to the application.
To inactivate a user account, perform the following steps:
-
Open Setup and Maintenance and search for the task Manage Users.
-
Select the Manage Users task from the search results list.
The Manage Users page opens.
-
Search for and select the user whose account you want to inactivate. The Edit User page for the user opens.
-
In the User Details section, in the Active field, select Inactive.
-
Click Save and Close.
Removing Roles from a User
Instead of inactivating the user account, you can remove some or all of the roles assigned to the user. You might want to do this if you want to keep some roles active. For example, maybe you want to keep the user account valid to allow the user access to your company-specific pages.
To selectively remove roles from a user, perform the following steps:
-
Open Setup and Maintenance and search for the task Manage Users.
-
Search for and select the user whose roles you want to remove.
The Edit User page for the user opens.
-
In the Current Roles section, select the role you want to remove, then click the Remove icon. Repeat this process for each role assigned to the user that you want to remove.
-
Click Save and Close.
Setting an End Date for the Resource
After you have either inactivated a user account or removed the roles assigned to a user account, you must set an end date for the resource (user) as described in this topic.
To set the end date for a user, perform the following steps:
-
In Setup and Maintenance, search for the task Manage Resources.
-
Select the Manage Resources task from the search results list.
The Manage Resources page opens.
-
Search for and select the resource you want to edit. The Resource page for the individual opens.
-
With the Organization tab selected, select the Edit option from the Actions menu.
The Edit Organization Membership page opens.
-
In the To Date field, enter the date the individual is leaving the company.
-
Click Save and Close.
When the end date you specify for a resource arrives, the following occurs:
-
The terminated employee is no longer available in the application so can no longer be newly associated with any Oracle Loyalty objects. The user's association with Oracle Loyalty objects made before the end date aren't automatically removed but you can remove them manually.
-
Resource roles for the individual are deprovisioned.
Impersonation and Proxy Users
Privileges Required by Proxy Oracle Loyalty Users
With the impersonation functionality in Oracle Loyalty, you can designate another user as a proxy to sign in to the application and perform tasks on your behalf. For example, a channel manager might want to log into the Partner Portal as a partner user to resolve a query relating to the UI pages or data. Similarly, as an Oracle Loyalty user, you might want to designate the Loyalty administrator to act as your proxy to troubleshoot an issue you're experiencing.
Channel managers don't require a partner user's permission to impersonate the partner user. To implement impersonation in all other cases, however:
-
The user must explicitly designate another user as his or her proxy.
-
The designated user must have the privileges required to act as a proxy.
Impersonate User Privilege
You can select a user to act as your proxy only if the user has the privilege required to be a proxy (the Impersonate User privilege). The following job roles are assigned the Impersonate User privilege in Oracle Loyalty by default; therefore, users assigned these job roles can act as proxies for other users:
-
Loyalty Administrator
-
Customer Relationship Management Application Administrator
-
Channel Account Manager
-
Channel Operations Manager
You can enable other groups of users to act as proxies by creating a copy of the job role assigned to the users and adding the Impersonate User privilege to the specific role.
Configuring Oracle Loyalty Impersonation Auditing
The impersonation functionality in Oracle Loyalty allows users to temporarily designate another user as a proxy to sign in to the application on their behalf. A proxy user has the same privileges as the impersonated user and has access to all of the impersonated user's personal data. By default, therefore, auditing of proxy user sessions is enabled, even when auditing is disabled for the application. An audit record tracks the user name of the proxy and any transactions performed.
Auditing of proxy sessions is recommended but, if appropriate for your environment, you can disable impersonation auditing by changing the default value of the site-level profile option Audit Impersonation Transaction Enabled.
For additional information about auditing in Oracle Loyalty, including information about the objects that can be enabled for auditing, see the Implementing Loyalty guide on Oracle Help Center at http://docs.oracle.com/.
Configuring Impersonation Auditing
The following procedure describes how to enable or disable impersonation auditing functionality by changing the value of the Audit Impersonation Transaction Enabled profile option.
-
Sign in to the Oracle Loyalty application with your administrator credentials.
-
Open Setup and Maintenance and search for the task Manage Administrator Profile Values.
-
Select the Manage Administrator Profile Values task from the search results list.
The Manage Administrator Profile Values page appears.
-
In the Search: Profile Option section, enter Audit Impersonation Transaction Enabled in the Profile Display Name field.
-
Click Search.
-
In the Search Results list, select FND_AUDIT_IMPERSONATION_TRANSACTIONS.
-
In the FND_AUDIT_IMPERSONATION_TRANSACTIONS: Profile Values section, select the Site Profile level and et the value of the Profile Value field to either Yes or No.
-
Click Save and Close.
FAQs for Terminating Users
How are the records of a terminated Oracle Loyalty employee reassigned
After you terminate an employee in the application, the assignment process automatically excludes the terminated user when it runs again. However, you have to manually handle other reassignments.