Adding the Twitter Social Sign On service to your landing pages
A Sign in with Twitter button can be added to your landing pages. When visitors click this button, they are directed to X (Twitter)'s authorization page, where they can grant permission to your company to use your X (Twitter) information. Then, the information from X (Twitter) is submitted to Eloqua. Users have the ability to supplement the X (Twitter) information with additional form fields if they want.
In order to use the X (Twitter) Social Sign On service, it must be installed by a customer administrator.
To add the X (Twitter) Social Sign On service to a landing page:
-
Open or create a landing page to which you want to add the Sign in with Twitter button.
-
Click Cloud Content to open the Cloud Content menu, which lists all available content services.
-
Locate the X (Twitter) Social Sign On service, either by scrolling through the list or searching with the search box.
-
Drag the X (Twitter) Social Sign On service onto the asset, and place it where you want it to appear.
-
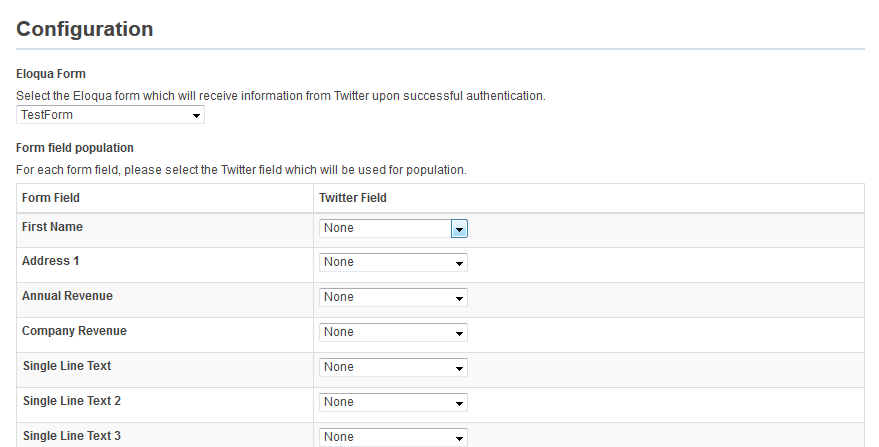
Double-click the element to open the configuration screen.
-
Select an Eloqua Form that you want to complete using Twitter data from the drop-down menu.
-
Map the Eloqua Fields to corresponding X (Twitter) Fields.
- Both static fields and custom fields can be mapped. If Custom fields are selected, the following styling information for the form is required:
- HTML prior to the form
- HTML after the form
- CSS Content
- Submit Button Name
- Mapping Query String values allows you to capture data such as the CampaignID to determine which campaign drove the customer to your landing page.
Example: Entering a Query String of CampaignID will capture the value of 102 in the example below.


- Both static fields and custom fields can be mapped. If Custom fields are selected, the following styling information for the form is required:
- Click Save Settings. When it is finished saving, you see a green Success! bar.
-
Click the X icon to exit the screen.
Note: You are able to capture a user's email address by performing a lookup on the visitor ID. You must first create an email address form field where the HTML Name is emailAddress.
If there are multiple fields requested on the secondary form, the user will be prompted to manually enter their email address.
If email address is the only form field, and Eloqua is able to determine the visitor ID, the email will be submitted automatically. The user will not be prompted to manually enter their email address. -
-
Click Save to save the asset.
A Sign in with Twitter button is now available on your landing page.
