Step 2: Creating the welcome campaign
Note: We're updating our help center to reflect the new Redwood experience. During the transition, some content reflects the previous version of the UI.
Now that you've opened up the campaigns area of Oracle Eloqua, let's create the welcome campaign.
In Oracle Eloqua there are two types of campaigns:
- Simple email campaigns allow you to send a single email to a group of contacts. Simply choose your email recipients (your segment), the email message, and then send the email and you're good to go! A simple email campaign can also be used to A/B test two emails. Find out more about simple email campaigns and A/B tests.
- Multi-step campaigns allow you to create highly customized marketing campaigns that can intrigue contacts and adapt to a contact's real-time activities. Using a simple drag and drop UI, quickly build campaigns that engage the right audience at the right time in your customer's journey. Have a look at some of our best practice templates for some inspiration.
For our welcome campaign, we will be creating a multi-step campaign. That is because we don't simply want to send a batch and blast email to our new contacts. Remember, our welcome campaign involves the following flow:
- Send an email to new subscribers with a limited time download offer
- If they don't sign up for our offer, we'll send a follow-up
- If they do sign up for the offer, we'll send them an email with their download link
- Whether they've signed up or not, all contacts are moved over to our monthly newsletter campaign
To create a multi-step campaign:
- Navigate to Orchestration
 , then click Campaigns.
 - Click Create a Multi-Step Campaign.

The Template Chooser appears.

The chooser allows you to create the campaign with a blank canvas or with one of the templates available. Your organization can create templates and Oracle Eloqua provides you with best practice templates out of the box. If you have purchased Oracle Eloqua for a specific industry, you might have other templates available to you specific to your industry.

For our tutorial, we are going to use a blank campaign.
- Click Blank Campaign, then click Choose.
The campaign canvas appears. It consists of the following areas:
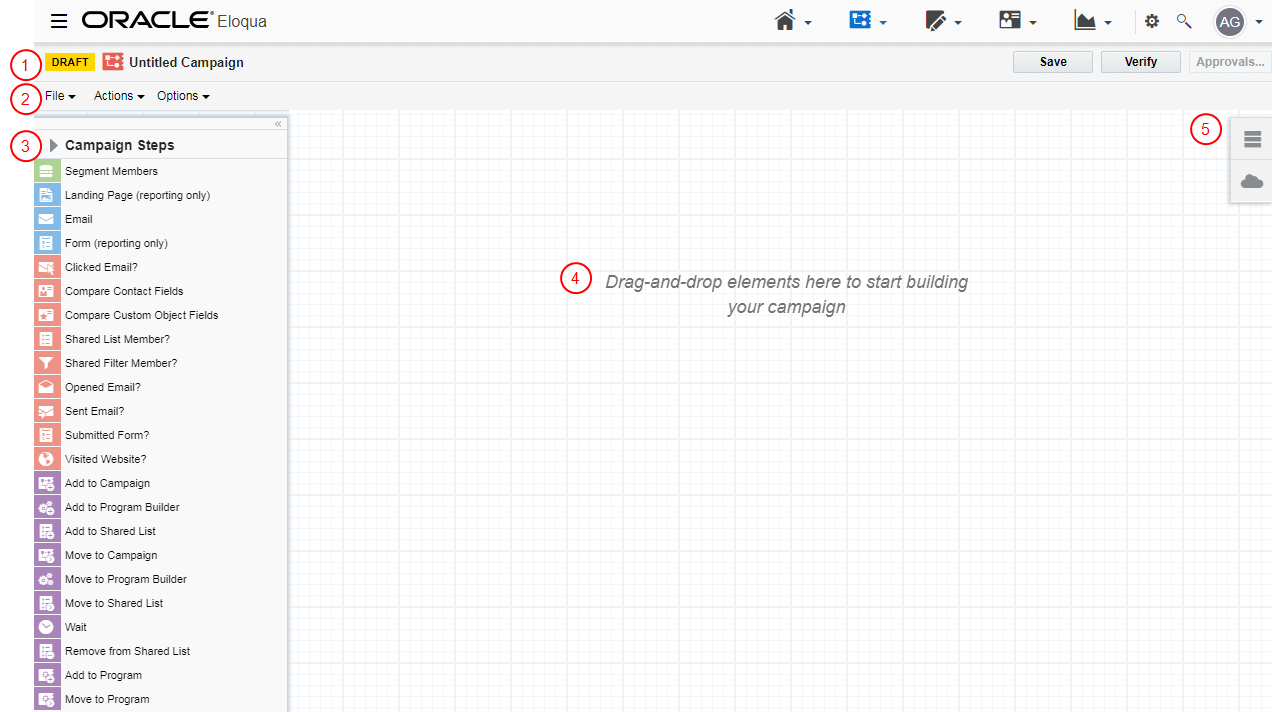

Campaign name and state
Later we'll show you how to give the campaign a descriptive name. The state tells you if the campaign is in Draft, Active, Completed, or Scheduled.

Menu bar
The menu options will vary depending on your permissions. But in general, the File menu provides options for handling a campaign such as creating, saving, or deleting campaigns. The Actions menu provides options for copying and pasting elements, activating the campaign, and so on. The Options menu provides options for campaign settings, fields and permissions.
Take some time to explore the menus on your own. We'll be using some of these menus in this tutorial.

Campaign elements
A multi-step campaign consists of various elements that you can use to build your campaign. Elements are classified into the following categories:
- Audience - who should be in the campaign
- Assets - what campaign assets are involved in the campaign
- Decisions - what are the decisions we want to use for what's next in the campaign flow
- Actions - what actions do we want to take based on the decisions or campaign flow
You can click the arrow to show you all of the elements available.

Campaign canvas
The campaign canvas is where you'll add the elements of the campaign to. Later, we'll be adding elements and connecting them to build out our campaign workflow.

Campaign settings and Cloud apps
Use these tabs to quickly access the campaign settings and also access Oracle Marketing AppCloud apps. Apps let your organization integrate external systems into your campaign. For example, use the WebEx app to integrate your WebEx events directly into the canvas and take action based on event activities. Find out more about apps.
OK! We've introduced you to the campaign canvas. Let's start adding elements to our campaign.