Configuring the CRM update program
Important: The Salesforce native integration was deprecated February 1, 2021. We recommend using the
The SYSTEM - CRM Update program is the primary integration program and determines how to update leads and contacts in Salesforce. There are two program templates you can choose from:
- SYSTEM - CRM Update (Create only unique leads) program: Creates a new lead record in Salesforce only if there is no existing lead or contact with the same email address. If there is an existing lead or contact, the program will update the existing entity instead of creating a new lead.
- SYSTEM - CRM Update (Point of Interest) program: Creates a new lead record even if there is an existing lead or contact in Salesforce CRM.
Choose one of these programs to use for your Salesforce integration then configure the program according to the details provided in below.
Note: If you do not have these program templates in your Oracle Eloqua instance, contact My Oracle Support.
Choosing the right CRM update program
Before you configure your CRM Update program you must choose a program template to use for your CRM update program.
About the SYSTEM - CRM Update (Create only unique leads) program
This program creates a new lead record in Salesforce only if there is no existing lead or contact with the same email address. If there is an existing lead or contact, the program will update the existing entity instead of creating a new lead.
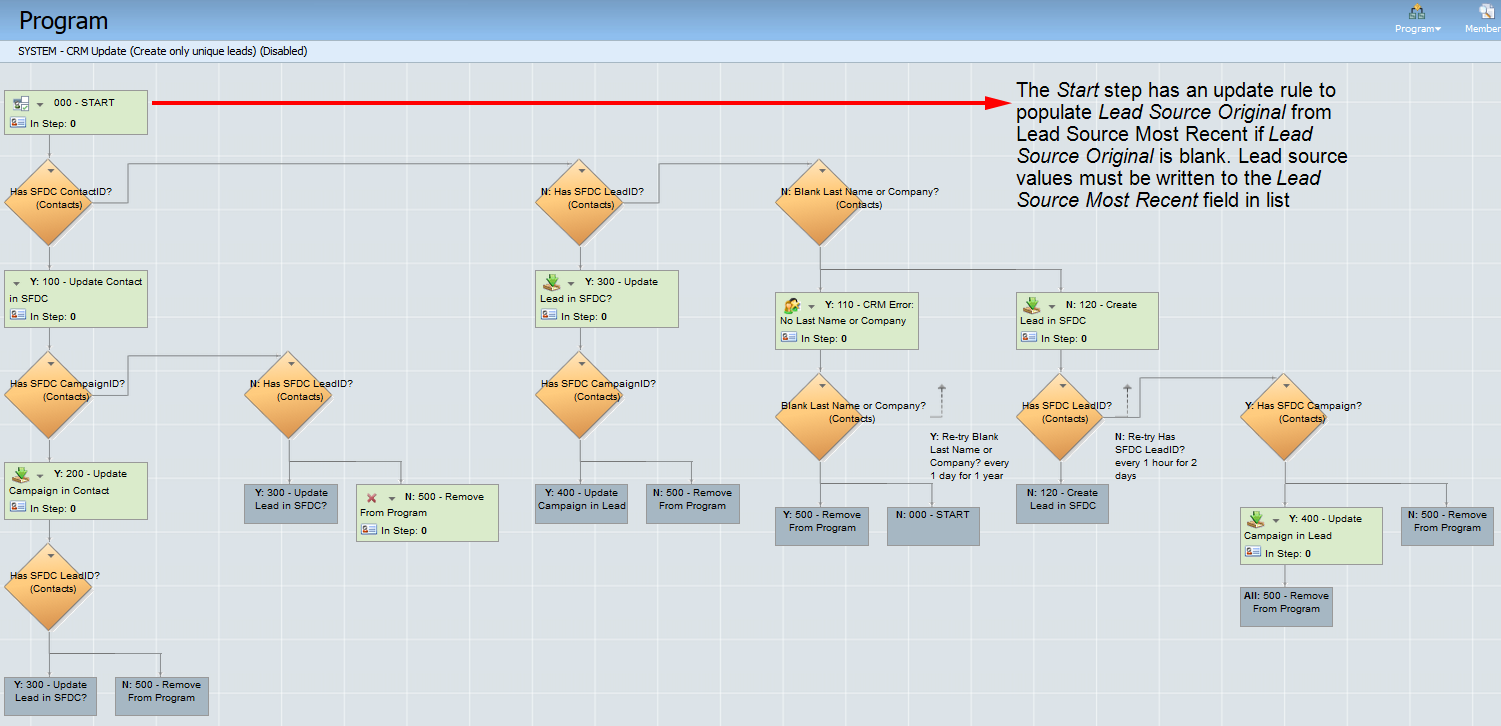
This program uses the following logic:
| Has lead ID on Eloqua contact record? | Has contact ID on Eloqua contact record? | Action |
|---|---|---|
| No | No | Create Lead in Salesforce |
| Yes | No | Update Lead in Salesforce |
| Yes | Yes | Update Lead and Contact in Salesforce |
| No | Yes | Update Contact in Salesforce |
About the SYSTEM - CRM Update (Point of Interest) program
This program creates a new lead record (or updates existing lead if one exists) even if there is an existing contact in Salesforce.
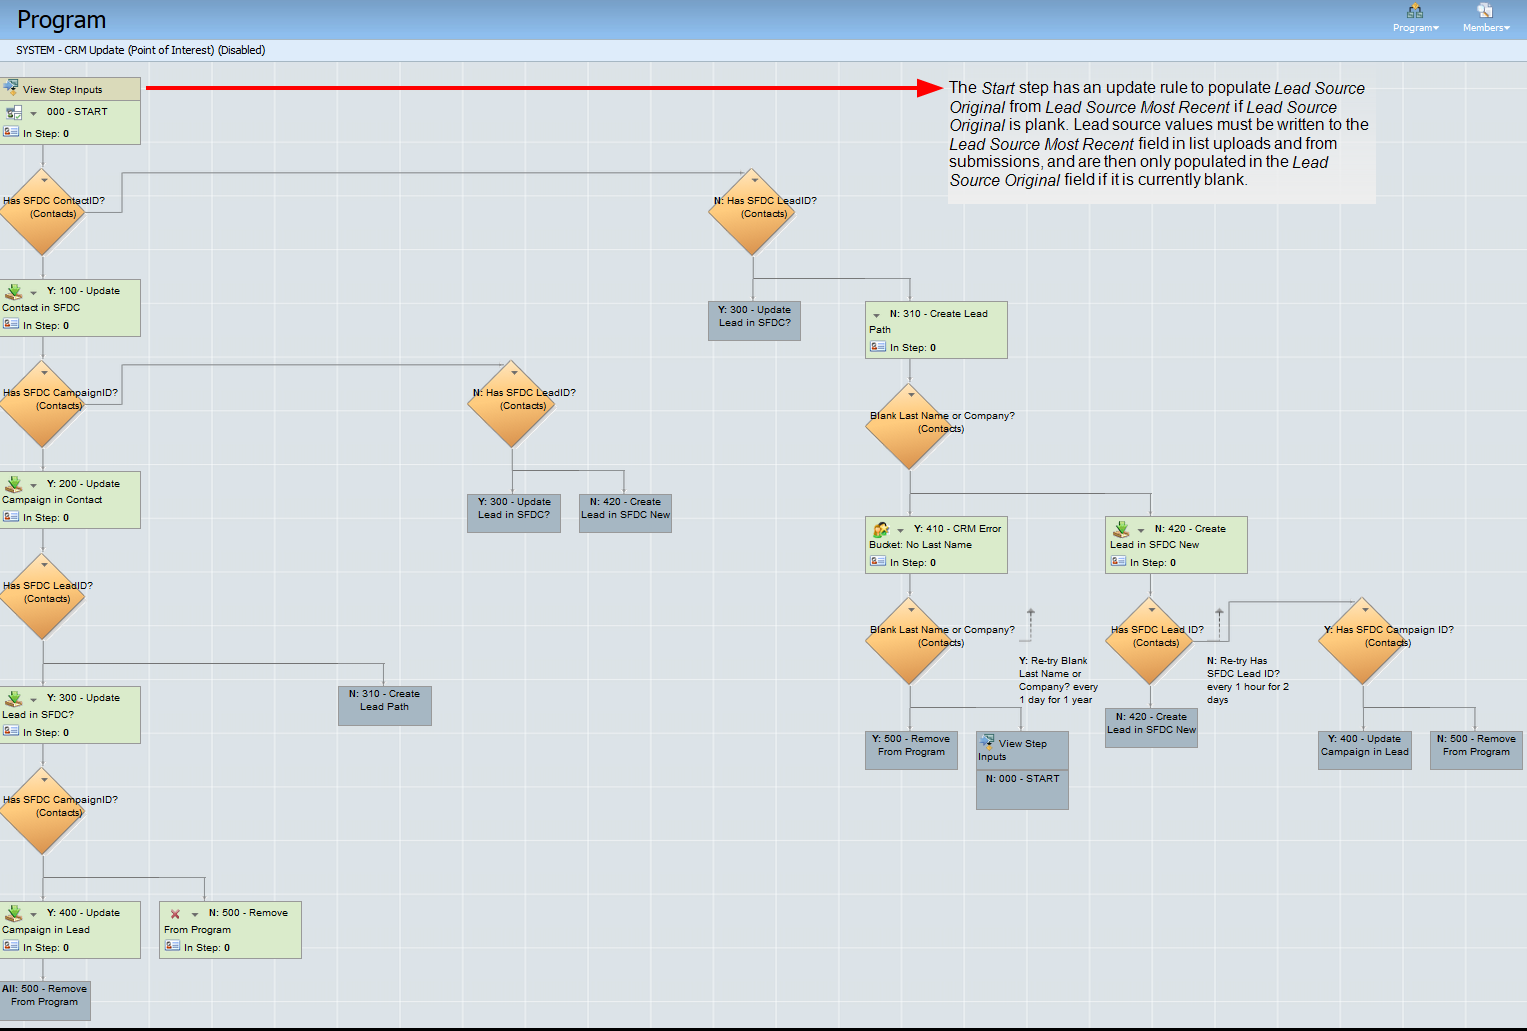
This program uses the following logic:
| Has lead ID on Eloqua contact record? | Has contact ID on Eloqua contact record? | Action |
|---|---|---|
| No | No | Create Lead in Salesforce |
| Yes | No | Update Lead in Salesforce |
| Yes | Yes | Update Lead and Contact in Salesforce |
| No | Yes | Create Lead and Update Contact in Salesforce |
Configuring the selected SYSTEM - CRM Update program
It's recommended that you map no more than 50 fields in the update process to from Oracle Eloqua to Salesforce.
Note: The folders and paths discussed in this document are the defaults or recommendations. Your environment may use different names.
Before you begin:
- Choose the appropriate program template to use for your integration. Refer to About the SYSTEM - CRM Update (Create only unique leads) program and About the SYSTEM - CRM Update (Point of Interest) program for more information.
- Configuring external calls to send data to Salesforce.
Configuring the SYSTEM - CRM Update program:
- Click Settings
 .
. - Click Integration under Platform Extensions.
- Click the Program Builder tab.
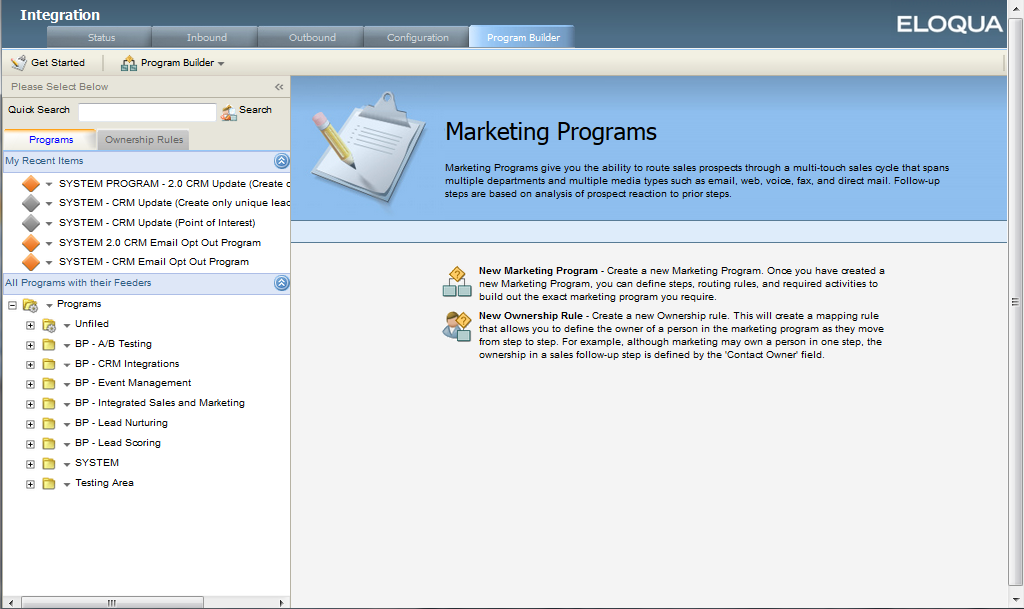
- In the Programs tab, if a SYSTEM folder does not already exist, create the folder. To create a new folder, in the folder list, click
 next to Programs, then click Create New Folder.
 - Navigate to the BP - CRM Integrations folder then open the Salesforce folder.
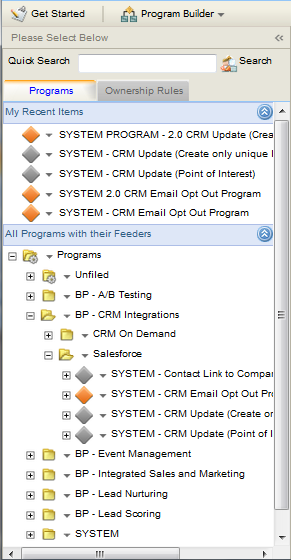
- Locate the CRM Update program you have selected.
- SYSTEM - CRM Update (Create only unique leads)
- SYSTEM - CRM Update (Point of Interest)
- Copy the CRM update program to the SYSTEM folder.
- Click the program name.
Click the Program menu, then click Copy Program.
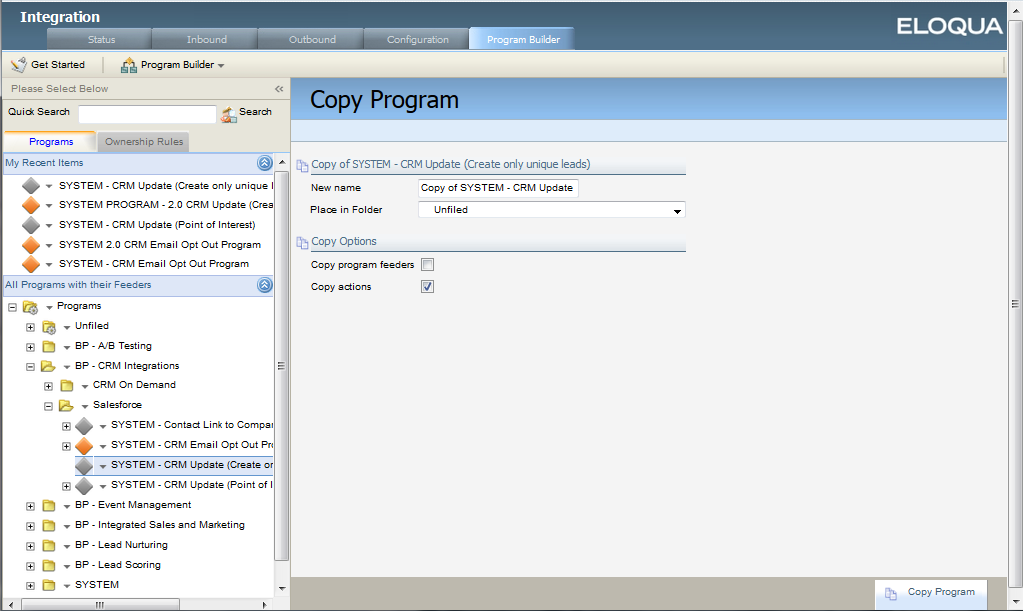
- Enter the name System 1.0 SFDC Update and select the SYSTEM folder from the Place in Folder drop-down.
- Enable both of the options Copy program feeders and Copy actions.
- Click Copy Program.
- Navigate to program that you created. It should now appear in the My Recent Items list.
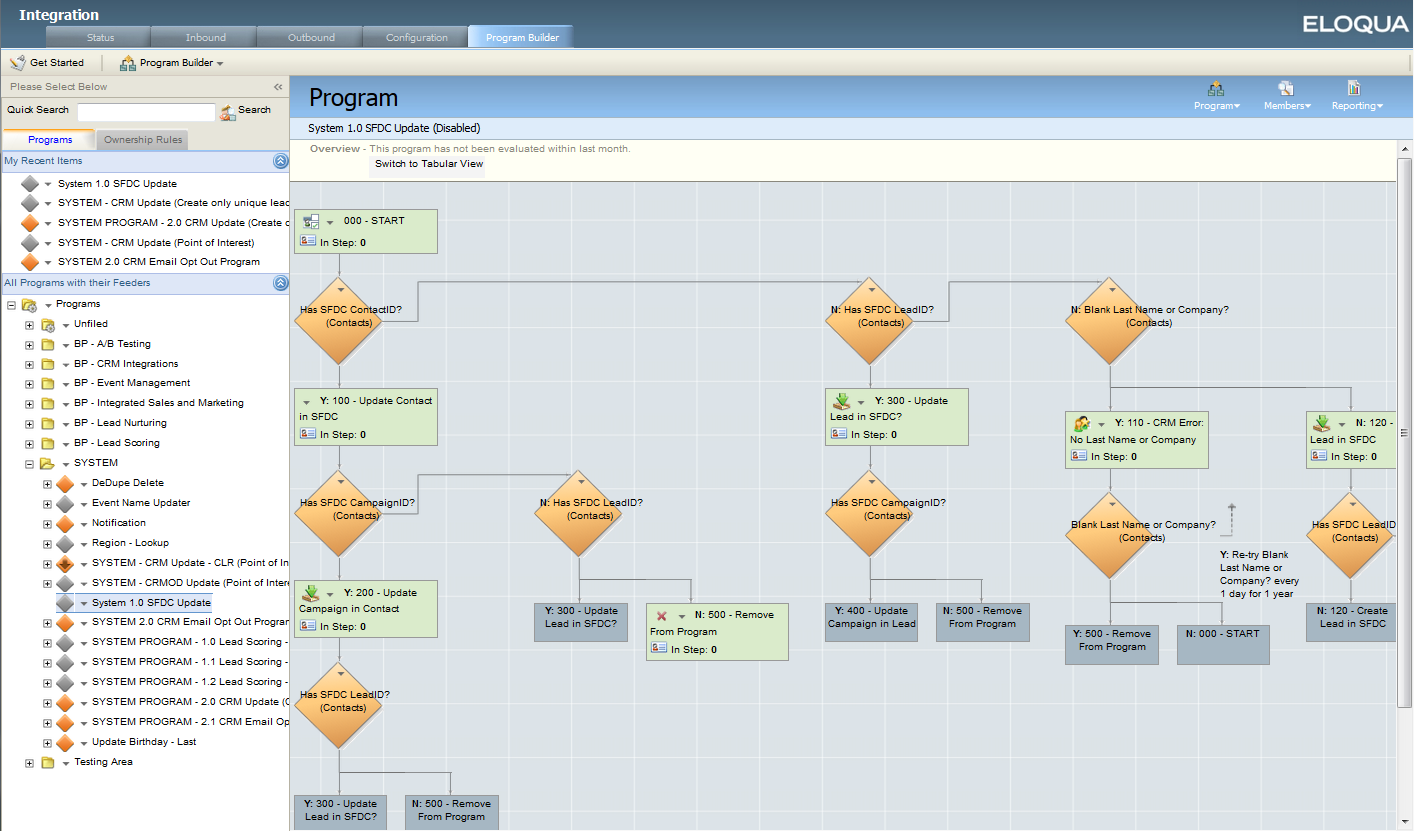
- For each of the following steps, click next to the step name, then click Edit Step Default Action to configure the settings:
- Update Contact in SFDC
- Update Lead in SFDC
- Create Lead in SFDC
- Configure the settings for each step as follows:
- The action can run at any time of day.
- Select Integration as the action type and Run Integration Event as the action.
- Select the Custom Event to run. The custom event you choose depends on the step you are updating. For example, the Update Contact in SFDC step should run the Update Contact event. For more information on these events, see Configuring external calls to send data to Salesforce.
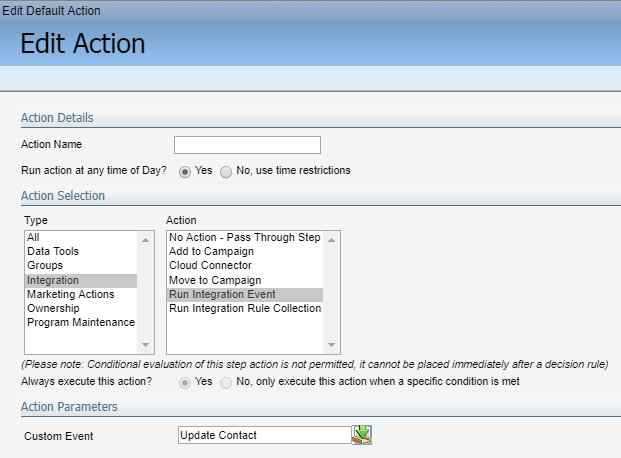
- Click Save and Close.
- Choose an option:
- If you are not implementing closed-loop reporting, update the campaign association steps to execute the applicable campaign association events. The steps you have to update will vary depending on the program template you are using. For example, the, Update Campaign in Lead and Update Campaign in Contact should execute the Campaign Custom Contact Internal Events Associate Lead With Campaign and Associate Contact With Campaign events. For more information on these events, see Configuring external calls to send data to Salesforce.
- If you are implementing closed-loop reporting,
- After configuring all the steps, click the Program menu, then click Enable Program.
- If you are prompted to, enable the appropriate run mode based on the descriptions provided onscreen.
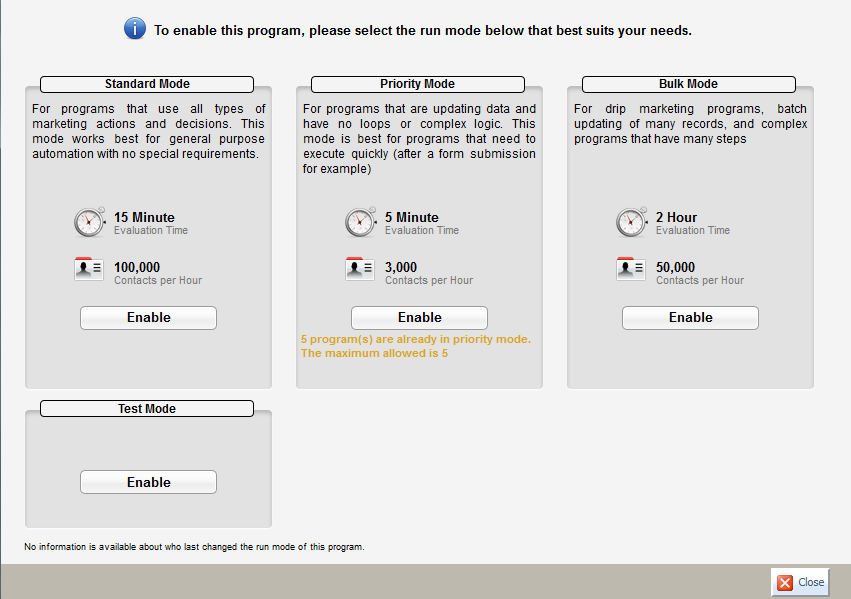
Note: It's recommended that you use priority mode for this program.
- In the Enable Program Feeders window, check the box next to the feeder.
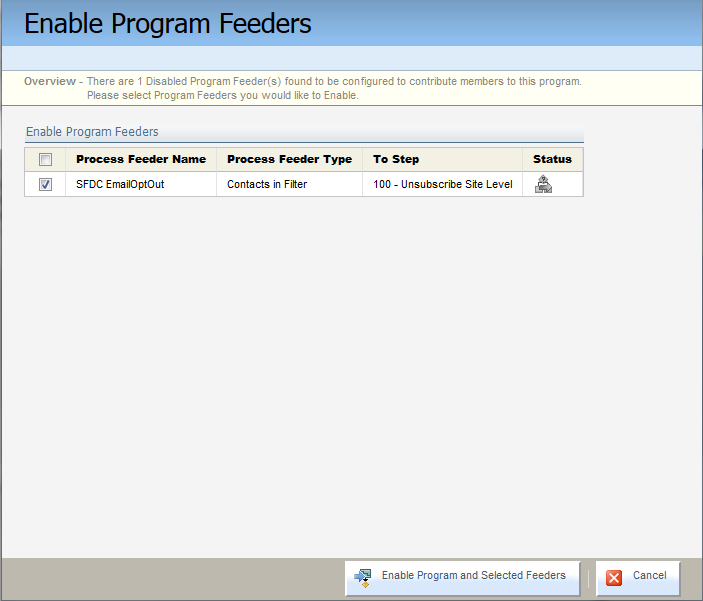
- Click Enable Program and Selected Feeders.
Note: Verify that the program is active by confirming that the program workflow background is white and the program icon is no longer gray.
After you finish: Continue to Enabling Salesforce activity writing.
Configuring Salesforce integration programs in Oracle Eloqua