Creating auto-tagging rules
Auto tagging allows you to automate the process of applying page tags to web pages. The benefit of enabling auto-tagging rules is to avoid having to tag individual pages as they are created.
You can set up the auto-tagging rule to tag any number of folder levels from your base URL. For example, you could set up a rule at the root level of your web site and configure it to tag all levels. Whenever a new page is added to the web site and your site map, in any section, Oracle Eloqua tags the page.
Before you begin:
- Auto page tagging rules rely on your organization's site map. The site map is a hierarchy of your organization’s landing pages and tracked pages that have been visited at least once. Only pages in the site map can be tagged with your page tags.
- Auto tagging rules are run daily. However, when a page is added to or removed from the page tag depends on your site map update schedule. Learn more about scheduling site map updates.
To create an auto-tagging rule:
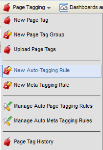
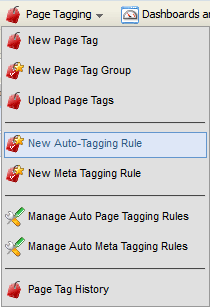
- Navigate to Assets
 > Website Setup, then click Page Tagging.
 -
Click Page Tagging, then click New Auto Tagging Rule.
-
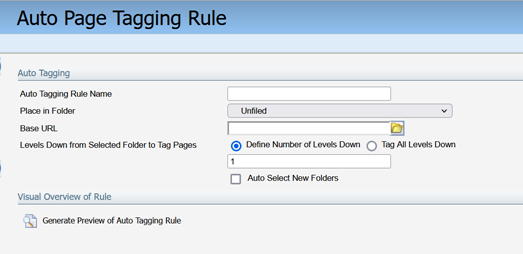
Configure the new Auto Page Tagging Rule window.

- Enter a name for your rule into the Auto Tagging Rule Name field.
-
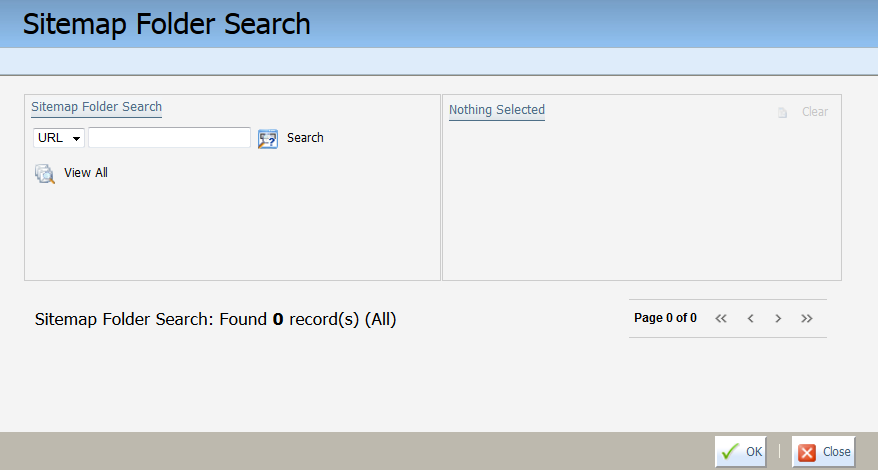
Click the folder next to the Base URL field to open the Sitemap Folder Search window.

-
Select a URL from the list, or search for the URL by entering a part of the URL in the Search field, then clicking Search. If you want to view all URLs in the site map from which you can add to your meta tagging rule, select View All.
Note: The list of URLs that is displayed is derived from the Site Map, which can be found by navigating to Assets
> Website Setup and clicking Tracking. If the list of URLs is empty in the Sitemap Folder Search window, then navigate to Tracking and select Update Site Map. - Once the desired folder appears in the left panel, select it by single left-clicking on its name to add. The folder is added to the Selected Folder list in the right panel.
- Click OK to save your selection, or Cancel to return to the Auto Page Tagging Rule page.
- In the Levels Down from Selected Folder to Tag Pages field, you must indicate how many levels down from the Base URL that you selected in step above will have this auto tagging rule applied. The default is 1, meaning the root and the next level down will have all pages automatically tagged with this rule. To change the number of levels, select Define Number of Levels Down and type in the number of levels. To automatically tag all levels down from the Base URL , select Tag All Levels Down (you will not be able to enter a number of levels if you select that option).
-
If you would like any new folders added to the site map included with this auto page tag rule, select Auto Select New Folders.
-
The new folders that fall under the Levels Down from Selected Folder to Tag Pages selection will be auto selected when the page tag rule runs.
-
The folder will inherit the tags of the folder’s parent, as well as the name of the folder added.
-
If the folder’s parent is not checked the new child folders will not be auto selected
-
- Click Generate Preview of Auto Tagging Rule to verify that the tags and the number of levels that to which you wish to have this rule applied is correct.
- Click Save when you are done. The new rule is now configured and added to Page Tags folder.
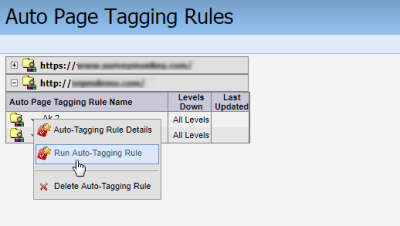
- To generate all page tags, click Manage Auto Page Tagging Rules on the Page Tagging menu located in the top-right corner of the page.
- In the list of rules displayed, click the + icon to view the details of the rule you created.
- Click the folder to the left of the rule name to expand the drop-down list, and then click Run Auto-Tagging Rule.
- Give the auto-tagging rule a descriptive name and choose a folder for the generated page tags.

- Specify the Base URL for the rule. Oracle Eloqua reads pages at this level and below.
- In the Levels Down from Selected Folder to Tag Pages field, indicate how many levels from the base URL you want to tag. The default is 1, meaning the auto-tagging occurs at the root level and the next level down.
- To change the number of levels, select Define Number of Levels Down and type in the number of levels.
- To tag all levels down from the Base URL, select Tag All Levels Down.
-
13. If you would like any new folders added to the site map included with this auto page tag rule, select Auto Select New Folders.
- Click Generate Preview of Auto Tagging Rule.
The pages that display are based on the number of levels you selected and your current site map. The text field next to the base URL shows the tags to be applied. Oracle Eloqua automatically generates default page tags using the URL. You can customize the page tags by entering in your own values.

Note: The site map only includes pages that have been visited since the last time the site map was generated. If a page does not appear in the site map, review the site map troubleshooting.
- Verify the tags and the number of levels or pages that the rule is to apply to.
- Click Save when you are done.

Manually run the auto-tagging rule
Auto tagging rules run daily. However, when a page is added to or removed from the page tag depends on your site map update schedule. Learn more about scheduling site map updates.
You can also run the rule manually.
To run the rule manually:
- Navigate to Assets > Website Setup, then click Page Tagging.
- Click Page Tagging > Manage Auto Page Tagging Rules.
- Locate the rule you want to run and click Run Auto-Tagging Rule.