Creating programs
Note: The program builder is an application separate from the Program canvas. As such, programs created in the program builder are separate from programs created in the Program Canvas. The Program Canvas is an easy to use, drag-and-drop whiteboard that allows you to transform data within Oracle Eloqua in real-time.
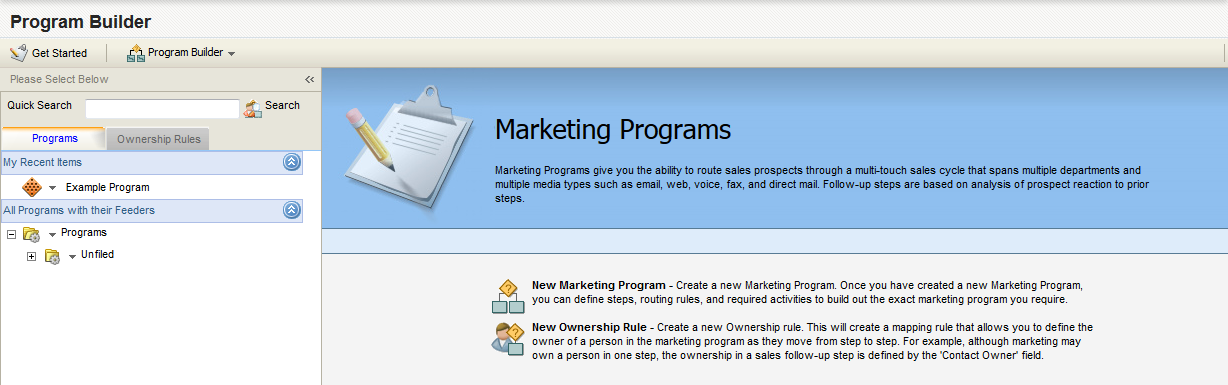
You can create a new program in program builder to carry out a wide range of automated marketing functions in Eloqua.
The exact procedure for building a program from scratch varies at the low-level details, but in general, follows these steps:
- Set up the program details
- Add steps and decision rules to the program flow and configure each one
- Add members or an automatic Program Feeder
- Test the program
- Enabling the program with "live" data entities (contacts, prospects, companies, or custom object records)
Note: If your program is large, with a lot of redirects, you may run into limitations in program builder that prevent any member from being redirected more than 10 times within a single batch run. You should split large programs into an series of smaller, modular programs, each sending members on to the next, then place them in correct order in the batch runs. This will mitigate the possibility that you'll violate the limits built into program builder. If you need more information, contact your customer success manager.
In this topic, you'll learn about:
- Example: creating a program
- Example: adding and configuring the first step
- Example: adding steps, decision rules
- Example: finishing the step paths
- Example: testing and activating the program
Example: creating a program
In the example below, we'll examine building a program with at least one decision rule that routes members in the program down two different paths.
First, we need to create the program from the program builder.
To create and configure a program in the program builder:
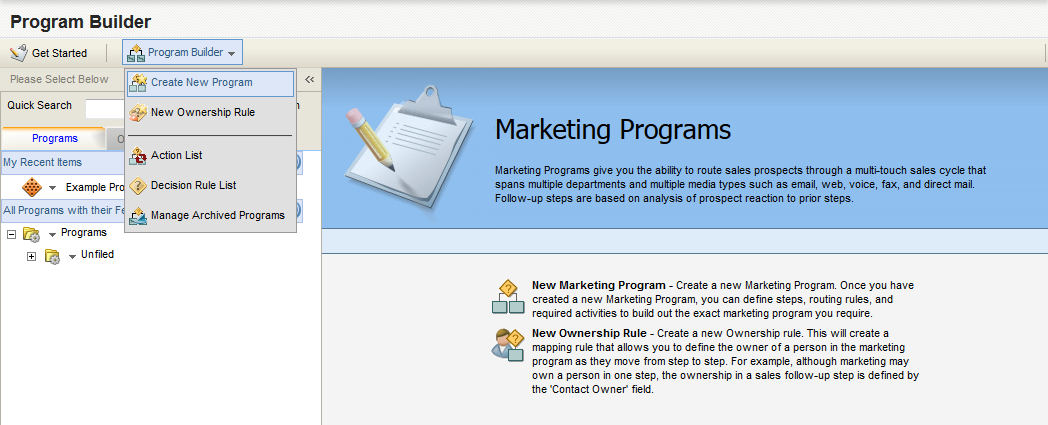
- In the classic UI, navigate to Orchestration > Tools > Program Builder. In the Redwood experience, navigate to Orchestration > Program Builder.
- Click Program Builder, then click Create New Program.
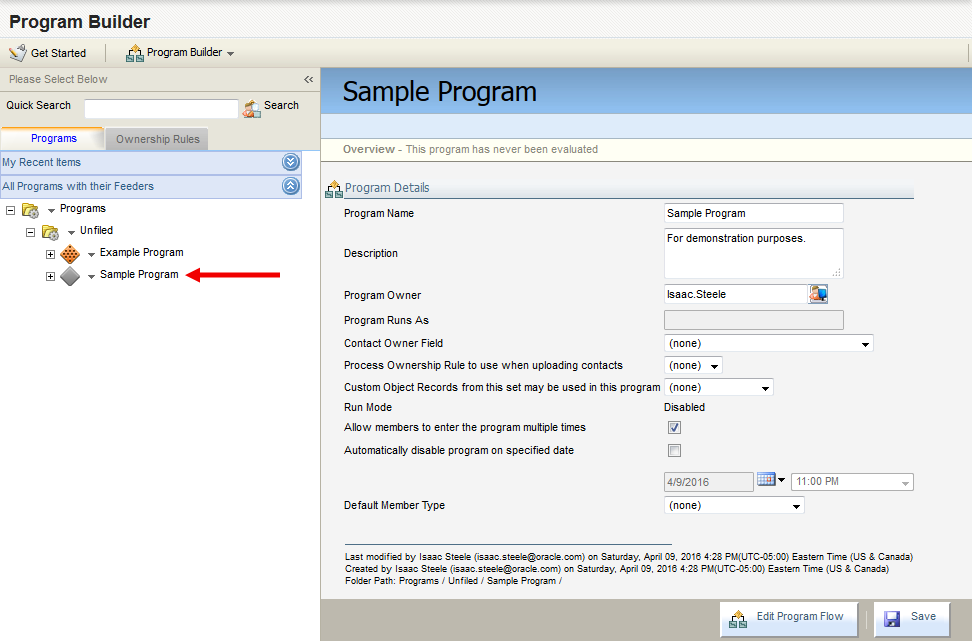
- Configure the Program Details:
- Type a name into the Program Name field.
Example: The program in this example is named "Sample Program."
- (Optional) Type a brief, meaningful description into the Description field.
- (Optional) Type the name of an Eloqua user in your company into the Program Owner field in order to assign this program to that user. Alternatively, click the user search
 button to search users in your application. By default, the program will be owned by the user creating it.
 - Click the Place in Folder drop-down and select a folder in which to store the program. By default, the program will be saved to the standard Programs > Unfiled folder.
- (Optional) Click the Contact Owner Field drop-down, and select a field.
- (Optional) Click the Process Ownership Rule drop-down, and select a rule to use when uploading contacts.
- (Optional) Click the Custom Object Records drop-down, and select a custom object record created in the event builder.
- Select or deselect the option to allow members to enter the program multiple times.
- Select or deselect the option to automatically disable the program on a specified date. If you select this option, then specify a date and time in the subsequent fields.
- (Optional) Click the Default Member Type drop-down, and select a member type (contacts, companies, prospects, or custom object records).
- Type a name into the Program Name field.
- Click Save.
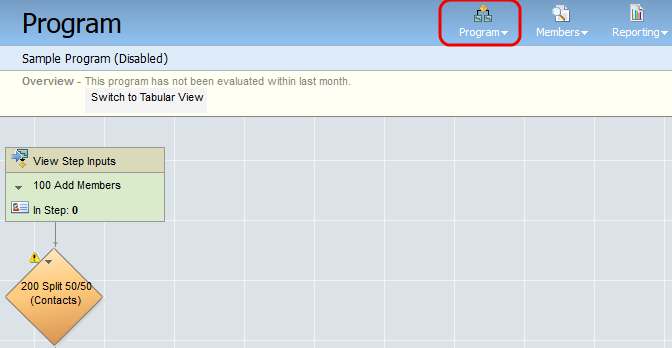
The program shell is saved, and the file is added to the directory view in the left panel. The program configuration window refreshes in the right panel.
You are able to re-configure many of the optional settings and re-save the event, or move on with adding a steps to the program.
Example: adding and configuring the first step
- Click Edit Program Flow. The program flowchart opens in the diagram view.
Note: If you navigate away from the program configuration window, click on the program file in the folder directory to open the program in the flowchart.
- Click on the first step, where indicated, to configure it.
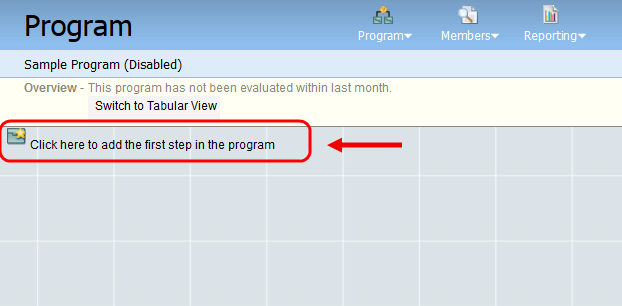
The New Step configuration window opens.
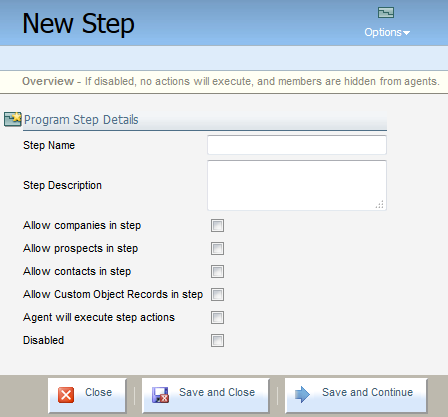
- Configure the Program Step Details:
Type the step name into the Step Name field.
Example: The step name in this example is "100 Add Members."
- (Optional) Type a brief, meaningful description of the step into the Step Description field.
- Select or deselect the respective check boxes that allow companies, prospect, contacts, and custom object records into the step.
Example: The example in this topic allows contacts in the step.
- Select or deselect the Agent will execute step actions check box.
Note: The Disabled check box should be selected only when you want to deactivate a step in a program for the time being. Disabling the first step in a program will, in effect, disable the entire program.
- Click Save and Continue. The New Step configuration window refreshes as the Edit Action window.
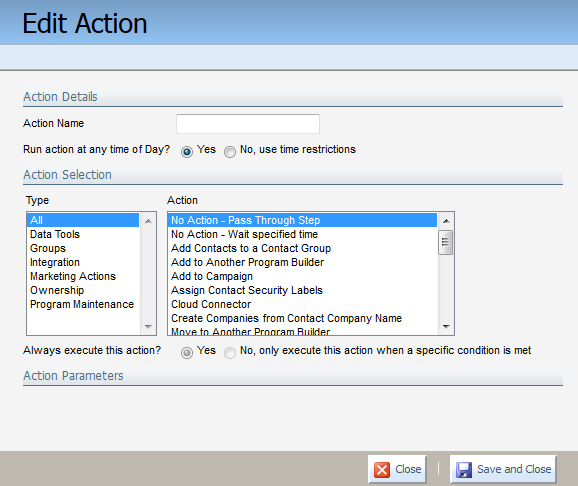
- Configure the Action Details:
- Type a name into the Action Details field. This the name that will display on the program flowchart.
Example: The name in this example step is "Pass Through."
- Select whether to run the action at any time of the day (run at all times), or whether to use time restrictions. If you select to use time restrictions, you will need to edit a schedule that pops up.
Example: This example is configured to run at all times.
- Type a name into the Action Details field. This the name that will display on the program flowchart.
- Configure the Action Selection:
- Click on a Type in the left field, or leave the default All selection.
- Click on an Action in the right field, or leave the default No Action - Pass Through Step selection. Most selections will influence what appears in the Action Parameters section below.
Note: At this point, we do not actually want this step to execute an action, but we'll add a program feeder next to add members to this step automatically. Therefore, select No Action - Pass Through Step. Note that there are no conditions or action parameters (at the bottom of the window) associated with No Action - Pass Through Step.
- Configure the Action Parameters. What you configure here is entirely dependent on the action selected in the Action Selection section above.
- Click Save and Close. The first step is added to the program flowchart.
Now that the step has been added, you can add the program feeder for contacts.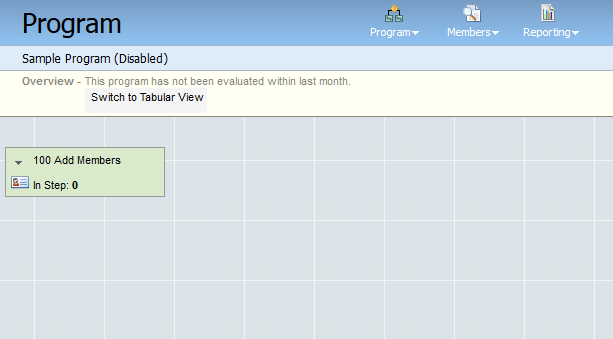
- Click the drop-down arrow next to the step name, then click Add members to this step.
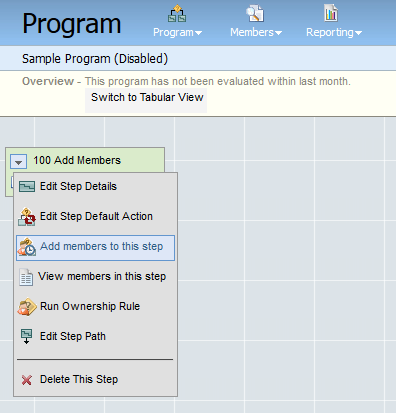
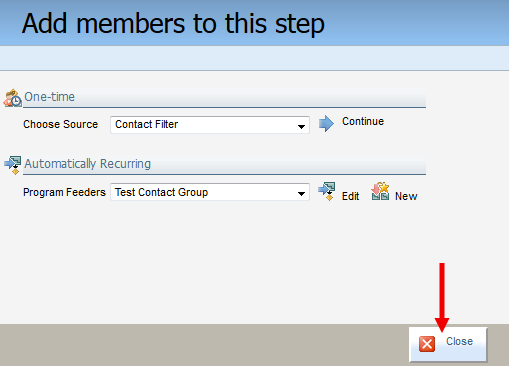
- Click New next to the Program Feeders drop-down.

Note: If there is an appropriate feeder for your purposes, you can select it from the Program Feeders drop-down.
The Program Feeder configuration window opens. - Configure the Program Feeder Details:
- Type a name into the Program Feeder Name field. Use a distinct name for future reference.
- Select from the source of program members drop-down list.
- Click the contact group search
 button next to the Contact Group field.
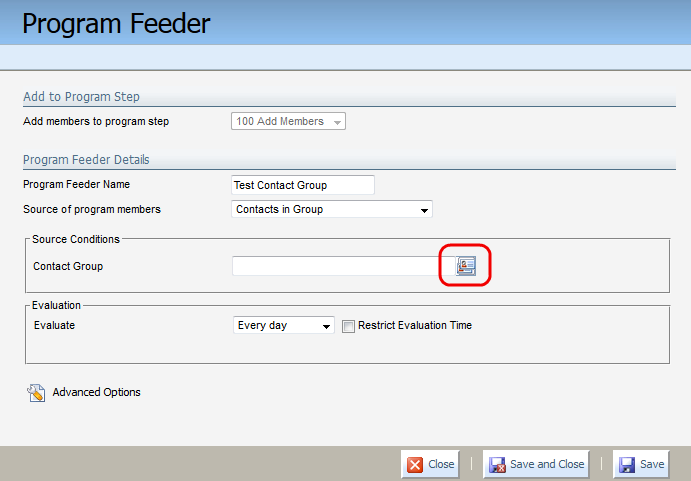
- Search for, locate, and click the desired test group, then click OK.
- Set an Evaluation time period.
Example: For this example, we'll leave the default set at "Every day."
- Click Save and Close, the click OK to confirm.
- Click Close to return to the program flowchart.
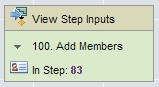
Note the number of members added to the first step.
Note: This is a temporary group containing test contacts only for testing, no live contacts; we'll replace this with a live contact group later.
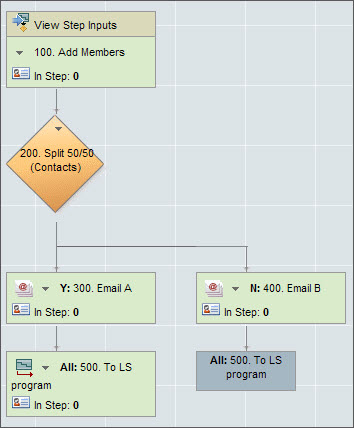
Now that we have set up the first step and the feeder, we can add the remaining steps to the program. We'll start with a decision rule used to split the members into two equal groups and send one of the A/B test emails to each group.
Example: adding steps, decision rules
- Click the drop-down arrow next to the first step name, then click Edit Step Path.

- Select Send to a new decision rule, then click Continue.
The Edit Decision Rule configuration window opens.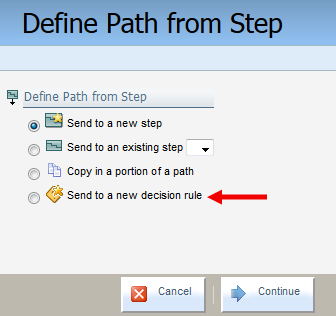
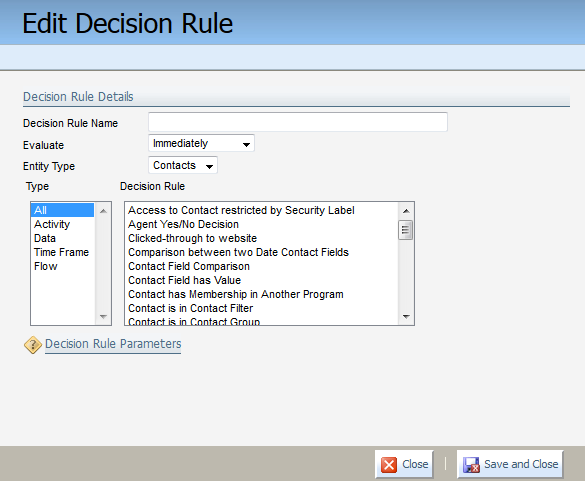
- Configure the Program Step Details.
- Type the name of the rule into the Decision Rule Name. Use a name that reflects the decision rule's function.
- Select a time from the Evaluate drop-down. This is the time between a previous step taking place and the subsequent action.
- Select the entity type. This type is limited to the entity types selected when the previous Program Step Details are configured.
- Click on a decision type in the left Type field, or leave the default All selection.
Click on a decision rule in the right Decision Rule field.
Note: The type you select in the left field will mitigate the decision rules displayed in the right field. The decision rule you select in the right field will mitigate any additional Decision Rule Parameters to configure in the area below.
Configure any additional settings in the Decision Rule Parameters section.
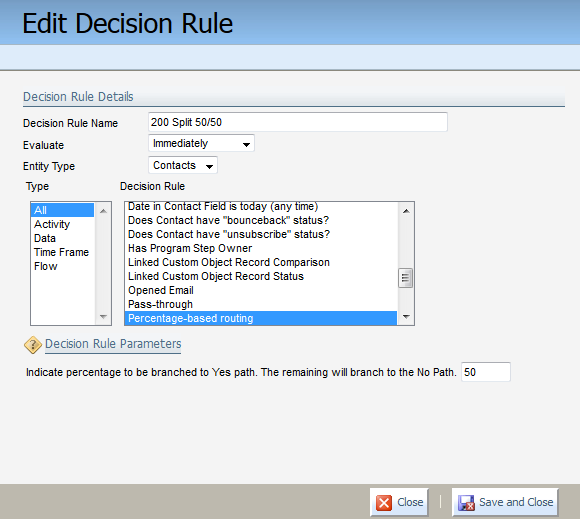
Example: For this example, the decision rule is named "200 Split 50/50." The time rule is set to Evaluate Immediately. The Entity Type in this case is limited to "Contacts" because that is what was selected when the Program Step Details were set above. The decision rule action is Percentage-base routing. As a result of the decision rule, the percentage to be branched to the Yes path (and the remaining percentage to be routed to the No path) is 50.
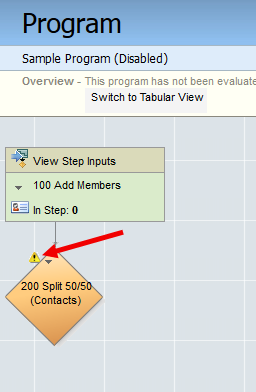
- Click Save and Close. The decision rule is added to the flowchart.
The decision rule is added to the flowchart. However, the decision rule is incomplete until the Yes and No paths are defined. This is indicated by the yellow caution symbol on the decision rule.
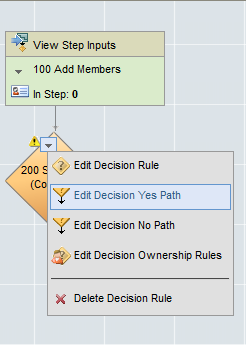
- Click the drop-down arrow on the decision rule, then click Edit Decision Yes Path.
- Select Send to a new step, then click Continue.
- Configure the new step, then click Save and Continue.
Note: This step is configured much like the first step.
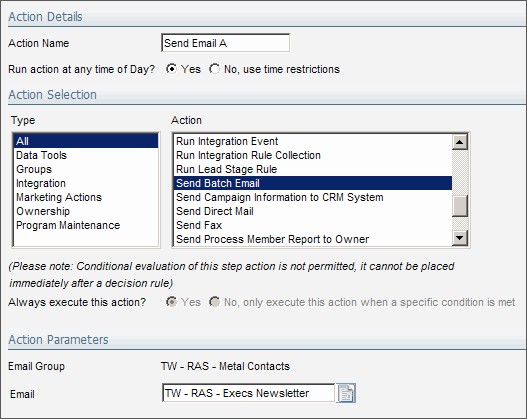
- Configure the step action, then click Save and Close.
Note: This action is configured much like the first step, however the action is "Send Batch Email." Click the button in the Email field to search for and select the email (click on it), then click OK in the Email Search window. The Email Group is shown automatically after this selection.
Note that this step is following a decision rule, so it cannot be conditional ("Always execute" is greyed out). - Click the drop-down arrow on the decision rule, then click Edit Decision No Path.
- Select Send to a new step, then click Continue.
- Configure the new step, then click Save and Continue.
Note: This step is configured much like the first step.
- Configure the step action, then click Save and Close.
Note: This action is configured much like the first step, however the action is "Send Batch Email." Click the button in the Email field to search for and select the email (click on it), then click OK in the Email Search window. The Email Group is shown automatically after this selection.
Now the example program looks like this:

Example: finishing the step paths
We'll finish the Yes and No paths by moving these members on to a lead scoring program.
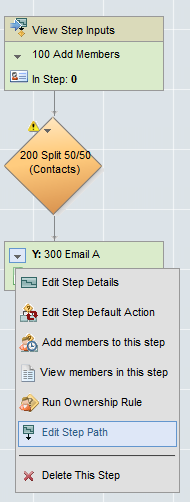
- Click the drop-down arrow on the Yes path, then click Edit Step Path.
- Select Send to a new step, then click Continue.
- Configure the new step, then click Save and Continue.
Note: This step is configured much like the first step.
- Configure the step action, then click Save and Close.
Note: This action is configured much like the first step, however the action is "Move to Another Program." Click the button in the To Program Step field. In the Process Step Search window, you can search on the Program Name or Program Step Name to find the step to which you want to send members. Note the that Program Name is shown in the first column of the results, and the Step Name in the second column. Click on a Step to select it and click OK.
The Yes path is configured. We'll move on to the No step.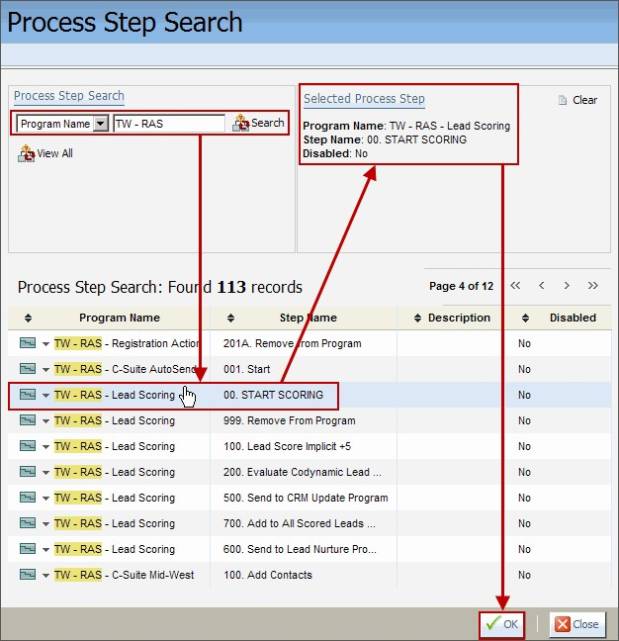
- Click the drop-down arrow on the No path, then click Edit Step Path.
- Select Send to an existing step, click the adjacent drop-down, and then select the same step with which the Yes path ended: "500 Move to LS Program."
- Click Continue.
Example: The sample program flow is now complete, and looks like this: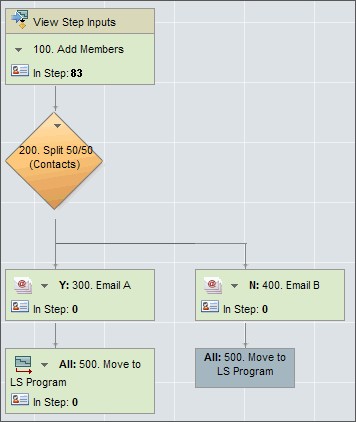
Example: testing and activating the program
Now that the program is set up, you can pass it off to your customer administrator to test the program. You can then enable the program it to begin processing contacts.
To test the program using the test contact group:
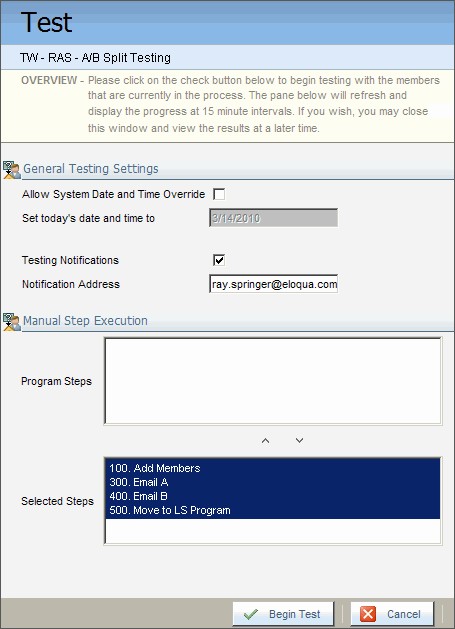
- The administrator must click Program > Test Program in the program flowchart window.
The Test configuration window opens. You can select or deselect the System Date and Time Override options, but leave Test Notifications checked and provide your email address in order to receive a confirmation email. Double-click on all the steps in the Program Steps field in order to move them to the Selected Steps field (you can test up to 5 steps at a time).
-
Click Begin Test. The test results will populate a new window for the administrator. A copy of the results will be sent to the email provided in the Test configuration window.
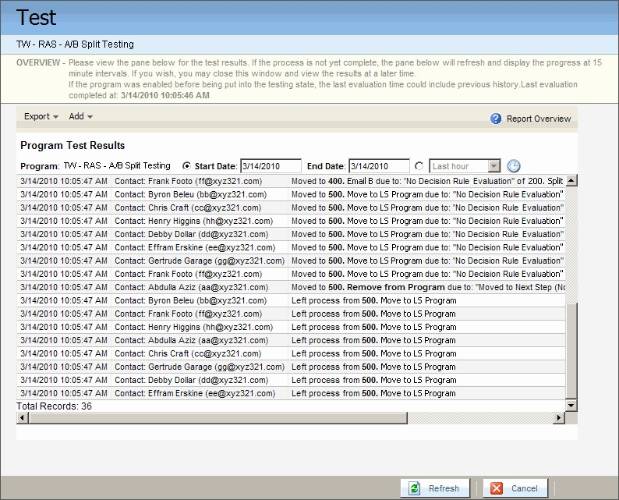
- Checks the results to ensure that the program is doing what it should be doing. Now you must set up the permanent Program Feeder. This will be from a contact group that you want to use consistently for A/B split testing and then feed to a lead scoring program.
- Click Program > Enable Program in the program flowchart window. You will see three options for enabling the program.
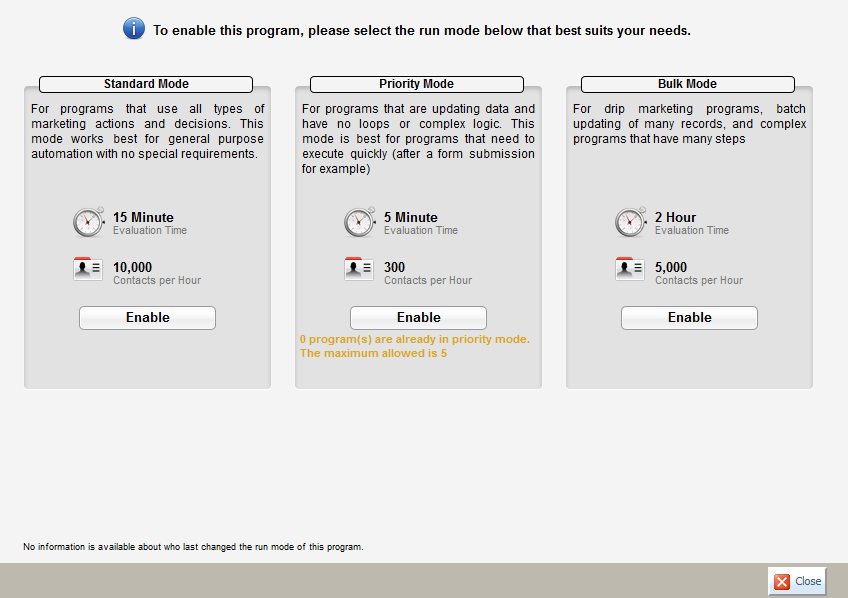
- Click Enable for the correct option.
Note: Each option has its own listed attributes that suite it best for different types of programs.