Create a Destination
Destination is a configured connection that defines where Fusion Unity Data Platform exports data, segments, or audiences. A destination stores the connection details, authentication settings, field mappings, and delivery configuration required to send data to supported Oracle applications, cloud storage services, file transfer servers, or third-party systems for activation and downstream processing.
- Sign in to Oracle Fusion Cloud Applications with a user account that has the required Destination access.
- From the navigator, select and a screen similar to the following is displayed.
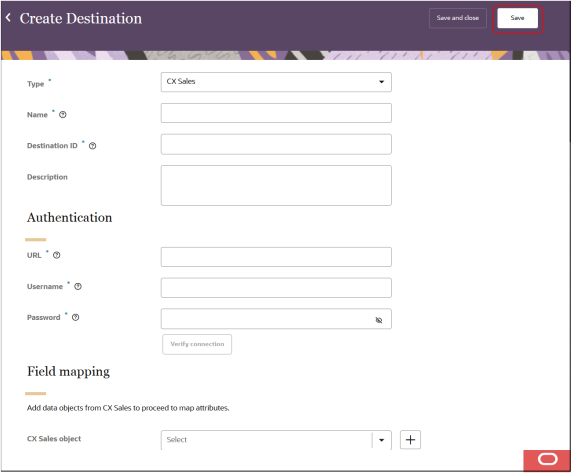
- In the Type field, select CX Sales
- Enter the details for the destination as follows:
- Name: Enter a name. The name must be 1 or more characters, up to a maximum of 50. Use only letters (a–z and A–Z), numbers (0–9), underscores (_), hyphens (-), and spaces. The first character can't be a space.
- Destination ID: When Fusion Unity Data Platform exports data using this destination, it uses this value for the Destination ID attribute of each object. The Destination ID is auto-populated from the destination name you enter. You can't change this value after you create the destination.
- Description: Enter a description. This field is optional, but it's highly recommended to add descriptions for any entity created. This helps all other users get more context when using and navigating the Fusion Unity Data Platform. The description can have a maximum of 512 characters with no restrictions on characters used. You can use characters from all languages supported in the language settings.
- Enter the details for the destination as follows:
Configure Authentication Settings
- URL: Enter the required base URL for your Oracle
Sales instance in this format:
https://<Oracle Sales host name> - Username: Enter the user name to access the URL.
- Password: Enter the password to access the URL.
Field mapping
After creating the data or segments you want to export and configuring the personalization attributes, you can then map the Fusion Unity Data Platform personalization attributes to CX Sales attributes. For example:
-
You can create a master list of mappings in one file for multiple Unity Data Platform segments to one CX Sales object. Each Unity Data Platform segment delivery will use the appropriate mappings from this one mapping file.
-
You can map one Unity Data Platform personalization attribute to multiple CX Sales attributes. For example, you can map the Email Unity Data Platform personalization attribute to more than one CX Sales attribute.