Setting Up Visitor Behavior Tracking
Note: If you've configured the Recommendations module some time ago but are looking for how to enable new features, check out our upgrade instructions: How to upgrade your Recommendations module version.
To successfully set up recommendations in Infinity, visitor behavioral data for actions such as viewed, and purchased need to be collected. This type of behavioral information is essential for the recommendations engine to work.
Visitor Behavior Tracking is implemented by setting up and enabling the Recommendations module within Oracle CX Tag.
Oracle CX Tag helps consolidate multiple tags for the Oracle Marketing Cloud suite of products under a single tag. The individual products are available as modules within the Data Collection application.
Assuming you have the CX Tag already implemented for your website, follow the steps below to set up Visitor Behavior Tracking by enabling the Recommendations module for your CX Tag.
To set up visitor behavior tracking:
-
Navigate to the Recommendations section using the top left navigation menu.
Find Recommendation Workspace ID as shown on the image below.
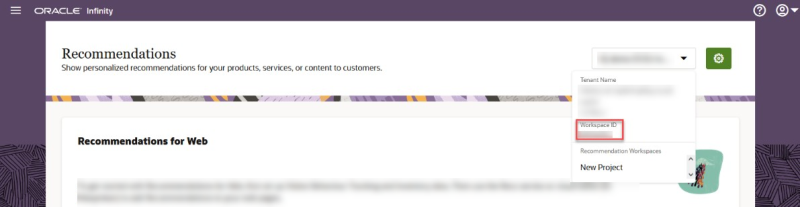
Copy this ID. You will need it soon.
-
Navigate to the Data Collection section using the top left navigation menu.
-
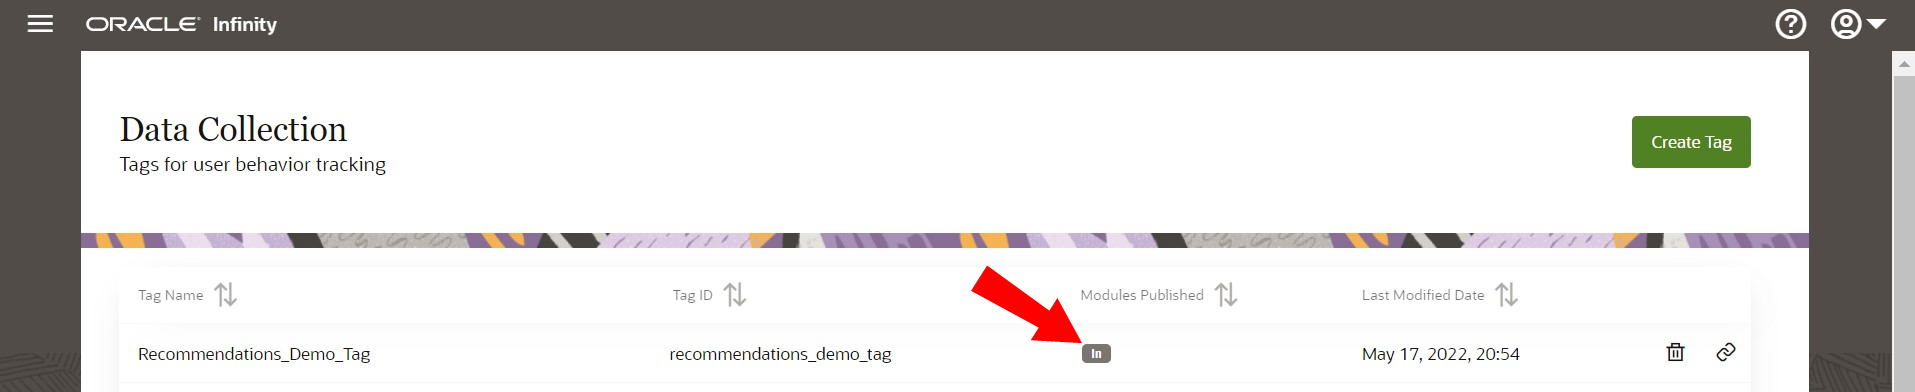
Locate your CX Tag in the Data Collection section. In the example below, you can enable recommendations for the CX Tag Recommendations_Demo_Tag. The modules Published column for this CX Tag shows [In], which means only the Infinity Analytics Module is enabled for this CX Tag.
-
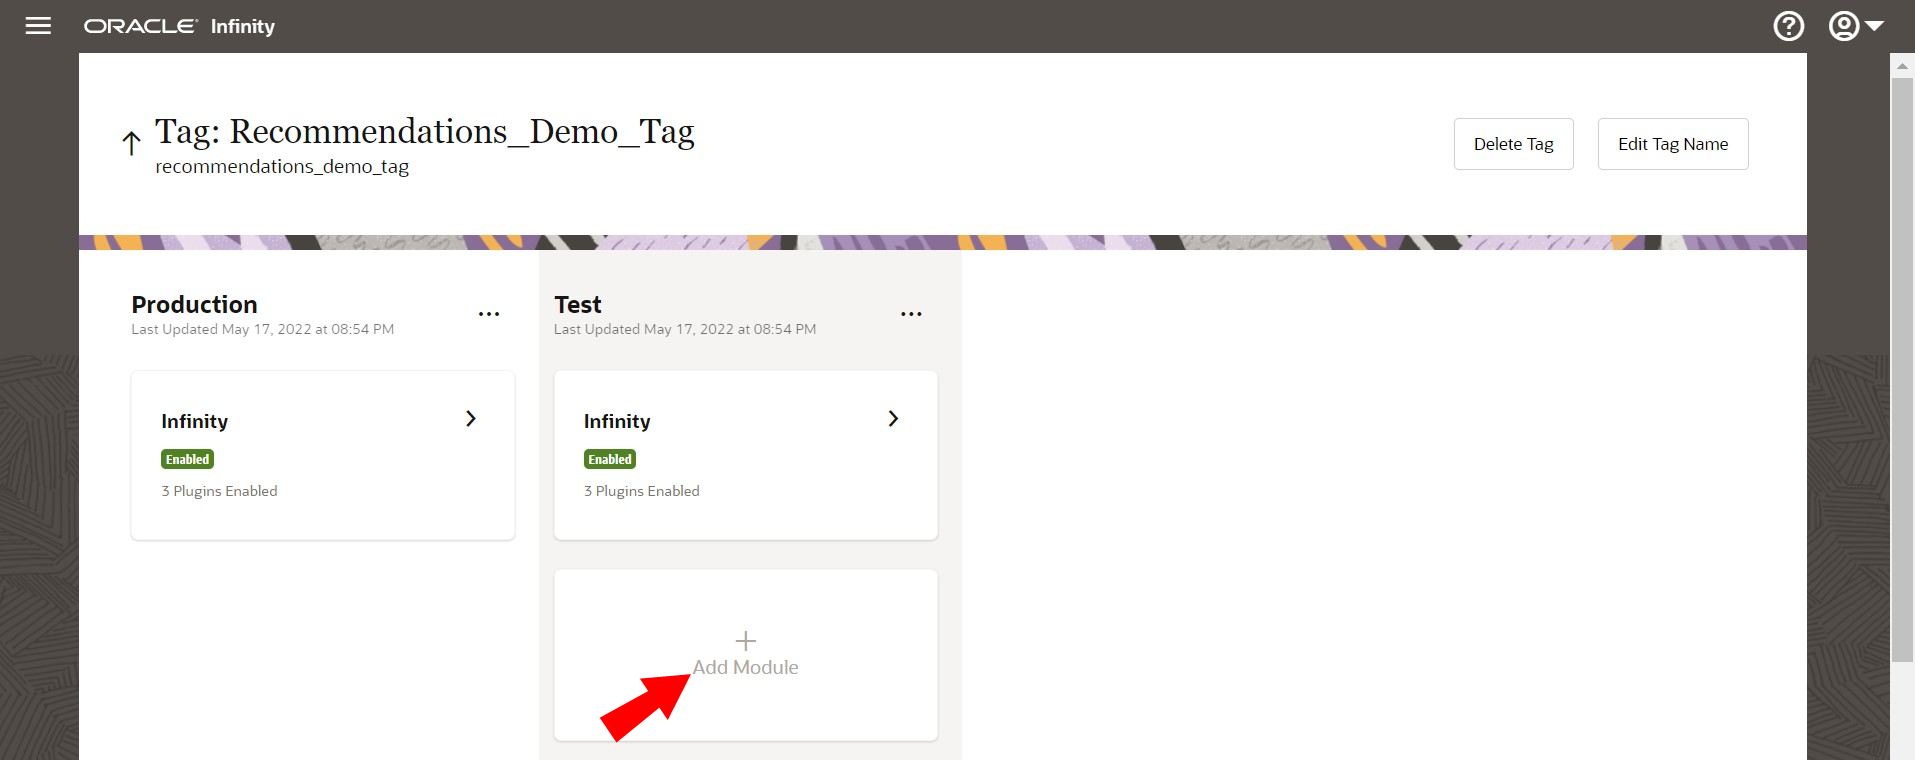
Click the CX Tag name you want to enable for recommendations. The screen below will display.
-
Hover your mouse over the Test section. + Add Module will display. Click + Add Module. The Add module dialog displays.
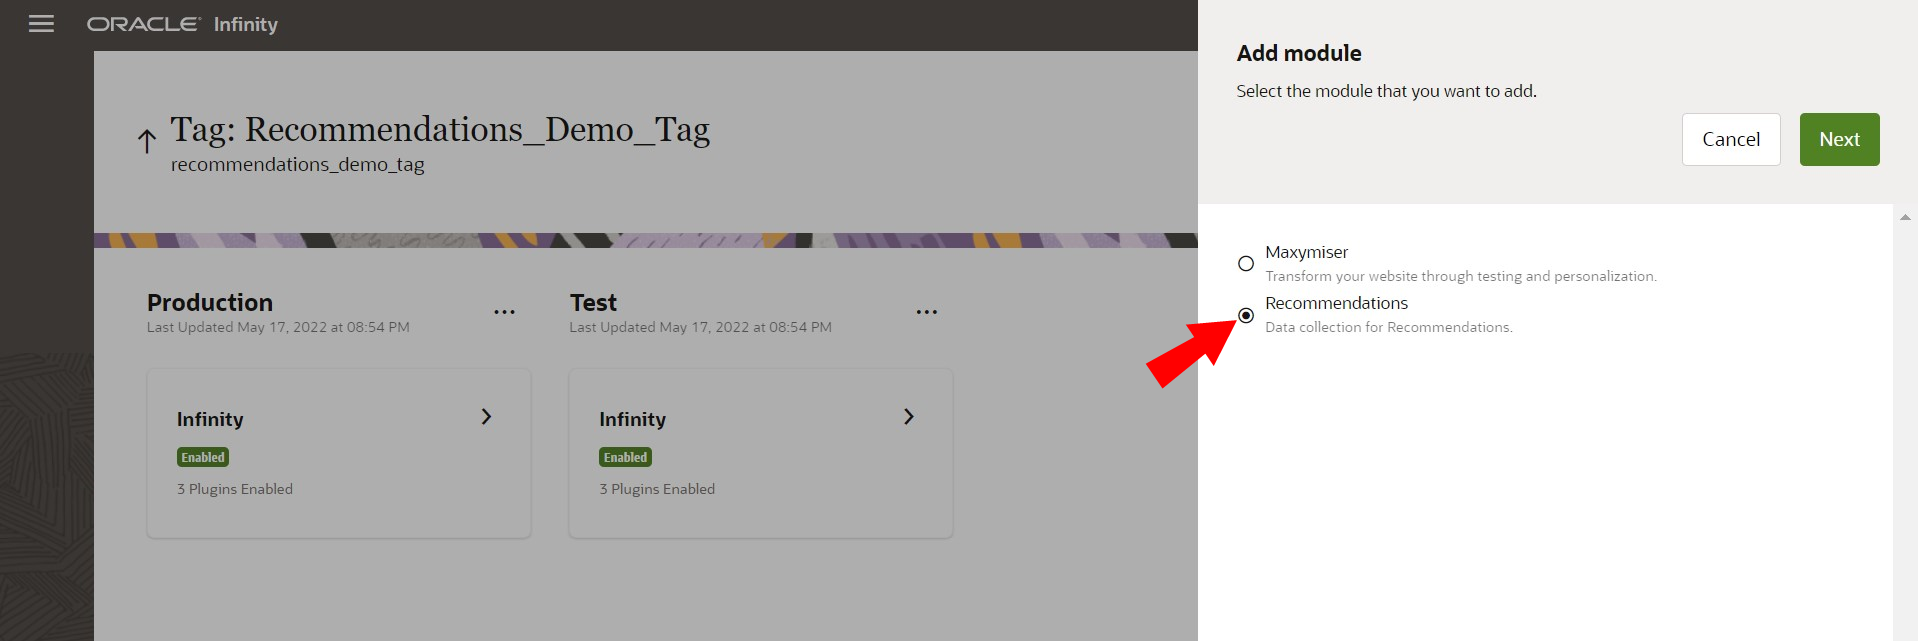
-
Select Recommendations to create a new Recommendations module and click Next. The options for the module display.
-
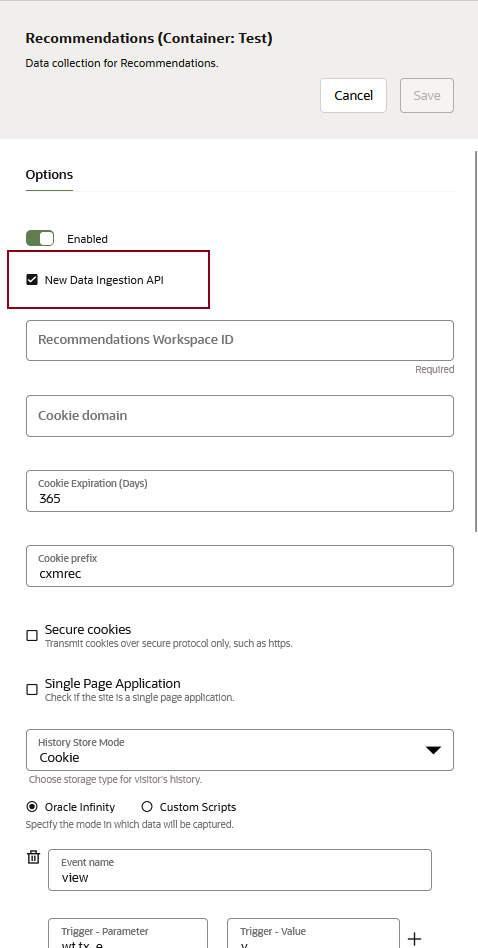
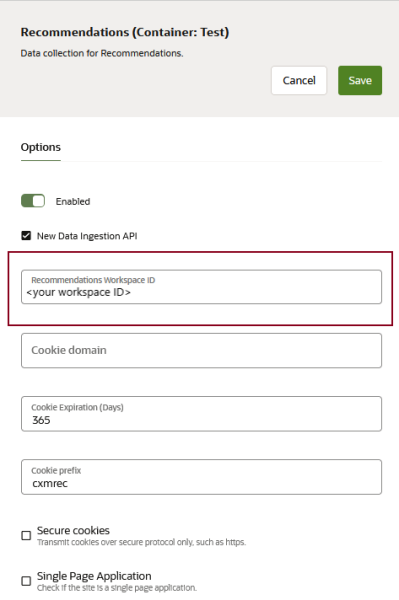
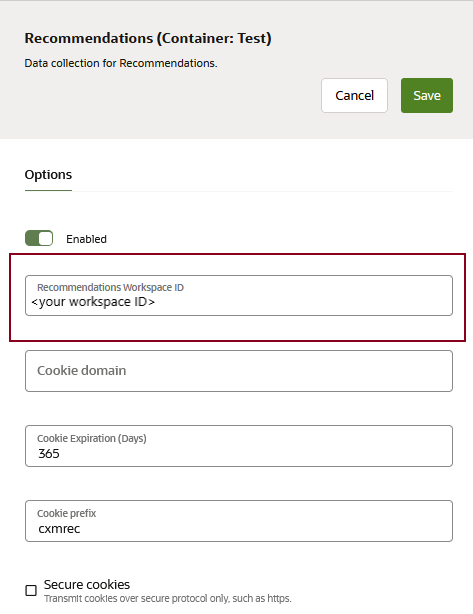
The next screen shows the options available for configuration for the Recommendation module. Refer to Configuration Options for Recommendations Module.
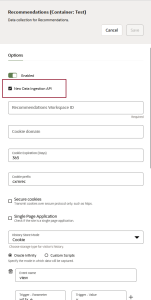
Your need to provide the Recommendation Workspace ID which you've copied on the first step. If you don't have this ID handy, you can put any value here and update it later. You need to provide a valid ID before testing and publishing your CX Tag.
-
Confirm the details and click Save.

Once the configuration is saved, you will be taken to the Tag Detail page.
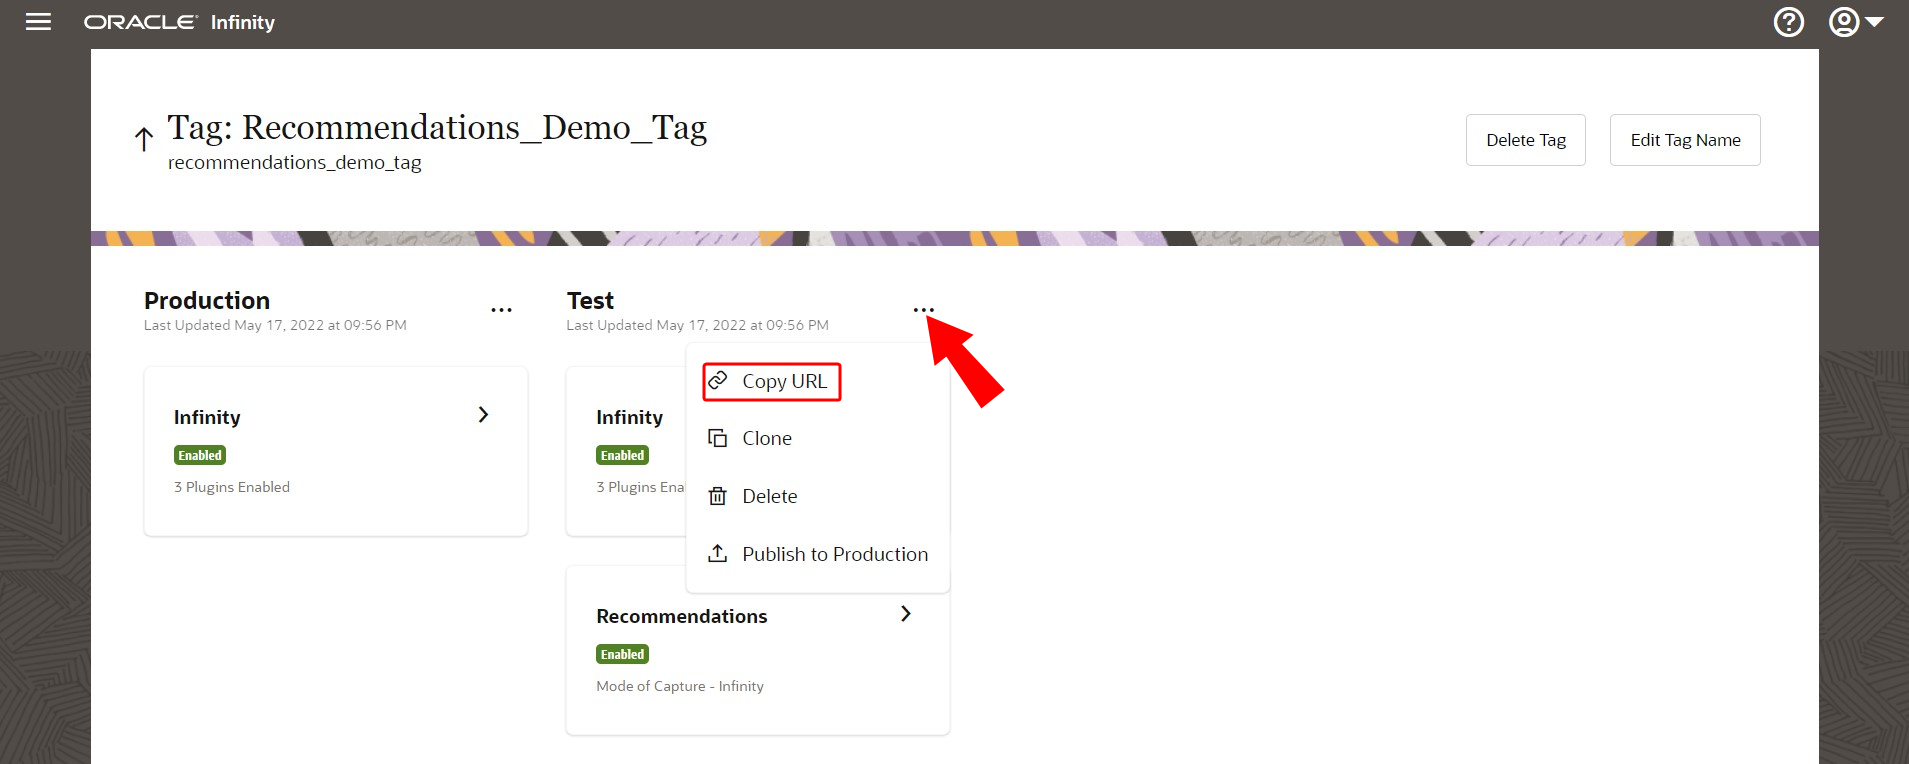
The tag is initially added to a test environment. Once the tag is available in the test environment, you can validate if the tag is working properly and reading all the required events you have set up. To validate the tag, refer to Test tag functionality. Once the validation is successful, you can then use the context menu  to publish the tag to production.
Configuration options for Recommendations module
| Option | Description |
|---|---|
| Enabled or Disabled | Use this option to enable Recommendations for the selected container. |
| Recommendations Workspace ID (Required) |
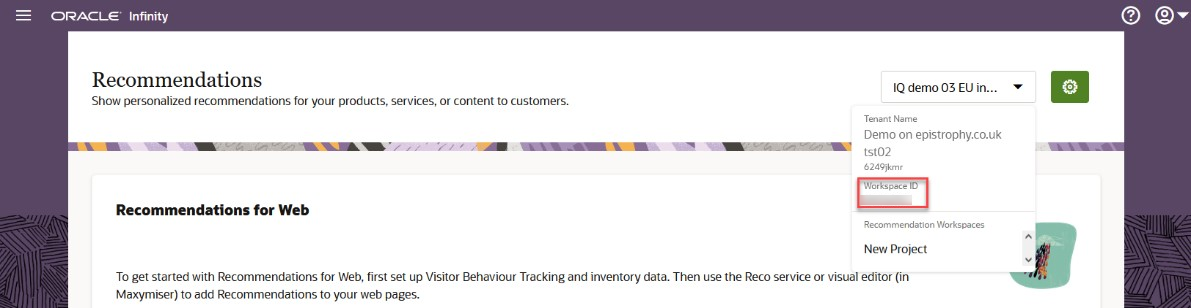
Enter a Workspace ID to receive the data collected by your tag. You can find a Recommendation Workspace ID in the Recommendation Home screen within Infinity IQ. Refer to the image below.
|
| Cookie domain | The domain that Recommendations cookies are set to. Specify only the top-level domain where the campaigns are run. Leave this field empty for auto-detection. |
| Cookie Expiration (Days) | Enter the number of days of visitor inactivity after which an Oracle Recommendations cookie expires. |
| Cookie prefix | Enter a prefix to be used for all Oracle Recommendations cookies. Default cookie prefix is cxmrec. |
| Secure cookies | Indicate whether the Recommendations module should enforce "secure" attribute for the cookies it sets. In case your site works only over https, it is better to enable this option and enforce secure cookies. But in case your site also has an http version available, you should disable secure cookies. |
| History Store Mode | Indicate how visitor history should be stored: with cookies or with local storage. |
| Event Tracking Parameters |
Refer to Event Tracking Configuration. |
| BeforeInit |
Enter your custom JavaScript that runs right before this tag module initializes. It should be provided in a format of JavaScript function. Example:
function() {
 //put your JavaScript here
}
|
| AfterInit |
Enter your custom JavaScript that runs right after this tag module initializes. Example:
function() {
 //put your JavaScript here
}
|
Event tracking configuration
This section contains the necessary settings for event tracking in the Recommendations module. The module currently supports two types of events: view and purchase. By default, the Recommendations module listens to standard Product View and Product Purchase E-Commerce events. See CX Tag Quick Start : Firing E-Commerce data with the CX Tag.
The image provides the default event configuration, which is automatically populated when a new tag module is created. You don't need to change it if you use a standard implementation of E-Commerce events.
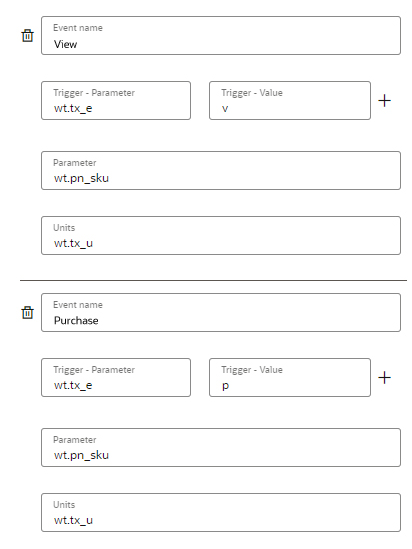
- Event Name: This specifies the action that triggered the event. Currently, only events named "view" or "purchase" are supported. Events with any other names will be ignored.
- Trigger - Parameter: This defines the event parameter to listen to in order to recognize the type of event. In the standard implementation of E-Commerce events, this parameter is wt.tx_e.
- Trigger - Value: This specifies which value of the trigger parameter describes the needed event. In the standard implementation, v means product view and p means product purchase.
- Parameter: This describes where to get the item or product ID for which the event is triggered. In the standard implementation of E-Commerce data tracking, it is wt.pn_sku.
- Units: This specifies where to take the number of items in the event, which is applicable for the purchase event. In the standard implementation of E-Commerce data tracking, it is wr.tx_u.
The parameter names for Trigger Parameter, SKU , and Units may vary depending on how your Infinity Analytics module was set up. If you are not sure, please reach out to your account manager to identify the variable names to be used for Trigger Parameter, SKU and Units. If the parameters are now properly configured, Recommendations will not get the data corresponding to these events (View and Purchase).
Test tag functionality
Once the test environment for the tag is ready, you can copy the tag URL by clicking the context menu for the test environment and clicking Copy URL.
There are two ways to test the tag to ensure it can be published to production:
-
If you have a QA environment for your website, you can set up the test tag URL directly on the website.
-
If your website doesn't have a separate QA environment, you can complete the steps below.
To test a tag without using a QA environment:
-
From the previously copied tag URL, you need to take _ora.config parameter, which is in the end of it. For example, if you were editing tag configuration named Test, your parameter will look like the following: ?_ora.config=recommender:test;analytics:test. It may be different depending on the name of the tag configuration you use for test and the list of tag modules you have.
-
Open any product detail page on your production website and append the URL with the following: &_ora.debug=vv&[_ora.config parameter with its value you've copied from the previous step]
Please note that you need to add ? instead of & before _ora.debug if your URL has no other parameters. If there are some parameters you need to use & before _ora.debug
-
_ora.debug=vv enables debug mode for your tag which allows to test and troubleshoot the new tag configuration
-
_ora.config with the value you copied from the tag configuration menu applies this configuration to the tag in your browser
Example:If your testing configuration of the CX tag is called Test and you have only Analytics and Recommendations module enabled, your _ora.config parameter in the copied tag, the URL will be: _ora.config=recommender:test;analytics:test.
If the product detail page URL for your website is https://www.sample.com/product.php?someparam=somevalue then you would update the test URL to the following: https://www.sample.com/product.php?someparam=somevalue&_ora.debug=vv&_ora.config=analytics:test;recommender:test.
If the original product detail page URL does not have any parameter and looks like https://www.sample.com/product.php, then you would update the test URL to the following: https://www.sample.com/product.php?ora.debug=vv&_ora.config=analytics:test;recommender:test.
-
-
Open Network Tools in your browser by using Function Key + F12.
-
Refresh the product detail page again with the _ora.config parameter appended to the URL.
-
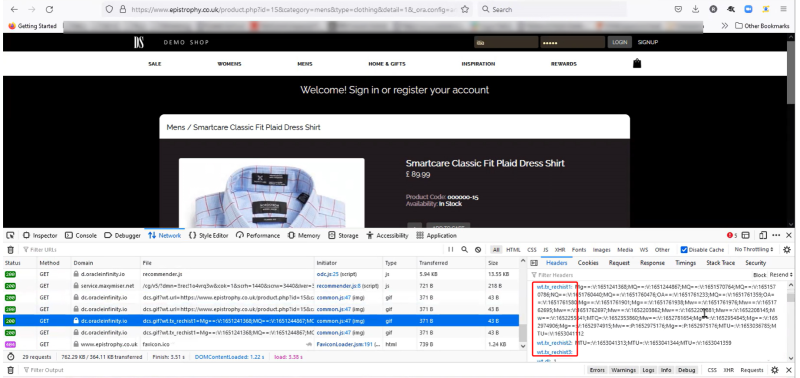
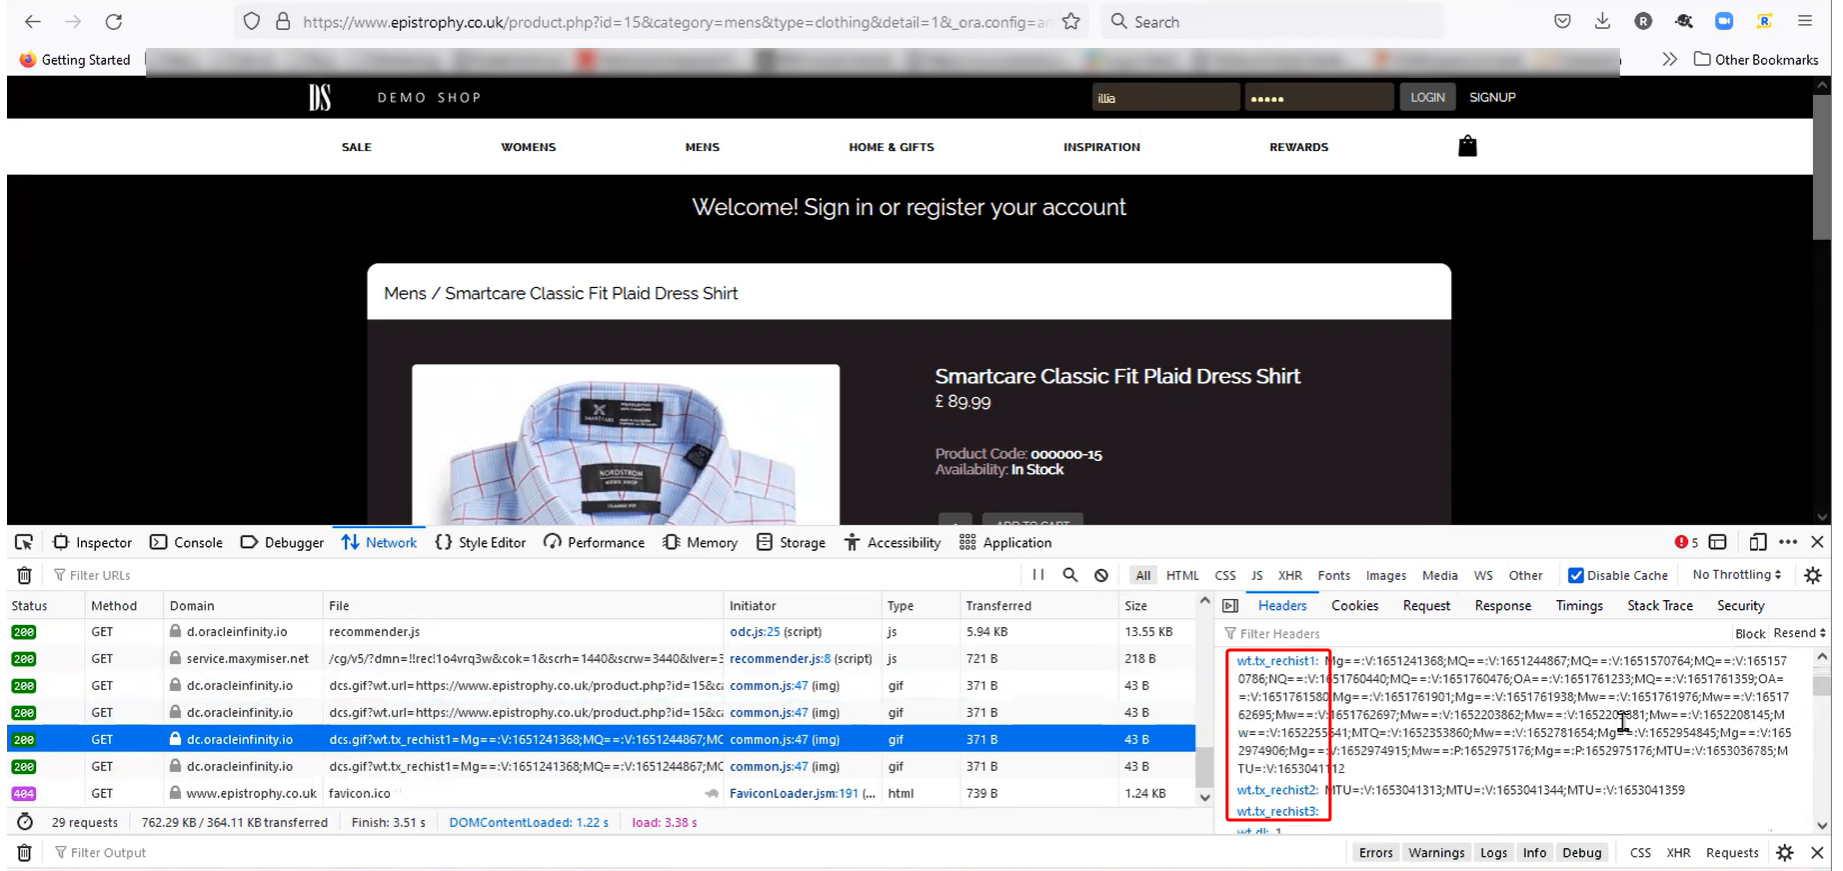
You should notice that recommender-test.js script should be loaded and the site variable in the network call should be the same as the site defined in Recommendation Tag setup done in the Data Collection section. Compare that site name is the same one configured in the Data Collection section while creating the tag. Refer to the image below showing that the correct test tag is loaded on the website.
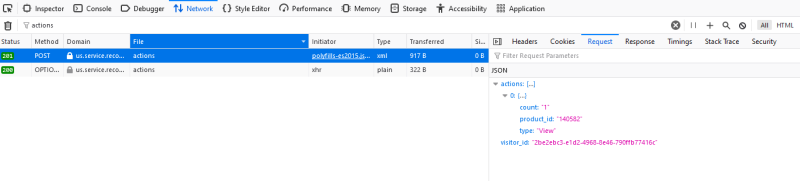
- In the network tab search for requests having "service.recommendations.ocs.oraclecloud.com/apps/dia/".
The full request URL may look like:
- https://eu.service.recommendations.ocs.oraclecloud.com/apps/dia/v1/projects/[Your workspace ID]/actions
- https://us.service.recommendations.ocs.oraclecloud.com/apps/dia/v1/projects/[Your workspace ID]/actions
The response code should be 201 - created. That means that the Product View event has been successfully registered by the system.

-
You should validate that the right View event with the correct product ID is being passed to Recommendations as shown below.
-
The Recommendation module should be sending the history data to Infinity using the tx_rechist1, tx_rechist2, and tx_rechist3 variables. The name of these variables will depend on your tag implementation.
-
Similar to validating the View event, test the Purchase event.
Make a purchase on your website. The data for the purchase event should be sent to Recommendations module. Validate if the WorkspaceID is correct as set up during the Recommendation module setup in the Data Collection section.
Validate that the purchase data is collected correctly.


Once you have performed the testing to ensure the tag is correctly sending event data for the View and Purchase events, you can publish the test tag to production.
Publish the tag to production
Once testing is successful, the tag can be pushed to production.
To publish the tag to production:
-
Visit the Data Collection page.
-
Click the name of the tag you want to publish.
-
In the Test section, open the context menu
for the tag and click Publish to Production.
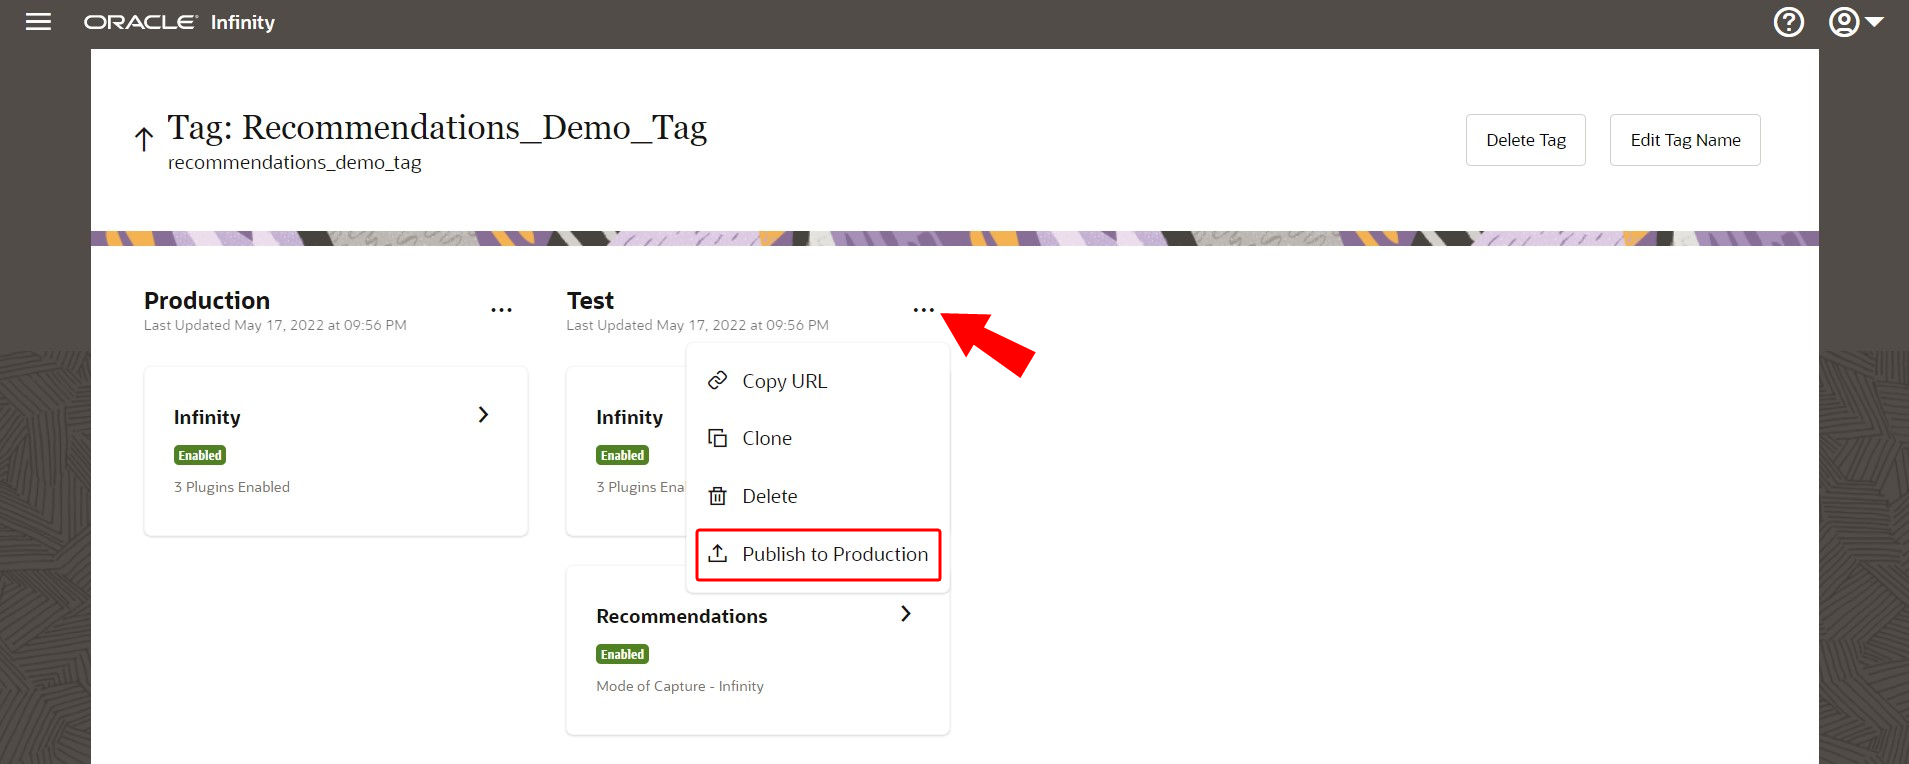
Once the tag is deployed to production, visitor behavior tracking should be enabled.
How to upgrade your Recommendations module version
Some new features may require a newer version of the Recommendations module than the one available when you initially set it up. Currently, the latest version of the Recommendations module is 5.0.1.
To upgrade the module:
-
On module configuration editing panel switch to Advanced option tab. You need to have Tag Consultant role for Data Collection to access this tab. Learn more.
-
In the JSON editor change moduleVersion value to 5.0.1 so the line looks like
"moduleVersion": "5.0.1". -
Switch back to Options.
-
Save changes and perform testing as described above.