Tag Consultant Role
The Tag Consultant role helps advanced users to administer tags to implement customers' digital strategies. All of the capabilities that are available in the Tag Consultant role are highly recommended to be exposed to advanced users with complete knowledge of all the capabilities.
In this section, you'll learn about:
Using the Data Collection application
Managing Roles and User Access in the Data Collection application
The following section enables you to determine and assign roles, along with access rights for various users who will administer the CX Tag for your organization. The Account settings pages enable you to grant the relevant roles, groups, and access rights. Learn more about Account settings.
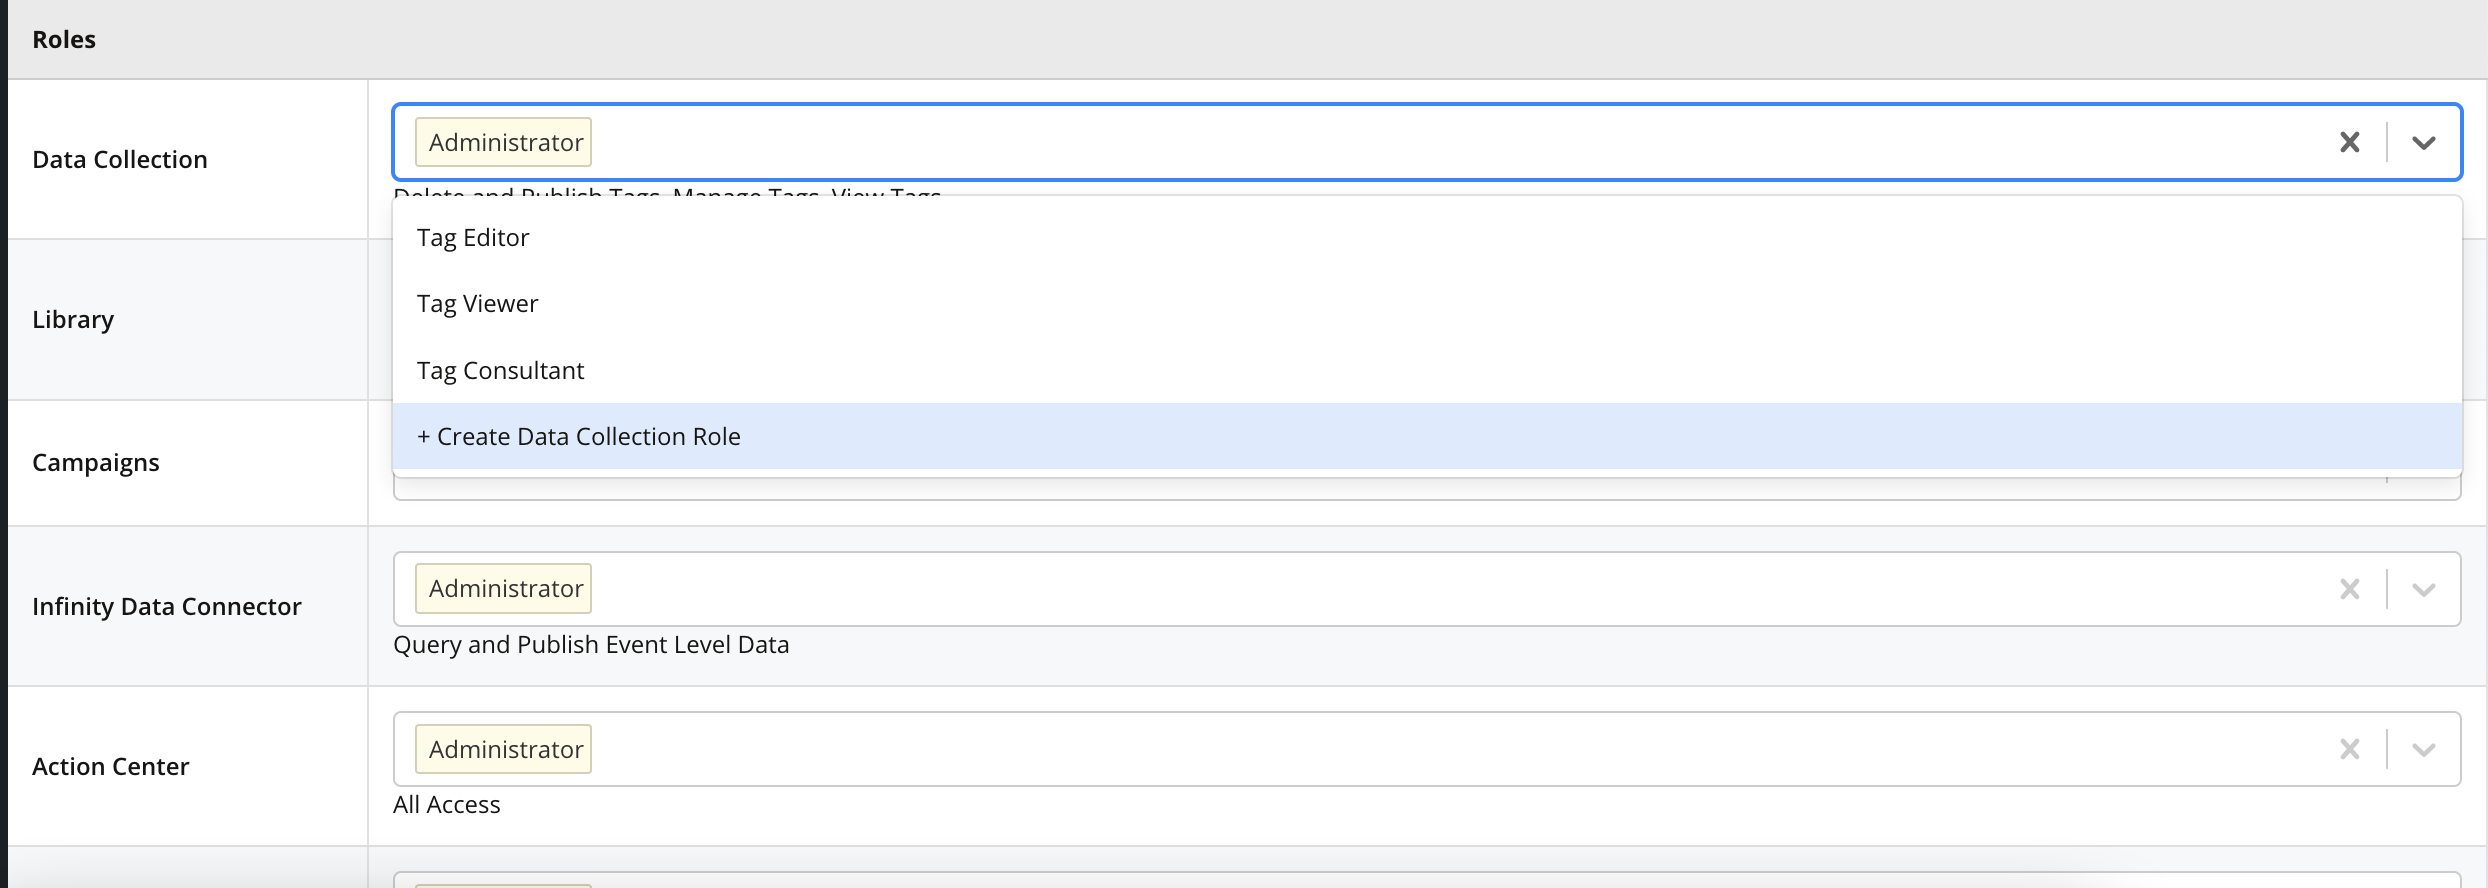
You'll be able to see the below available roles for the Data Collection.
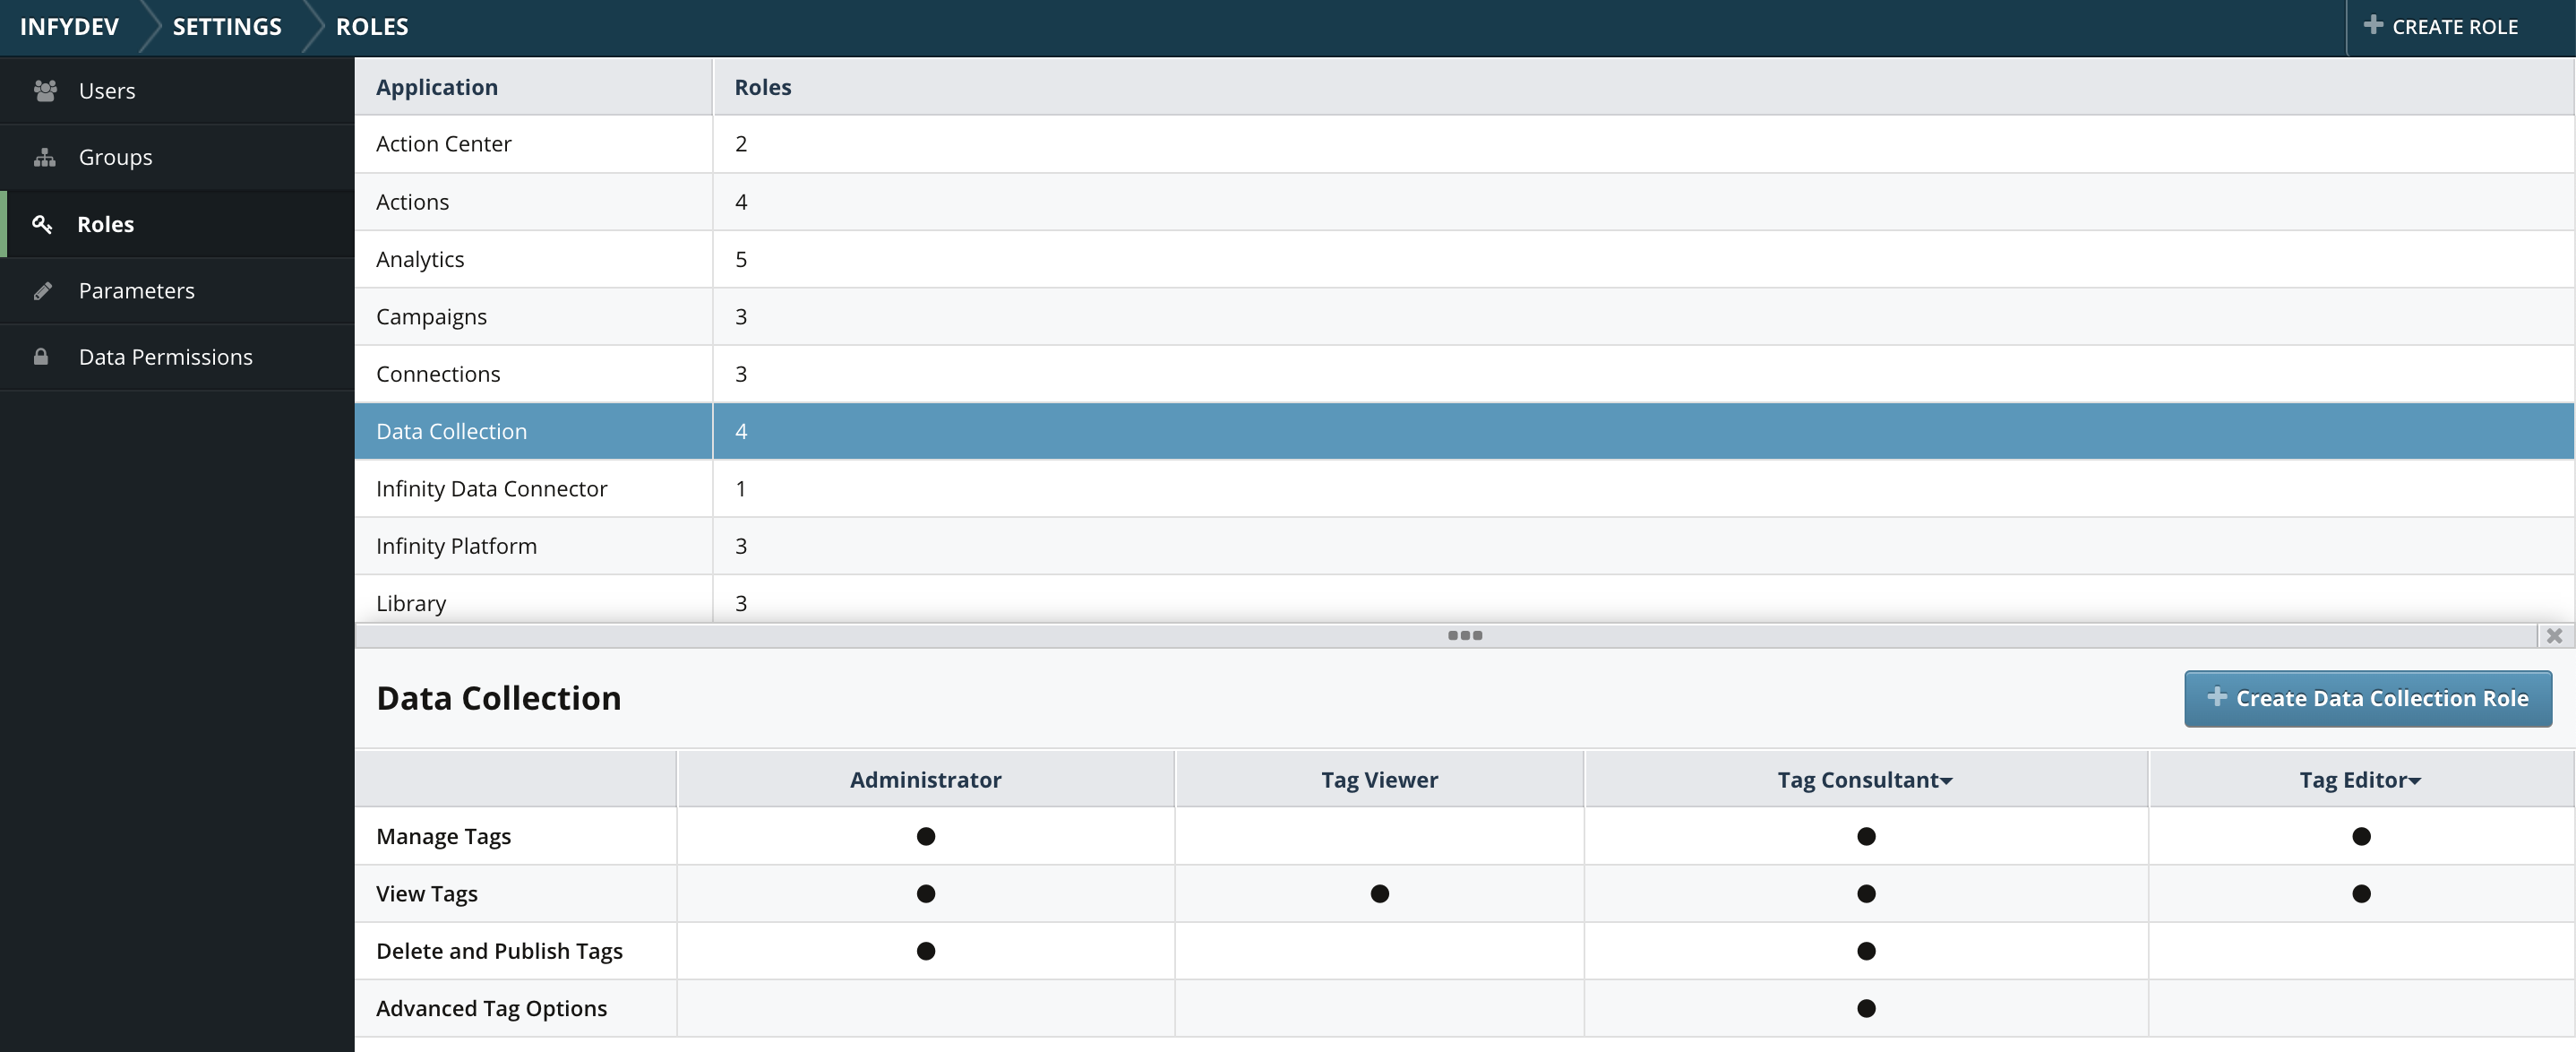
And you can assign the Tag Consultant role to perform the required actions in the Data collection application.
Warning: The Tag Consultant role is specifically designed for advanced users to configure the advanced tag administration options. Access to this role should be only given to users with complete knowledge of these advanced tag administration options. Changes performed to these advanced tag administration options might impact your tag data collection.
Managing tags
Creating, editing, and managing the tags remain the same for the Tag consultant role.
Learn more about generating tags and implementing tags.
Managing the modules in a Tag
With the Tag Consultant role, you'll now be able to see the advanced options for each module.
Editing the Infinity module
Navigate to the tag details page by clicking the desired tag on the page containing the list of tags for the account. You will see the Tag Name as the title of the page and the Tag ID underneath it. The name of the container and the modules are displayed in the container on the main page. The modules are available as labels on the page. Learn more about the Infinity module.
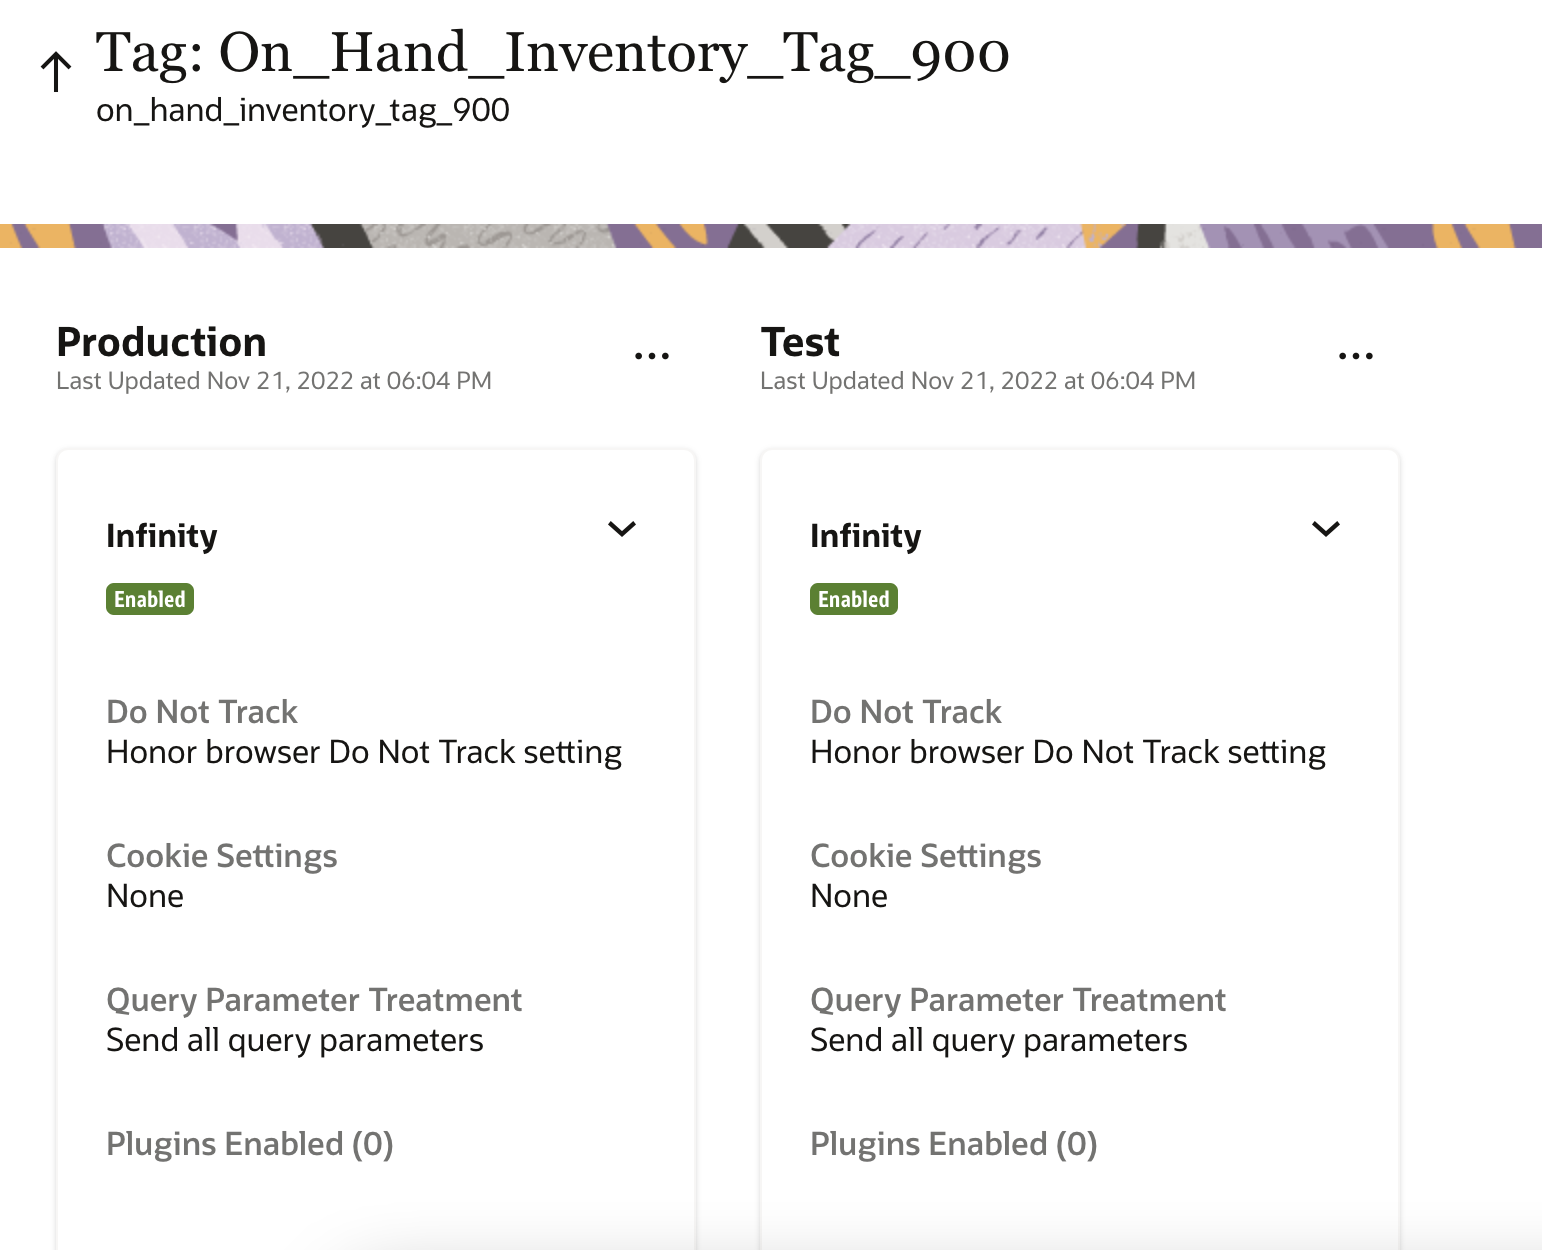
The Infinity module’s status in the context is indicated by a colored status box named Enabled. To continue editing the Infinity module, click the label. A slider pane containing the configurable options for the module (namely Options, Plugins Added, and Advanced Options tabs) are displayed.
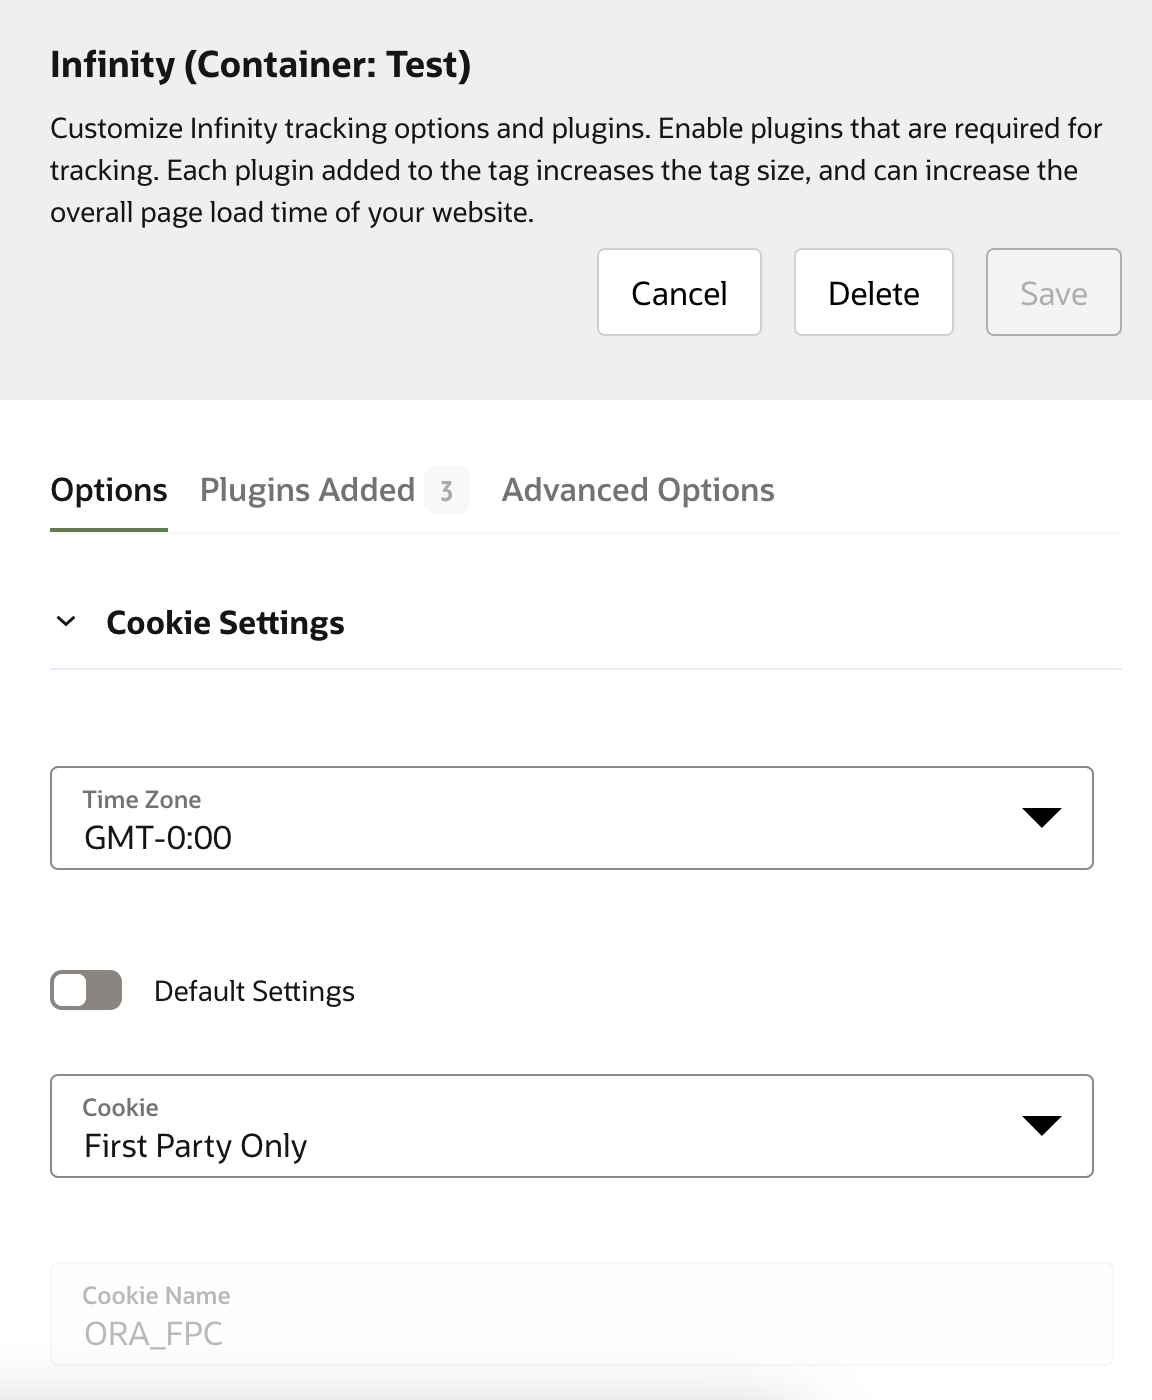
Editing the module options
The following module options are available for editing by the user with the Tag Consultant role:
| Sections | Option / Sub-option | Values | Description |
|---|---|---|---|
| Cookie Settings | Time-Zone | Time zones in GMT | This is used to calculate the Cookie Expiry date |
| Default Settings | Enable |
When enabled, it uses the default values. |
|
| Disable |
When disabled, it allows the below settings to be edited by the user. |
||
| Cookie: This property enables you to set first-party cookies for the tag. | First-Party only | Sets the cookie in the end user’s system as a first-party cookie. | |
| None | Does not set a first-party cookie. | ||
| Cookie Name | ORA_FPC | This is read-only. | |
| Cookie Expiry | 365 | Enter the number of days of visitor inactivity after which an Oracle Infinity cookie expires. | |
| Cookie Domain | Default | This is read-only. | |
| Session Only cookie | True/False | Set to expire after the session (will generate new Infinity Visitor ID). | |
| Secure Cookie | True/False | Transmits cookies only over a secure protocol, which is HTTPS. | |
| Automatic Cookie TLD | True/False | Set to automatically calculate cookie domain (if unchecked, use the 'Cookie Domain' field to define cookie domain). | |
| Load Options |
Disable Tag Load |
True/False |
Disables the module from initiation. |
| Always Load Tag | True/False | ||
| i18n | True/False | ||
| Enable Analytics Tag | True/False | Disables the Infinity data collection. | |
| Disable Collect on Init | True/False | Check to stop the automatic initial View Call from firing upon page load. | |
| Wait for Set Client ID | True/False | Stops automatic View Call from firing on page load unless Client ID is explicitly set on each page load. Learn more. | |
| Custom Init Rules | True/False | Allows custom init rules to be set. | |
| Dom Element to Insert After | HEAD | This is read-only. | |
| Advanced Features | Do Not Track: This property can be used to set the Tag to honor the user preferences set in the browser settings. |
Honor browser Do Not Track setting
|
Does not collect any data.
|
| Anonymize session if browser Do Not Track setting is set | The tag ignores the Client ID from previous visits and collects data from the session as an anonymous user. | ||
|
Ignore browser Do Not Track setting |
Ignores the setting in the browser and proceeds to collect the data. |
||
| Query Parameter Treatment* |
Skip query parameters with no value
|
Parameters that are not assigned a value are not collected. For example:
In this example, |
|
|
Skip query parameters with no value and equals |
Parameters that are not assigned a value, and also those which have an equals symbol without a value are not collected. For example: In this example, |
||
| Don't send query parameters |
All query parameters are ignored. |
||
|
Send all query parameters |
All parameters tagged to a URL are captured. | ||
| Tag Configuration | Allows the user to define at least one account GUID to send the data collection calls. |
Note: *Query parameters are a set of parameters and values that are passed by appending them to the end of the URL. These parameters can be used to define actions based on the data being passed in the query parameters. This option helps to select how the query parameters can be captured and passed on to Infinity.
Plugins
Plugins can be used to further customize the behavior of the Infinity module. A list plugins supported by the Infinity module are available in the List of Available Plugins section. When a tag is created with the Infinity module, the following plugins are added to the tag and are disabled by default. If the plugins are sufficient for your requirement, copy the Tag URL and deploy it in your website, or web application.
-
Cross Domain
-
Event Tracker
-
Persistent Parameters
There are different actions that you can perform in the plugins section. Like adding a plugin, Enabling/Disabling the plugin, or Removing a plugin. Learn more about plugins.
Modifying the Plugin options
For the Tag Consultant role, now all the plugins have configurable options that help you modify the plugin behavior. To modify the plugin behavior click Edit  next to the plugin name.
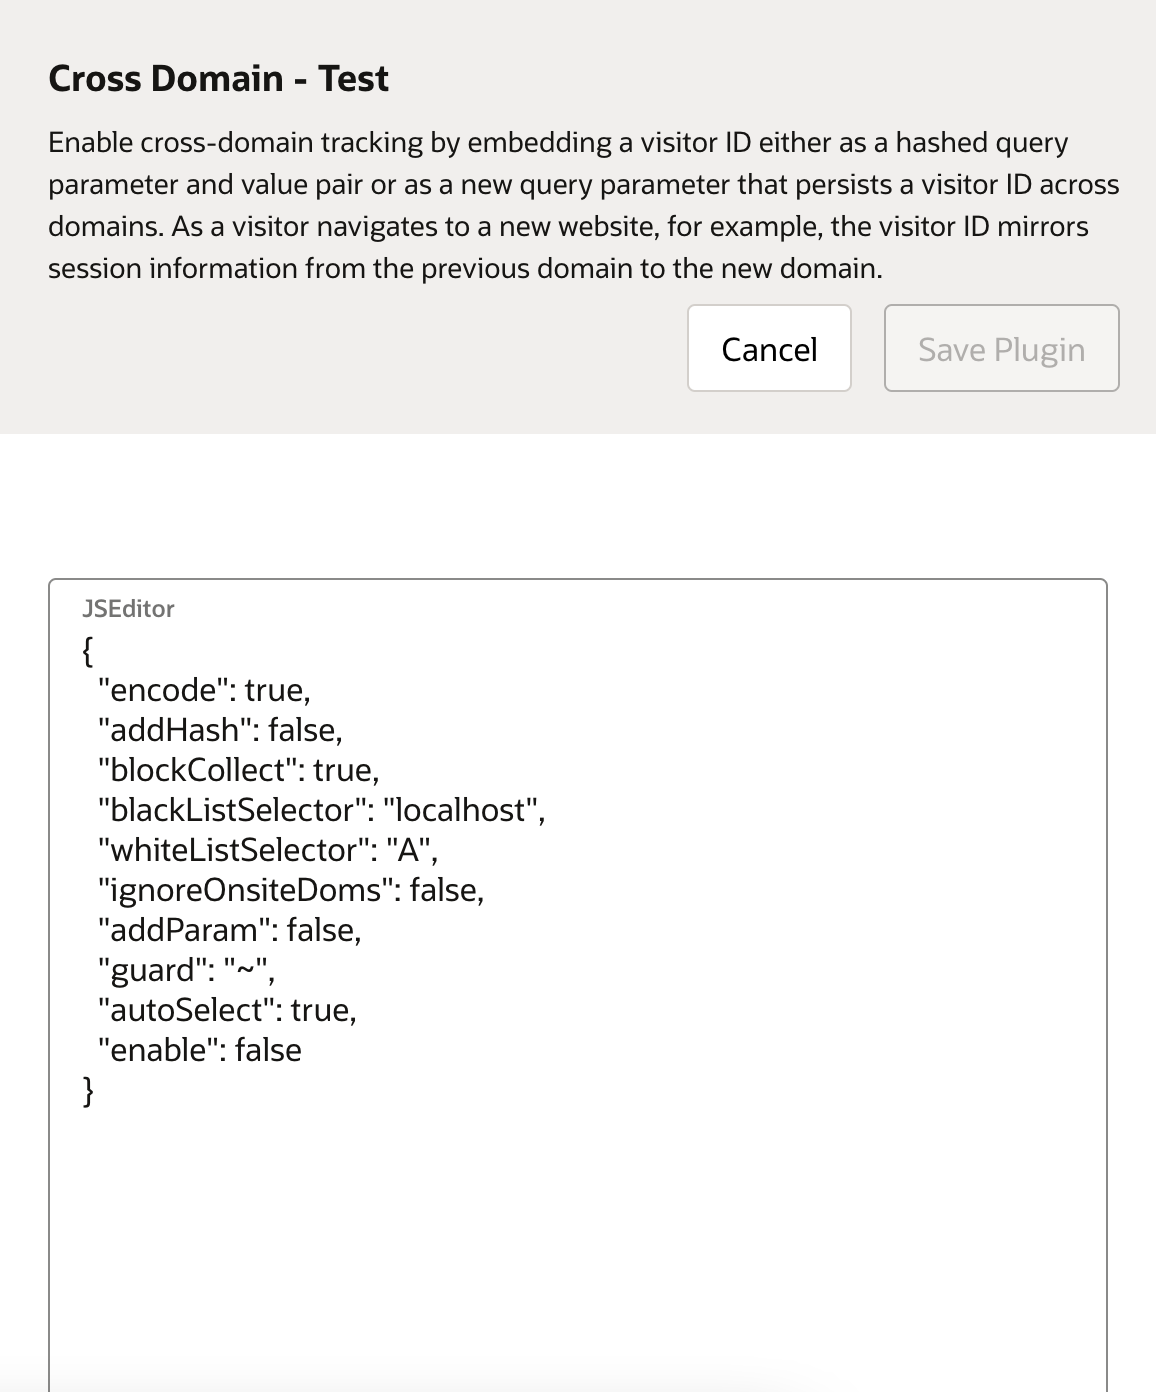
A new slider pane appears displaying the parameters that are required for editing the plugin in a JSON form editor.
As an example, the options for the Cross Domain plugin appear as shown in the following image. The Save Plugin button is disabled until you make changes to the plugin options.
After you click Save Plugin, you are returned to the Options slider pane. Click Save on the Options slider pane.
Clicking Save persists the changes to the module, and the Tag details screen appears after a successful save.
Editing the Advanced options
Now you can see an additional tab - Advanced Options for the Tag Consultant role, where you can find the advanced module options of the Infinity module.
The Advanced options display the options that are required for editing in a JSON form editor. The Save button is disabled until you make changes to the advanced options.
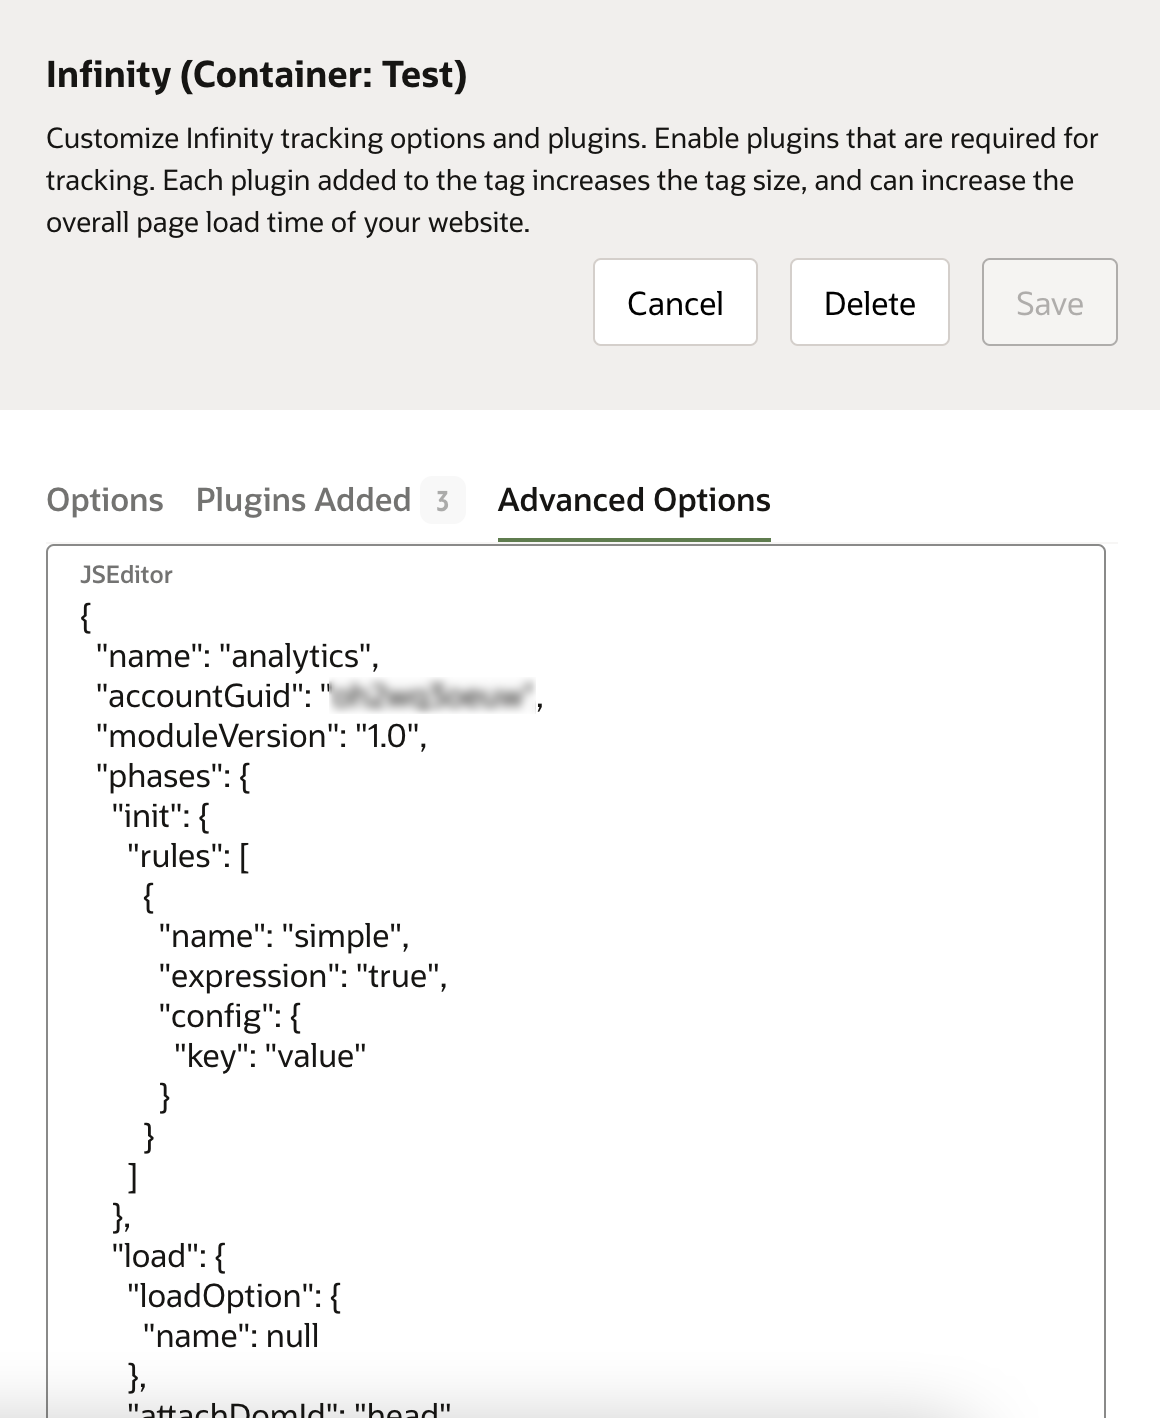
Clicking Save persists the changes to the module, and the Tag details screen appears after a successful save.
Editing the Recommendations module
See the Infinity Help Center for more information on the Recommendations module and managing the Recommendations module.
Editing the Advanced options
Now you can see an additional tab - Advanced Options for the Tag Consultant role, where you can find the advanced module options of the Recommendations module.
The Advanced options display the options that are required for editing in a JSON form editor. The Save button is disabled until you make changes to the advanced options.
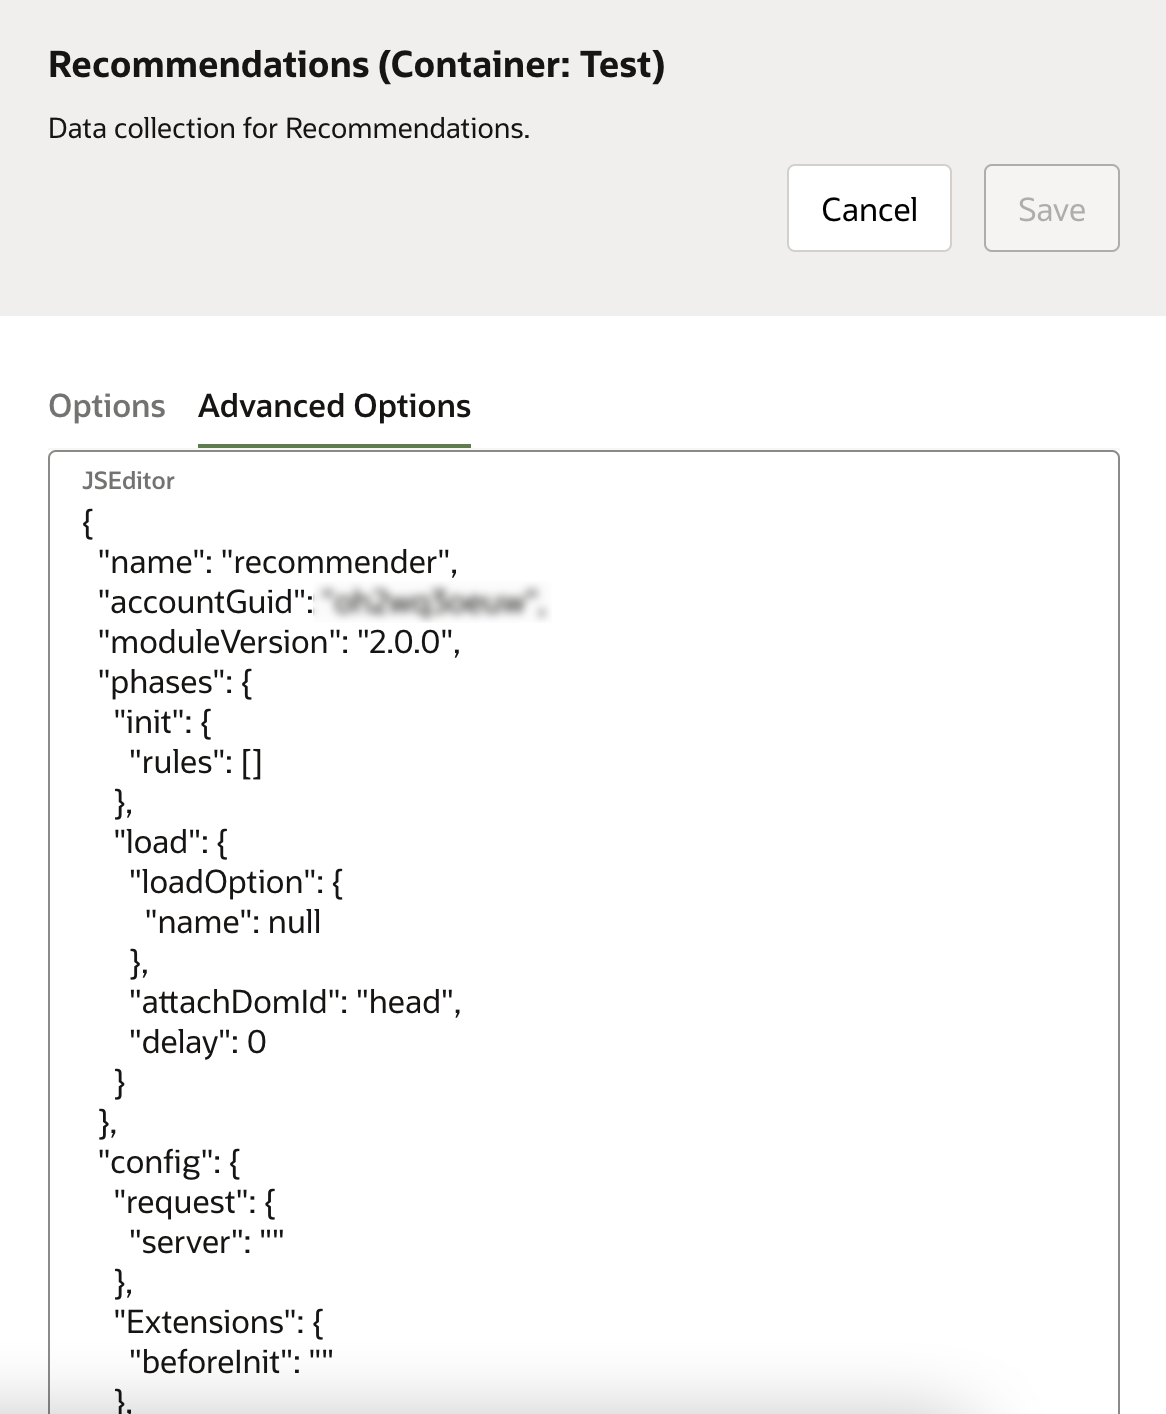
Clicking Save persists the changes to the module, and the Tag details screen appears after a successful save.
Advanced Tag options
The Advanced Tag options screen shows a JSON view with configuration options specific to a module. Below are some of them:
| Parameter | Parameter | Description | Sample Value |
|---|---|---|---|
| name | Describes the name of the module | analytics, recommender | |
| accountGuid | The unique account ID of your account | Alphanumeric | |
| moduleVersion | Indicates the version of the module | 3.0.0 | |
| phases | It indicates the phases available in the tag life cycle. You can add your custom scripts to different life cycles. Look below for some examples. | INIT, PREINIT, LOAD, POSTLOAD etc. | |
| config | It has all the configurations (Module Options , Plugins, if any) of your module. This configuration is specific to your module. | ||
| createdAt | The timestamp of when the tag is created. | 2023-05-10T08:58:53Z | |
| updatedAt | The timestamp of when the tag is updated. | 2023-05-10T08:58:53Z | |
| id | The unique ID of the tag | 27e2fea7-fb7f-48f0-bd8d-3b46ce78c600 | |
| container | |||
| name | Name of the container | test | |
| accountGuid | The unique account ID of your account | 1adsfadsf123 | |
| live | This specifies if the container is live. | false | |
| commonCDN | If enabled all CX tag assets will be available in a common CDN | true | |
| tagUrl | This is the URL of you Tag. | https://d.oracleinfinity.io/infy/tag/account/js/analytics/odc.js | |
| createdAt | The timestamp of when the container is created. | 2023-05-10T08:58:53Z | |
| updatedAt | The timestamp of when the container is updated. | 2023-05-16T10:50:28Z | |
| tagGuid | The unique ID of your tag | f40518df-e7ca-46e9-afcc-a89c0f97fb01 | |
| id | The unique ID of the container | da10b865-2d3b-460a-b5fa-bc933b158596 |
Note: The other configuration options that are available under the config object are available in the Form-based UI in the other tabs such as Options and Plugins if applicable.
Example - Advanced options
{
  "name": "analytics",
  "accountGuid": "asdfadsf",
  "moduleVersion": "1.0",
  "phases": {
    "init": {
      "rules": [
        {
          "name": "simple",
          "expression": "true",
          "config": {
            "key": "value"
          }
        }
      ]
    },
    "load": {
      "loadOption": {
        "name": null
      },
      "attachDomId": "head",
      "delay": 0
    }
  },
   "config": {
    "ora-plugins": {
    }
  },
  "createdAt": "2023-05-10T08:58:53Z",
  "updatedAt": "2023-05-10T08:58:53Z",
  "id": "27e2fea7-fb7f-48f0-bd8d-3b46ce78c600",
  "container": {
    "name": "test",
    "accountGuid": "aasdfasdf",
    "live": false,
    "commonCDN": true,
    "tagUrl": "https://d.oracleinfinity.io/infy/tag/account/oh2wq3oeuw/js/rohitest/odc.js",
    "createdAt": "2023-05-10T08:58:53Z",
    "updatedAt": "2023-05-16T10:50:28Z",
    "tagGuid": "f40518df-e7ca-46e9-afcc-a89c0f97fb01",
    "id": "da10b865-2d3b-460a-b5fa-bc933b158596"
  },
  "qpValue": "skip_no_qp"
}
Loader script guide
The loader or Infinity Tag has the capability of running arbitrary scripts at various predefined injection points. This allows for an incredible amount of power and flexibility in your implementations where none previously existed. Each module downloaded by the loader goes through a set of phases that describe the execution state of the module. Each phase provides an opportunity for further customization of phase behavior and logic. Depending on where and how javascript is injected, power will accrue to its implementer in all its myriad forms of wealth (though mainly in the form of knowledge).
The following list describes the load phases:
-
PREINIT: The intent of this section is to allow for any logic that may be used in theINITphase(or subsequent phases) e.g. suppose you have amyLibrary.isChrome()function used in theINITphase. This would be a good place to put it. -
INIT: The intent of this section is to handle the injection of rule-based logic. Depending on certain configured predicates, then execute logic in this section. -
PRELOAD: Any logic that needs to occur prior to the loading. -
LOAD: The loading of the project, for example, analytics.js. -
POSTLOAD: This is the callback from theLOADphase. That is, as soon as theLOADphase is complete, then runPOSTLOAD.
Examples of load phases
INIT
{
  "rules": [
    {
      "name": "ChromeInit",
      "expression": "true",
      "config": {
        "key": "value"
      },
      "script": "window.console.log(\"This is a init script\");",
      "scriptName": "ChromePluginCfg"
    }
  ]
}
PRELOAD
{
  "customScript": "window.console.log(\"This is a pre load script\");"
}
LOAD
{
  "loadOption": {
    "name": null
  },
  "attachDomId": "head",
  "delay": 0,
  "customScript": "window.console.log(\"This is a load script\");
var fail = function(){ ORA.fireEvent(new ORA.Event(productName+\"_\"+ORA.Event.LOADER_MODULE_ABORT, ORA.Event.STATUS_SUCCESS)); };
/* this line has to be here */ ORA.downloadLib(attachId, callback, fail, 0, true, this.oraConfigObj.libUrl); ",
  "async": false
}
Note the following:
-
LOADrequiresORA.downloadLib(attachId, callback, fail, 0, true, this.oraConfigObj.libUrl);be in the script if you want to load the standard libraries (such as common).
POSTLOAD
{
  "customScript": "window.console.log(\"This is a post load script\");
/*this line has to be here */
ORA.analytics.setup(ORA.analyticsModule.prototype.oraConfigObj);"
}
Note the following:
-
POSTLOADrequiresORA.analytics.setup(ORA.analyticsModule.prototype.oraConfigObj);to start analytics if working with the analytics product.
Mutations
Mutations are simple functions that provide a way to dynamically modify the existing event data sent to collection. They provide access to the entire message, can alter the data payload as it passes through the event tracking pipeline, and can specify different communication protocols and destinations. Mutations are not plugins. Learn more about Mutations.
Note: For more details about this implementation, contact your Oracle Infinity solutions consultant.
Managing Roles and User Access for administering the CX Tag