Managing Interactive Notifications
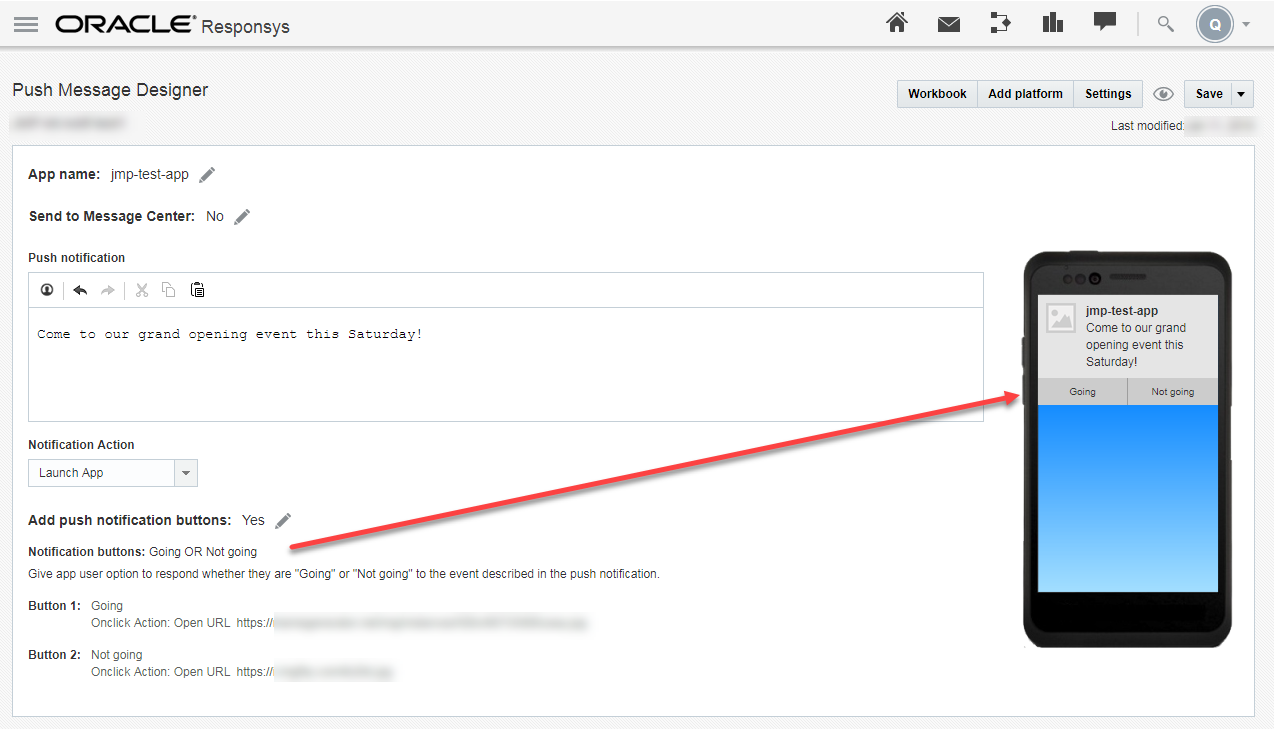
As described in the Interactive Notifications section of the "Design Mobile Apps for Responsys" topic, Marketers can use Interactive Notifications to add buttons to Push notifications. For Responsys accounts enabled for the Interactive Notifications feature, Marketers can add the standard interactive notifications, such as "Buy Now OR Add to Wishlist", to the Push notification. When the mobile app user receives the Push notification, they can choose their next action using the "Buy Now" or "Add to Wishlist" buttons displayed in the Push notification.
For Interactive Notifications to work in your mobile app, you must perform the following steps:
-
Request access to the Interactive Notifications feature. To do so, contact your Customer Success Manager or log in to My Oracle Support and create a service request. The Interactive Notifications feature is currently released under our Controlled Availability program.
-
Build your app with the Mobile App SDK for iOS, version 6.35 (when available) or greater. The SDK will be available from the SDK download page. The Mobile App SDK supports several default Interactive Notification buttons and categories, and your mobile app requires no additional configuration to use the defaults.
Implementing custom Interactive Notification buttons in your Android app
Optionally, you can add custom Interactive Notification buttons for Marketers to use in their Push campaigns. To do this for your mobile app, you must perform the additional steps in this section.
Step 1: Design the custom buttons
Work with the Marketing team to determine whether custom buttons are required for your mobile app, and then determine the button labels and functions.
In Responsys, Interactive Notification buttons are grouped by Category. When the mobile app user receives a Push notification that uses the button category, all buttons defined for that category are displayed in the notification. Each category supports having one or two buttons.
Allowable button actions are as follows:
-
Opening a URL. Buttons intended to open a URL must be of type "Foreground".
-
Dismissing the Push notification without taking further action. (Tapping any button will dismiss the Push notification.)

Step 2: Configure the custom buttons in the Mobile App Developer Console.
Use the Mobile App Developer Console to set up your mobile app to use Custom Interactive Notification buttons. See the topic Manage Notification button settings for instructions.

Step 3: Modify your Android app code to implement custom Interactive Notification buttons
To use custom Interactive Notification buttons in your mobile app, implement the APIs in this section.
API for adding a custom Interactive Notification
To add a custom Interactive Notification to the application, add the custom category along with its buttons.
Notes on the example below:
-
Attributes used in adding the custom category and buttons should match those defined in Responsys on the Mobile App Developer Console. For example, if you created buttons for the mobile app user to indicate "Going" or "Not going" to an event, and you put
go_OR_nogointo the Category field of the Add notification buttons dialog, then you would usego_OR_nogofor thecategoryId. Similarly for buttons: if you usedgoingandnot_goingas the Button ID fields, you would usegoingandnot_goingasbuttonId 1andbuttonId 2. In case of any discrepancies, the ones defined by the app developer will take precedence. -
Categories may have either one or two buttons. The example below shows how to add two buttons, but you can modify it for one button by omitting the block defining the second button.
-
If the button needs to be added as a Background action button, the action for that button can be set as "BG".
addInteractiveNotificationCategory()
Parameter: Object for Notification category with details of category along with the buttons metadata.
Returns: True in case the category gets successfully added; False if there is a error reported
Sample
                    PIOInteractiveNotificationCategory interactiveNotificationCategory = new PIOInteractiveNotificationCategory();
                    interactiveNotificationCategory.setCategory(<Enter categoryId here>);

                    PIOInteractiveNotificationButton button1 = new PIOInteractiveNotificationButton();
                    button1.setId(<Enter buttonId 1 here>);
                    button1.setLabel(<Enter button1 Label here>);
                    button1.setAction("BG");
                    interactiveNotificationCategory.addInteractiveNotificationButton(button1);

                    PIOInteractiveNotificationButton button2 = new PIOInteractiveNotificationButton();
                    button2.setId(<Enter buttonId 2 here>);
                    button2.setLabel(<Enter button2 Label here>);
                    interactiveNotificationCategory.addInteractiveNotificationButton(button2);

                    PushIOManager mPushIOManager = PushIOManager.getInstance(this);
                    mPushIOManager.addInteractiveNotificationCategory(interactiveNotificationCategory);
                        val interactiveNotificationCategory = PIOInteractiveNotificationCategory()
                        interactiveNotificationCategory.category = "<Enter categoryId here>"

                        val button1 = PIOInteractiveNotificationButton()
                        button1.id = "<Enter buttonId 1 here>"
                        button1.label = "<Enter button1 Label here>"
                        button1.action = "BG"
                        interactiveNotificationCategory.addInteractiveNotificationButton(button1)

                        val button2 = PIOInteractiveNotificationButton()
                        button2.id = "<Enter buttonId 2 here>"
                        button2.label = "<Enter button2 Label here>"
                        interactiveNotificationCategory.addInteractiveNotificationButton(button2)

                        val pushIOManager = PushIOManager.getInstance(applicationContext)
                        pushIOManager.addInteractiveNotificationCategory(interactiveNotificationCategory)
API for getting a custom Interactive Notification category
App developers can use this API to get the custom Interactive Notification category details for a particular categoryId.
getInteractiveNotificationCategory()
Parameter: CategoryId for which the details are required
Returns: Object of the PIOInteractiveNotificationCategory; null if categoryId is not found
Sample
PIOInteractiveNotificationCategory notificationCategory = mPushIOManager.getInteractiveNotificationCategory(<Enter categoryId string>);
val notificationCategory = pushIOManager.getInteractiveNotificationCategory("<Enter categoryId string>")
API for deleting a Custom Interactive Notification
App developers can use this API to delete a custom interactive notification which was initially added using the addInteractiveNotificationCategory. Because custom Interactive Notifications are saved in your app's memory, using this API may help your save space.
deleteInteractiveNotificationCategory()
Parameter: CategoryId of the custom interactive notification which is to be deleted
Returns: True if delete is successful; False if categoryId is not found
Sample
boolean result = mPushIOManager.deleteInteractiveNotificationCategory(<Enter the categoryId string>);
val result:Boolean = pushIOManager.deleteInteractiveNotificationCategory("<Enter the categoryId string>")