Manage Notification button settings
As described in the Interactive Notifications section of the "Design Mobile Apps for Responsys" topic, you can use Interactive Notifications to add buttons to Push notifications.
This topic applies only if you plan to add Custom Interactive Notification buttons for your app. Adding custom buttons is optional. If your team requires custom buttons, use the steps in this section to add, edit, or delete notification buttons for your mobile app. The configurations you add here let the Responsys server know about the custom buttons and enables the Marketers to see and use them when they are creating Push campaigns that use Interactive Notifications.
Before you begin: Your mobile app must incorporate the Mobile App Platform SDK version 6.35 (when available) or greater in order to support custom interactive notifications. You must also complete the platform-specific steps for implementing custom interactive notifications in your mobile app.
For platform-specific information about implementing custom Interactive Notifications in your mobile app:
Adding Custom Interactive Notification buttons
NOTE: The definition of the Interactive Notification buttons that you set up here must match the implementation by the mobile app development team. Otherwise, there can be unexpected behavior on launching a Push campaign that uses the custom Interactive Notification buttons.
[1]Log in to the Mobile App Developer Console.
[2] From the Manage Apps page, locate the row containing your mobile app, and then click the Edit button.
[3] On your app's page, click the Notification buttons link in the navigation list.
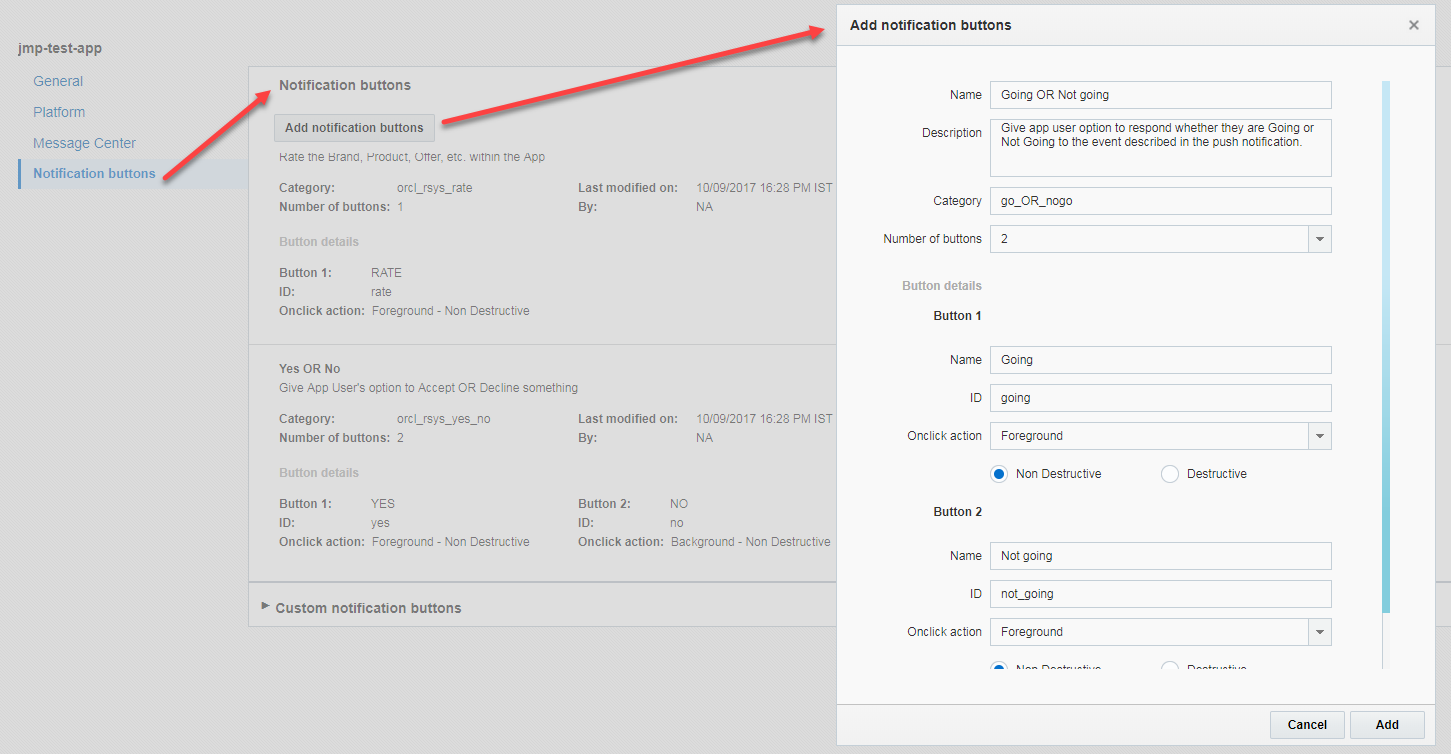
[4] From the Notification buttons page, click Add Notification Buttons. The Add notification buttons dialog is displayed.
The following diagram shows how the information you enter here is displayed for Marketing users in Responsys.
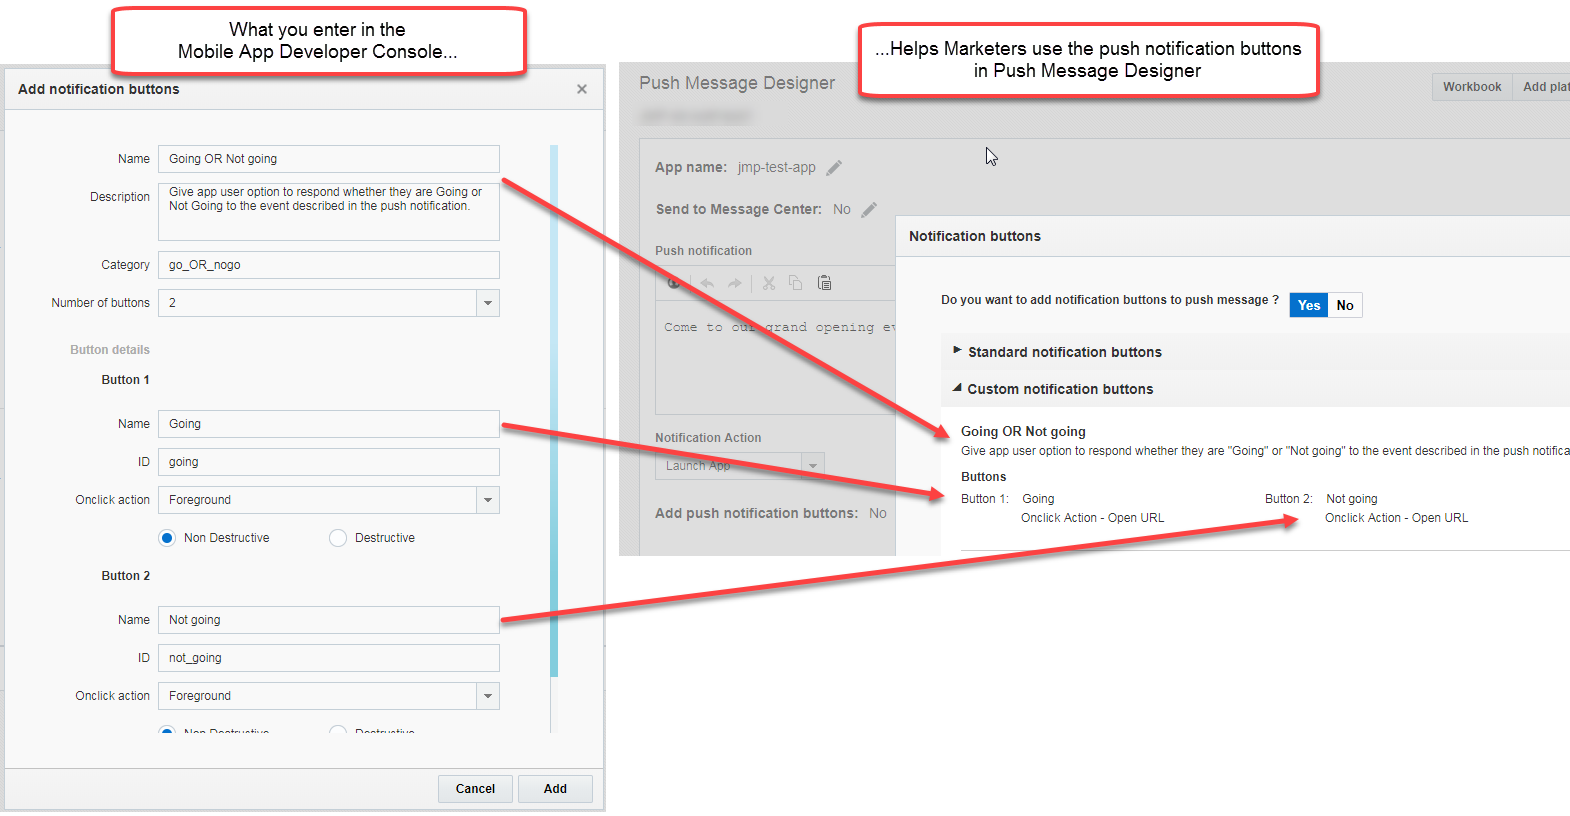
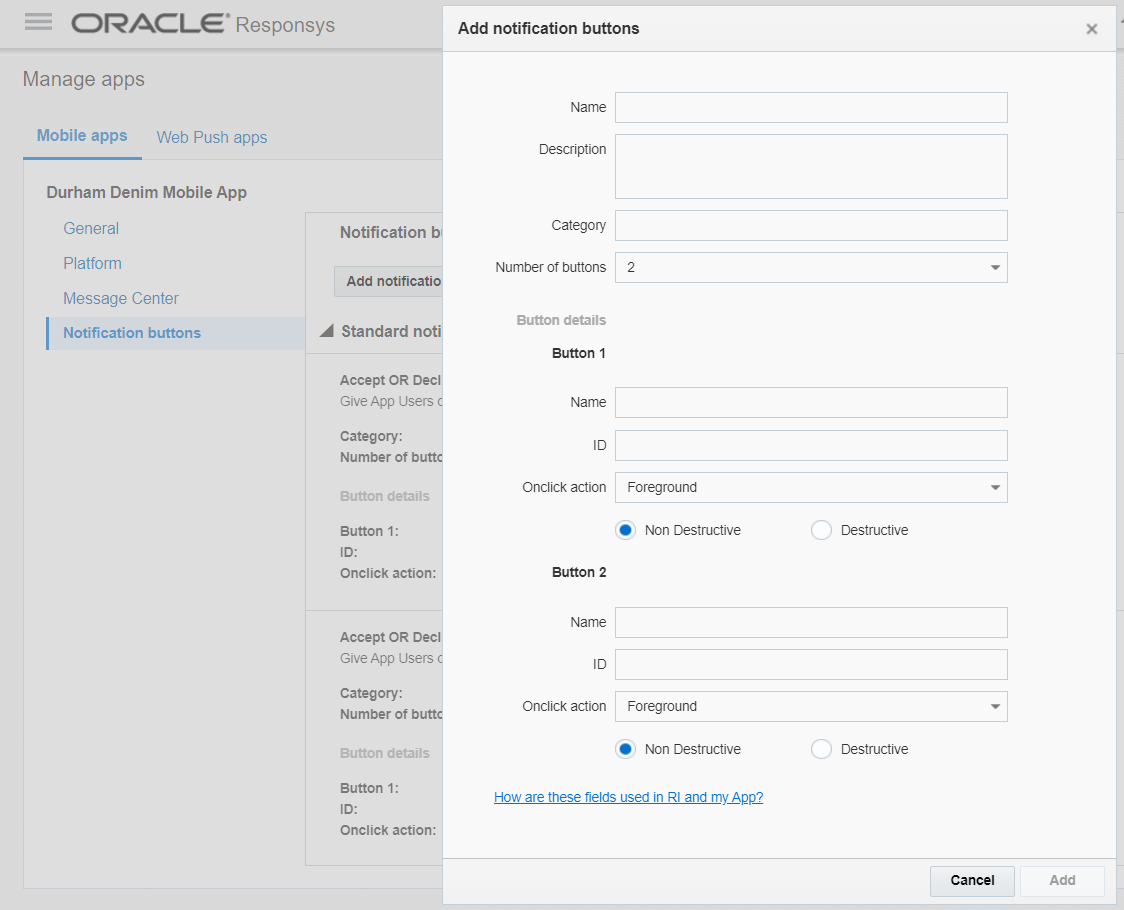
[5] In the Name field, enter the name of the set of buttons. This is usually in the format "Button 1 OR Button 2". The name you enter here is displayed in the Push Message Designer. It enables Marketers to choose the set of buttons to add.
[6] In the Description field, enter a clear description of the buttons and their intended behavior. The text you enter here is displayed in the Push Message Designer. It helps the Marketers determine how to use the buttons in their Push campaign.
[7] In the Category field, enter the button category identifier. This is the identifier that the system uses to recognize the set of buttons. It is not displayed to Responsys users except in this console. You can enter up to 30 characters. You can use upper and lower case letters, numbers, and underscores. Spaces and other characters are not supported.
[8] Select the number of buttons to be added. You may select one or two. A set of Button details fields are added for each button.
[9] For each button, do the following:
-
In the Name field, type the button name. The name you enter here is displayed in the Push Message Designer and will be displayed in the Push notification for mobile app users. It helps Marketers and mobile app users understand what the buttons will do.
-
In the ID field, type the button ID. This is the identifier that the system uses to recognize the button. It is not displayed to the Responsys users except in this console. You can enter up to 30 characters. You can use upper and lower case letters, numbers, and underscores. Spaces and other characters are not supported.
-
Select the Onclick action: You can choose either Foreground or Background. Choose "Foreground" if you want the mobile app to open a URL when the mobile app user clicks the button. (The Marketer will be prompted to specify a URL to open when they add push notification buttons to their Push campaign. The URL can either be a deep link into the mobile app or a location outside of the mobile app.) Choose "Background" if you want the Push notification to be dismissed when the mobile app user clicks the button.
-
Select Non Destructive or Destructive. Most buttons should be marked Non Destructive. Only use Destructive for actions that change or delete data. On iOS devices, using Destructive causes the button to be diplayed in red. (This property has no effect on the Push Message Designer preview.)
[10] After you have completed the details for each button, click Add to add the custom interactive notification buttons to the list. To dismiss the dialog without adding the buttons, click Cancel. Repeat steps 4 through 10 for each category of notification buttons that you want to add.
Editing Custom Interactive Notification buttons
IMPORTANT - BEFORE EDITING: Check with Responsys Account Admins and Marketers before editing notification buttons that have been set up for use in Mobile Push campaigns. Editing notification buttons may impact Mobile Push campaigns that use the custom interactive notification buttons.
[1]Log in to the Mobile App Developer Console.
[2] From the Manage Apps page, locate the row containing your mobile app, and then click the Edit icon.
[3] On your app's page, click the Notification buttons link in the left navigation bar.
[4] From the Notification buttons page, scroll to the Custom notification buttons section and click the arrow to view the custom buttons.
[5] Locate the category you want to edit, and then click its Edit icon.
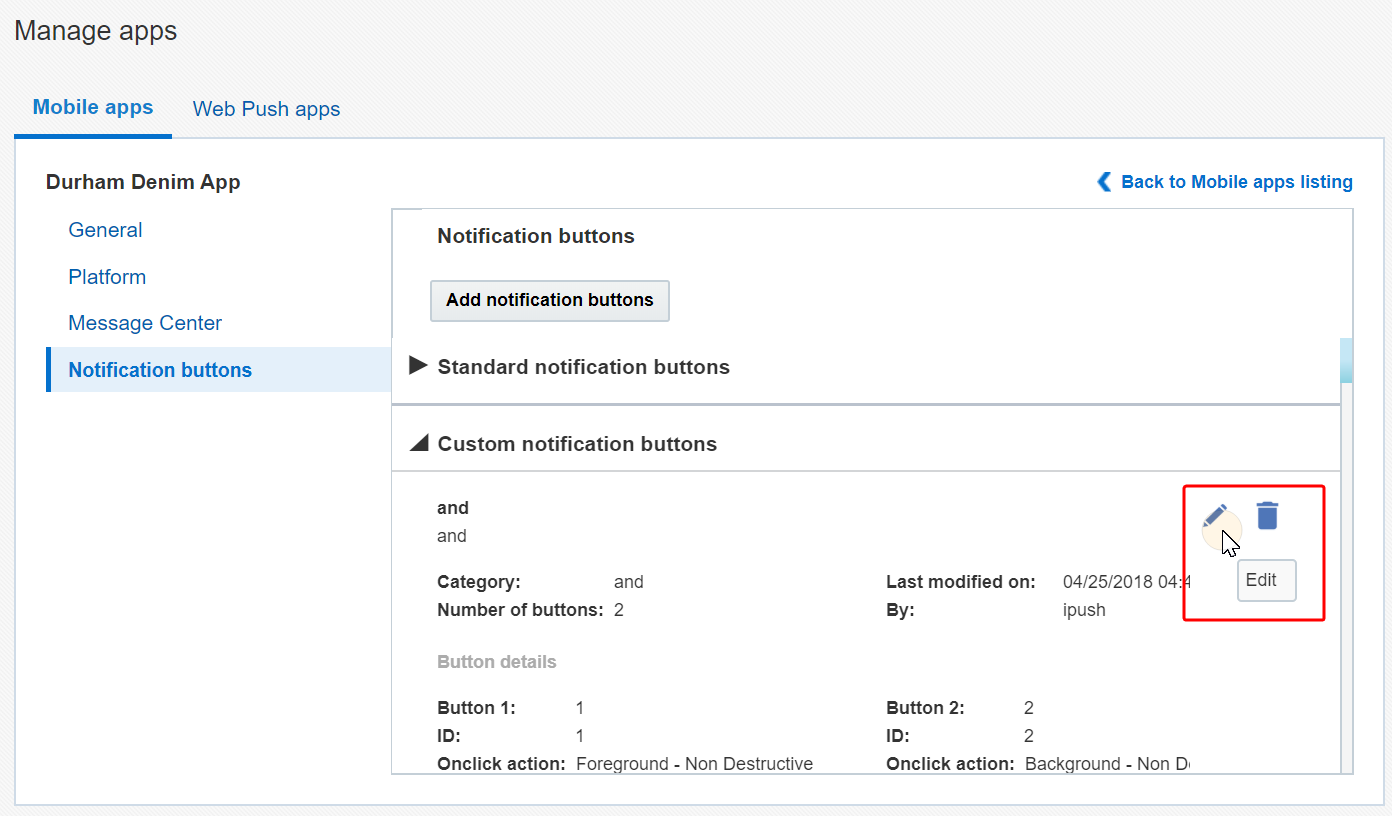
[6] On the Edit notification buttons dialog, make your desired changes.
[7] Click Save to save your changes, or click Cancel to close the dialog without saving.
Deleting Custom Interactive Notification buttons
Responsys users with the Mobile App Admin role may delete custom notification buttons.
IMPORTANT - BEFORE DELETING: Check with Responsys Account Admins and Marketers before deleting notification buttons that have been set up for use in Mobile Push campaigns. Deleting notification buttons may impact Mobile Push campaigns that use the custom interactive notification buttons.
[1]Log in to the Mobile App Developer Console.
[2] From the Manage Apps page, locate the row containing your mobile app, and then click the Edit icon.
[3] On your app's page, click the Notification buttons link in the left navigation bar.
[4] From the Notification buttons page, scroll to the Custom notification buttons section and click the arrow to view the custom buttons.
[5] Locate the button category that you wish to delete, and then click the Delete icon.
NOTE: When you delete a button category, note that all buttons in the category will be deleted. For example, if you have a button category called "Going OR Not going" with two buttons called "Going" and "Not going", you cannot delete only the "Not going" button. (If you need to change button behavior or remove one button from a category, use the editing steps instead.)
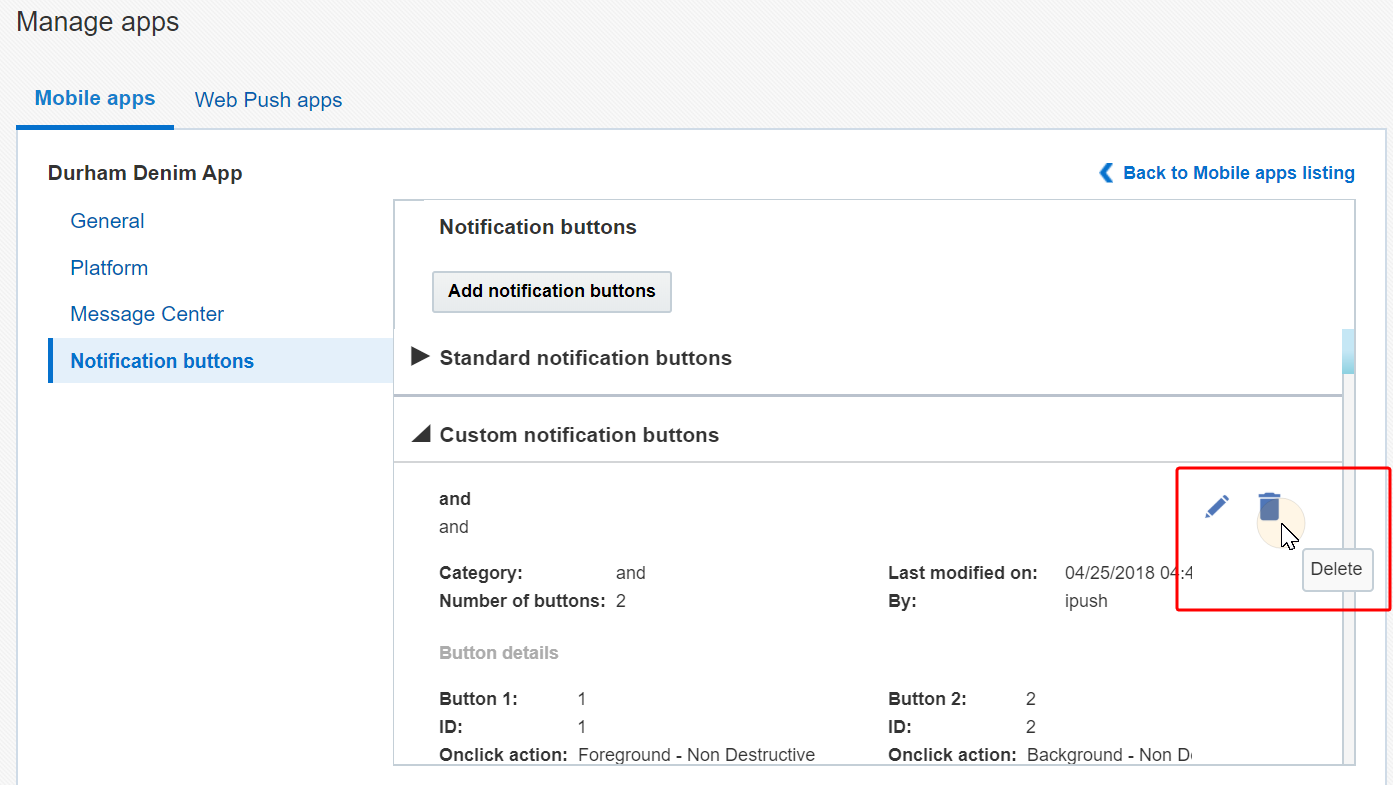
[6] A confirmation dialog is displayed, which asks if you are sure that you want to delete the notification button category. Click OK to delete the notification button category, or click Cancel if you choose to not delete it. A confirmation message informs you that the notification button category was deleted successfully.