Managing Interactive Notifications
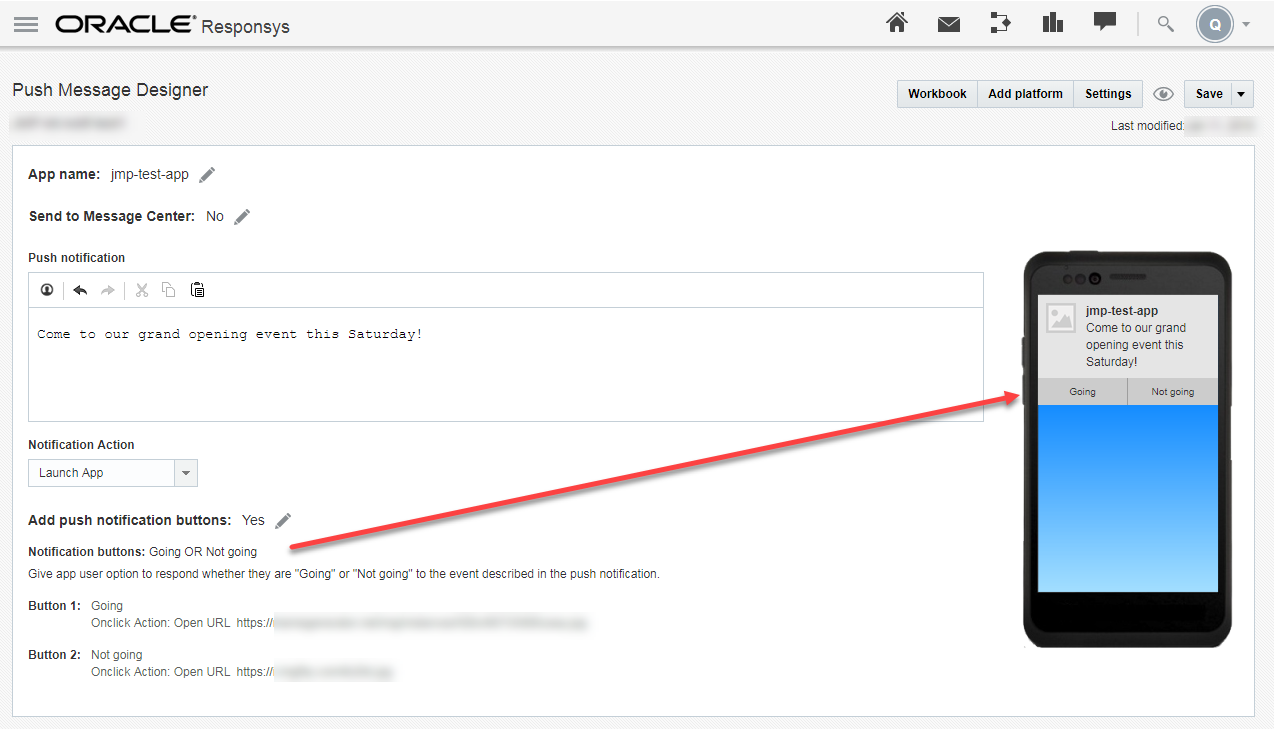
As described in the Interactive Notifications section of the "Design Mobile Apps for Responsys" topic, Marketers can use Interactive Notifications to add buttons to Push notifications. For Responsys accounts enabled for the Interactive Notifications feature, Marketers can add the standard interactive notifications, such as "Buy Now OR Add to Wishlist", to the Push notification. When the mobile app user receives the Push notification, they can choose their next action using the "Buy Now" or "Add to Wishlist" buttons displayed in the Push notification.
For Interactive Notifications to work in your mobile app, you must perform the following steps:
[1] Request access to the Interactive Notifications feature by contacting your Customer Success Manager or logging in to My Oracle Support and creating a service request. This feature is currently released under our Controlled Availability program.
[2] Build your app with the Mobile App SDK for iOS, version 6.35 (when available) or greater. The SDK will be available from the iOS Push IO Manager project. The Mobile App SDK supports several default Interactive Notification buttons and categories, and your mobile app requires no additional configuration to use the defaults.
Implementing Custom Interactive Notification buttons in your iOS app
Optionally, you can add custom Interactive Notification buttons for Marketers to use in their Push campaigns. To do this for your mobile app, you must perform the additional steps in this section.
Step 1: Design the custom buttons
Work with the Marketing team to determine whether custom buttons are required for your mobile app, and then determine the button labels and functions.
In Responsys, Interactive Notification buttons are grouped by Category. When the mobile app user receives a Push notification that uses the button category, all buttons defined for that category are displayed in the notification. Each category supports having one or two buttons.
Allowable button actions are as follows:
-
Opening a URL. Buttons intended to open a URL must be of type "Foreground".
-
Dismissing the Push notification without taking further action. (Tapping any button will dismiss the Push notification.)

Step 2: Configure the custom buttons in the Mobile App Developer Console.
Use the Mobile App Developer Console to set up your mobile app to use Custom Interactive Notification buttons. See the topic Manage Notification button settings for instructions.

Step 3: Modify your iOS app code to implement custom Interactive Notification buttons
The steps in this section provide instructions for modifying your iOS app code.
[3.1] Import PIONotificationCategory.h
The mobile app must configure your app in advance to display custom action buttons with a Push notification. You perform all of your configuration before your application finishes launching. This means configuring your notification support no later than the application:didFinishLaunchingWithOptions: method of your AppDelegate.
#import <PushIOManager/PIONotificationCategory.h>
// No need separate import for PIONotificationCategory.h, as PushIOManager will import it automatically for your app.
[3.2] Define Custom Notification Action(s)
The SDK provides the PIONotificationAction to encapsulate the notification action's properties and method to instantiate.
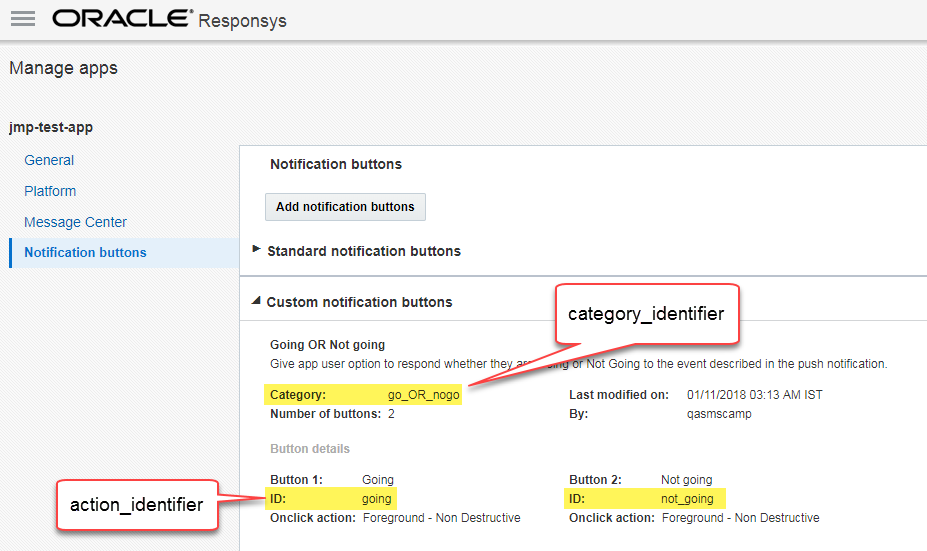
In the following code, substitute action_identifier for the Button ID value that you enter in the Mobile App Developer Console. For example, if you are adding a button for the mobile app user to indicate "Going" to an event, and you put "going" as the Button ID field of the Add notification buttons dialog, then you would use going in place of action_identifier in the code below.
Note: Interactive Notification categories can have one or two buttons. The code snippet shows the implementation for a single button in a category. To implement a two-button category, you must define a second action, and then add it to the same category as the first.
PIONotificationAction *newAction = [[PIONotificationAction alloc]initWithIdentifier:@"action_identifier" title:@"Action Title" isDestructive:NO isForeground:YES isAuthenticationRequired:YES];
let newAction: PIONotificationAction = PIONotificationAction.init(identifier: "action_identifier", title: "Action Title", isDestructive: false, isForeground: true, isAuthenticationRequired: true)
[3.3] Configure Custom Notification Category
The SDK provides the PIONotificationCategory to encapsulate the notification category properties and method to instantiate. Your application uses categories to associate custom actions with a notification and to specify options for how to handle notifications of that type.
Category identifier needs to match the exact value defined in server, which system then uses to retrieve the options and display the notification. In the following code, substitute category_identifier for the Category value that you enter in the Mobile App Developer Console. For example, if you created buttons for the mobile app user to indicate "Going" or "Not going" to an event, and you put "go_OR_nogo" into the Category field of the Add notification buttons dialog, then you would use go_OR_nogo in place of category_identifier in the code below.
    UNNotificationCategoryOptions notificationOptions = UNNotificationCategoryOptionCustomDismissAction; // Define the category options.
    PIONotificationCategory *newCategory = [[PIONotificationCategory alloc] initWithIdentifier:@"category_identifier" actions:@[] intentIdentifiers:@[] hiddenPreviewsBodyPlaceholder:@"" options:notificationOptions];
    var newCategory: PIONotificationCategory
    if #available(iOS 10.0, *) {
        //Instantiate notification category with the iOS 10+ applicable properties.
        let notificationOptions = UNNotificationCategoryOptions.customDismissAction
        newCategory = PIONotificationCategory.init(identifier: "category_identifier", actions: [], intentIdentifiers: [], hiddenPreviewsBodyPlaceholder:placeholder , options: notificationOptions)
    } else {
        //Instantiate notification category with the iOS 8+ applicable properties.
        newCategory = PIONotificationCategory.init(identifier: "category_identifier", actions: [], intentIdentifiers: [])
    }
[3.4] Request authorization to interact with the user
Your mobile app must have authorization to display alerts, play sounds, or badge the app’s icon in response to incoming notifications. To request authorization, call the registerForAllRemoteNotificationTypesWithCategories: method with the list of notification categories. If your app is authorized for all of the requested interaction types, completionHandler is called with the deviceToken acquired from APNS. On success in completionHandler, your application should call the registerApp: to register the application with server. Use the completion handler block to update your app’s behaviors based on success or failure of registration.
Reminder: In the following code snippets, substitute category_identifier for the Category value and action_identifier for the Button ID value that you enter in the Mobile App Developer Console.
Category with one button
The following code snippet shows the implementation for a category with one button. See the next section to see instructions for categories with two buttons.
NSArray *intentIdentifiers = @[]; //The intents supported support for notifications of this category. See <Intents/INIntentIdentifiers.h> for possible values.
NSString *placeholder = @"Awesome content hidden inside the notification"; // When preview is disabled from settings, this placeholder text is displayed.
PIONotificationAction *newAction = [[PIONotificationAction alloc]initWithIdentifier:@"action_identifier" title:@"Action Title" isDestructive:NO isForeground:YES isAuthenticationRequired:YES];
// For a category with two buttons, this is where you would put the second button.
NSArray *actions = @[newAction]; // Add the list of actions you want to group together. See next section for what this would look like with two buttons.
UNNotificationCategoryOptions notificationOptions = UNNotificationCategoryOptionCustomDismissAction; // Define the category options.
PIONotificationCategory *newCategory = [[PIONotificationCategory alloc] initWithIdentifier:@"category_identifier" actions:actions intentIdentifiers:intentIdentifiers hiddenPreviewsBodyPlaceholder:placeholder options:notificationOptions];
[[PushIOManager sharedInstance] registerForAllRemoteNotificationTypesWithCategories:@[newCategory] completionHandler:^(NSError *error, NSString *response) {
if (nil == error) {
NSError *regError = nil;
[[PushIOManager sharedInstance] registerApp:®Error completionHandler:^(NSError *rError, NSString *response) {
if (nil == rError) {
NSLog(@"Registration successful");
}else{
NSLog(@"Error while trying to register. Error: %@", rError);
}
}];
if (nil == regError) {
NSLog(@"Registration requested successfully");
}else{
NSLog(@"Error while trying to request register. Error: %@", regError);
}
}else{
NSLog(@"Error while trying to get device token from APNS. Error: %@", error);
}
}];
     // Register for Interactive notifications
    let placeholder = "Awesome content hidden inside the notification"; // // When preview is disabled from settings, this placeholder text is displayed.
    let intentIdenfiers = [String]()// The intents supported support for notifications of this category. See <Intents/INIntentIdentifiers.h> for possible values.
    let newAction: PIONotificationAction = PIONotificationAction.init(identifier: "action_identifier", title: "Action Title", isDestructive: false, isForeground: true, isAuthenticationRequired: true)// Define your notification action
	// For a category with two buttons, this is where you would put the second button.
    let actions = [newAction] // Group the similar kind of actions for a category. See next snippet for what this would look like with two buttons.
    var newCategory: PIONotificationCategory
    //Create the category for the list of actions.
    if #available(iOS 10.0, *) {
        let notificationOptions = UNNotificationCategoryOptions.customDismissAction
        newCategory = PIONotificationCategory.init(identifier: "category_identifier", actions: actions, intentIdentifiers: intentIdenfiers, hiddenPreviewsBodyPlaceholder:placeholder , options: notificationOptions)
    } else {
        // Fallback on earlier versions
        newCategory = PIONotificationCategory.init(identifier: "category_identifier", actions: actions, intentIdentifiers: intentIdenfiers)
    };
    let notificationCategories:[PIONotificationCategory] = [newCategory]
    //Registering the Notification Categories for Your App
    PushIOManager.sharedInstance().registerForAllRemoteNotificationTypes(withCategories: notificationCategories) { (error:Error?, response:String?) in
        if(nil == error){
            do{
                try PushIOManager.sharedInstance().registerApp(completionHandler: {(_ error: Error?, _ response: String?) -> Void in
                    if nil == error {
                        print("App registered successfully!")
                    }
                    else {
                        print("Unable to register application, reason: \(error!.localizedDescription)")
                    }
                })
            }catch(let err){
                print("Unable to register application, reason: \(err.localizedDescription)")
            }
        }else{
            print("Failed to Register, reason: \(error.debugDescription)")
        }
    }
Category with two buttons
To implement for a category with two buttons, define a second button and add it to the category's button list. In the above snippet, comments identify where you would add the second button for the category. The following snippets illustrate what those sections would look like when coded for two buttons. (The rest of the code in the above snippet would remain the same.)
PIONotificationAction *action1 = [[PIONotificationAction alloc]initWithIdentifier:@"action_identifier" title:@"Action Title" isDestructive:NO isForeground:YES isAuthenticationRequired:YES];
PIONotificationAction *action2 = [[PIONotificationAction alloc]initWithIdentifier:@"action_identifier" title:@"Action Title" isDestructive:NO isForeground:YES isAuthenticationRequired:YES];
        NSArray *actions = @[action1, action2]; // Add the list of actions you want to group together.
let action1: PIONotificationAction = PIONotificationAction.init(identifier: "action_identifier", title: "Action Title", isDestructive: false, isForeground: true, isAuthenticationRequired: true)
let action2: PIONotificationAction = PIONotificationAction.init(identifier: "action_identifier", title: "Action Title", isDestructive: false, isForeground: true, isAuthenticationRequired: true)
let actions = [action1, action2] // Group the similar kind of actions for a category.