Design Mobile Apps for Responsys
Your first step in developing mobile apps that work with Oracle Responsys is to gather the design requirements. You'll work with the Responsys Account Admin and the Marketers to define the following:
-
App Channel List - Get the user identifier "match key" from the Responsys Account Admin who set up the App Channel List.
-
Message Center - Determine whether the mobile app will include a Message Center and, if so, what data will Marketers expect the mobile app to display to its users.
-
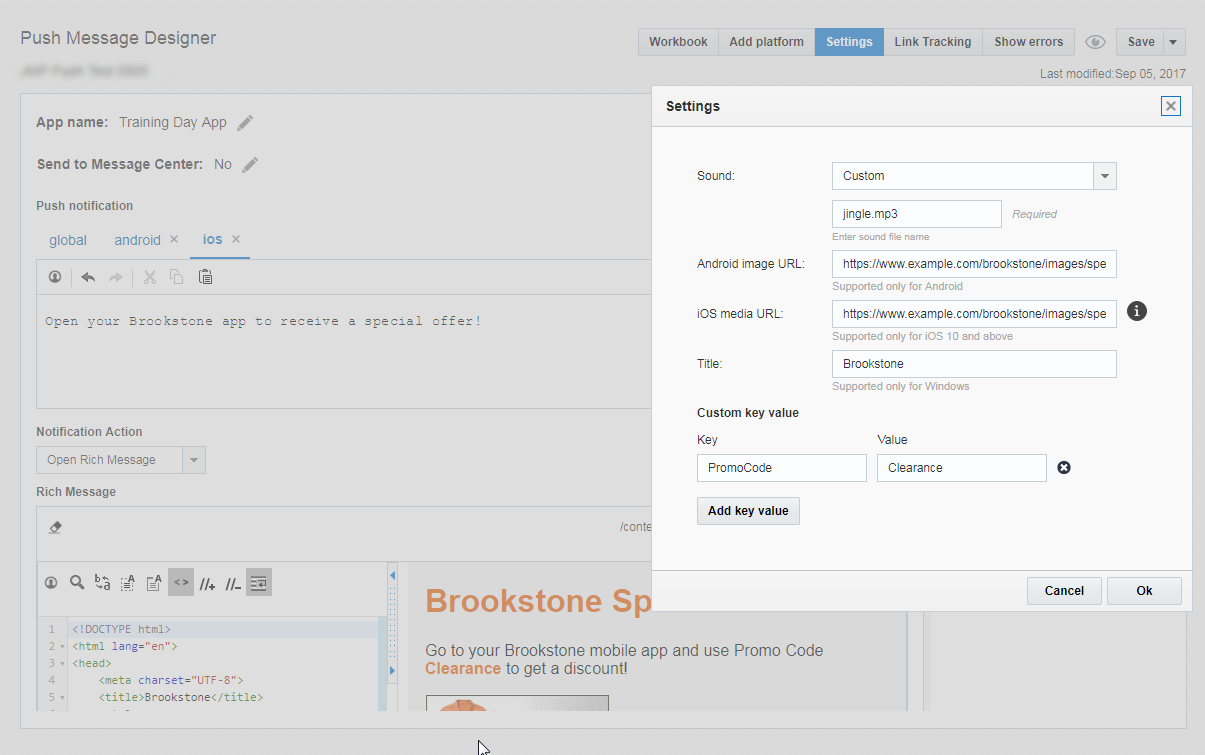
Custom sounds - Determine whether custom sounds must be supported by your app, and provide the names of the sound files to the Marketers.
-
Custom triggers - Determine the types of events and the names by which they will be known by the mobile app.
-
Push campaign custom key-value pairs - Marketers use these to send additional data to the app. Work with Marketers to determine what they expect your app to do with this data.
-
Notification preferences - Determine which key-value pairs the Marketers plan to use, and use the SDK's convenience methods to build a UI to capture the mobile user's preferences.
-
Interactive notifications - Determine whether your mobile app requires custom notification buttons, which enable Marketers to add custom Interactive Notifications to Push notifications.
-
Customized UX for destination URLs - Determine whether your mobile app requires a customized the user experience for destination URLs sent as part of In-app and Rich Push messages.
More details are provided below.
About the Mobile App Channel in Responsys
The Mobile App channel in Responsys comprises the following campaign types:
- Push campaigns let your mobile app send messages to a user's mobile device even when the user is not actively using the app. Marketers can choose how the app responds when a user opens the notification: open the app, open a specific (deeplinked) URL, or display a Rich HTML message. Rich HTML messages can be either a file from the company's Responsys content library (limited by platform payload constraints), an external publicly available URL, or HTML content hosted by the company's public-facing domain.
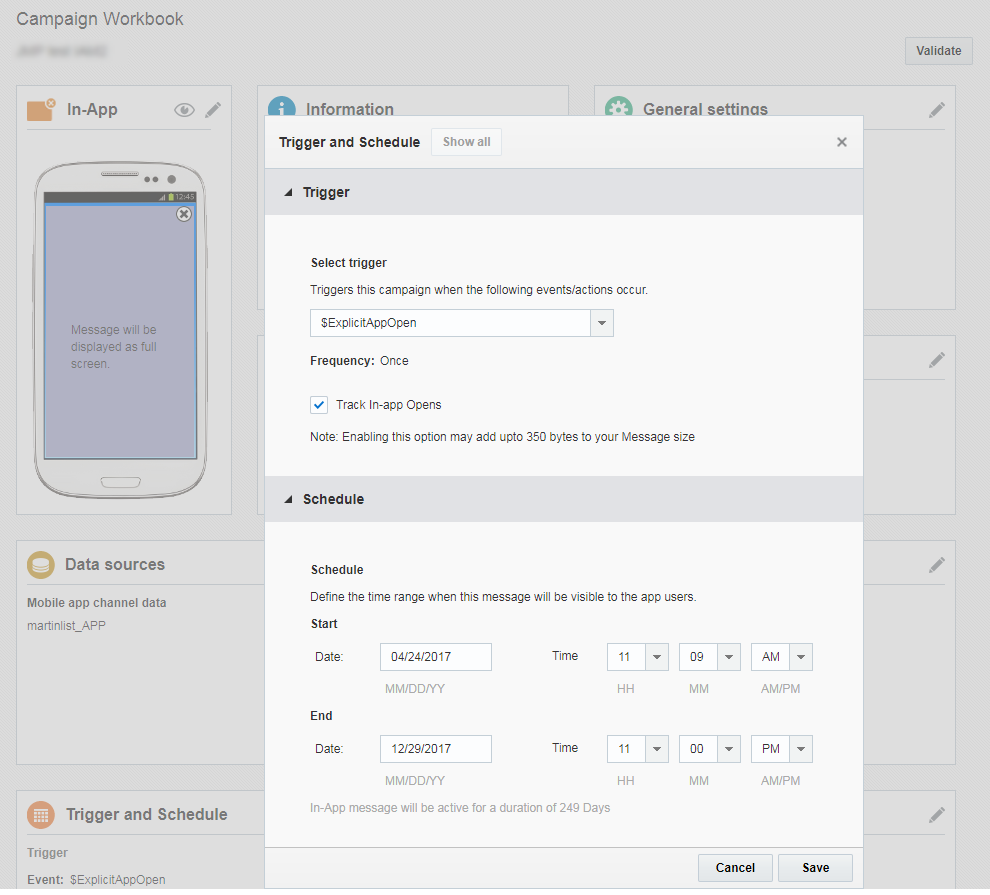
- In-App campaigns show alerts or full screen landing pages from within your mobile app when a specified action occurs. In-app messages can be shown either when the app is opened, or when a custom trigger action such as "add to cart" occurs. Marketers determine the schedule for when the messages are visible to uses. The delivery method depends on whether the mobile app is enabled for the redesigned In-app feature and which version of the SDK it is using.
Creating the App Channel List
Mobile apps that work with Responsys are associated with an App Channel List. The App Channel List:
- Contains a list of all your App Device profiles
- Includes a relationship to your contact list for known user matching
- Facilitates targeting of both “known” and “unknown” app users all within a single program
- Enables marketers to message users across channels
About the Match Key
Responsys uses the USER_IDENTIFIER parameter as the match key to uniquely identify "known users" of your app. This helps with such Responsys tasks as enabling filtering by known users, personalization, and for retrieving Message Center messages for known users.
How the match key is chosen
Coordinate with the Responsys Account Admin regarding which field to use. Only one field may be used as the match key across your app users, and it cannot be changed later.
When the Account Admin creates the app channel list to receive the app data, the admin should set one of the following to be the match key:
CUSTOMER_ID_EMAIL_ADDRESS_MOBILE_NUMBER_
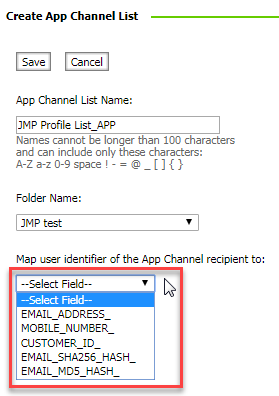
The following choices are also available - but not recommended - to be set as the match key:
EMAIL_SHA256_HASH_– SHA-256-hashed email addressEMAIL_MD5_HASH_- MD5-hashed email address
Why are these values not recommended? MD5/SHA are one-way keys. Therefore, the system will be unable to use the incoming USER_IDENTIFIER value to populate the EMAIL_ADDRESS_ field in a new Profile List record. (Merging with existing Profile List records is unaffected.) Not having a plain-text email address in a Profile List record is a problem, because Responsys users typically search for Profile List records by plain-text email address. Being unable to locate a record may cause confusion.
For more information about the match key, and recommendations for choosing which Profile List field to use as the match key, see the "Setting up the App Channel List" topic in the Mobile App Channel Configuration Guide.
Setting the match key value through the mobile app
An App Developer is expected to set the match key value through the USER_IDENTIFIER parameter in the app code.
For example:
pushIOManager.registerUserId("john.doe@email.com")
When this field is set, Responsys looks for a corresponding record in the App Channel List. If there is a record, the system associates that profile record to the newly created device record. If not, it creates a new Profile List record and associates the newly created contact record to the App Channel List record.
If your mobile app supports multiple platforms, ensure that the mobile app code for each platform sets the correct match key value. For example, if CUSTOMER_ID_ is the match key and you are supporting iOS and Android, then your iOS and Android apps must both set the USER_IDENTIFIER parameter to a Customer ID value, because Responsys uses the Customer ID to match the App Channel List and Profile List records. If your iOS code is setting USER_IDENTIFIER to an email address instead of a Customer ID, and the App Channel List is expecting a Customer ID, then the App Channel List records created through the iOS version of your mobile app will not be matched to a Profile List record.
Normalization recommendations: Ensure that the data is normalized before the match key values are sent to Responsys; in the case of hashed values, perform the normalization before hashing the data. This helps ensure that records are matched properly.
EMAIL_SHA256_HASH_– Before hashing: Case-normalize (that is, all characters transformed to lower case), trailing and leading spaces removed, ensure valid email formatCUSTOMER_ID_- Remove trailing and leading spacesEMAIL_ADDRESS_- Case-normalize (that is, all characters transformed to lower case), trailing and leading spaces removed, ensure valid email formatMOBILE_NUMBER_- Ensure that number is in E.164 format, but omit the "+" sign. The number includes country code, area code, and number. For example, a Japanese mobile phone number of 090-1234-5678 would be represented 819012345678.EMAIL_MD5_HASH_- Before hashing: Case-normalize (that is, all characters transformed to lower case), trailing and leading spaces removed, ensure valid email format
Determine Message Center Design
The Mobile App Message Center feature enables Marketers to persist their Push campaign messages, so that mobile app users can view them later in the mobile app. As of the 18D update, Marketers can also create Message Center Direct campaigns, which send campaign messages directly without an accompanying Push message. Mobile App Developers can fetch these messages from Responsys and display them to mobile app users.
The SDK provides an API for fetching the Message Center messages data from Responsys. You must work with the Marketing team to design and develop the user experience in your mobile app. Marketers can learn more about Message Center by accessing the Responsys online help while using the Push Message Designer.
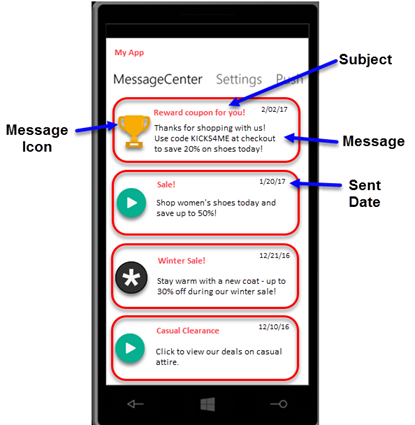
For more details about supporting Mobile App Message Center in your app, refer to the Message Center section.
Determine Custom Sounds
Responsys supports including custom sounds in the mobile push messages, but it must also be supported by your app. Work with your Marketers to determine the sounds and provide the names of the sound files to the Marketers.
For platform-specific information about supporting custom sounds in your mobile app to be used in notifications:
Determine Custom Triggers
In-App messaging campaigns rely on triggers to display the message for the app. Responsys and the Mobile App SDK support the standard trigger, $ExplicitAppOpen, for all apps. When a user opens the mobile app, the standard trigger is activated, which causes the in-app message to display.
However, Marketers may want different actions to trigger their in-app messages, such as when an app user adds merchandise to a cart. As the app developer, you must code the app to support each custom trigger. A custom trigger raises a mobile app event using a specific name. You must coordinate with the Account Admin on the custom trigger names, because the Account Admin must add the custom trigger names to the mobile app configuration in Responsys. Once the custom trigger names are configured in Responsys, marketers will see them in the list of triggers in the In-App Campaign Workbook.
Custom trigger notes:
- Examples of custom triggers might be “add_to_cart” or “reached_level_10”
- Custom triggers are defined in your app using SDK helper methods
- Custom trigger names are case sensitive and must not start with “$”
For platform-specific information about supporting custom triggers and in-app messages in your mobile app:
Determine Supported Key/Value Pairs
As the app developer, you must ensure that your app code can extract key-value pairs from the payload, and use it as expected by the Marketers.
For platform-specific information about supporting custom key-value pairs in your mobile app:
Notification Preferences
Work with Marketers and Responsys Account Admins to define which Notification Preferences to offer in your app. Your app can support up to 30 preferences. Each preference consists of a key, value, and type. The value can be in the form of yes or no, a numeric value, or contain a string. Convenience methods help you build UI elements to allow your users to set their preferences.
If your mobile application registers notification preferences for users, then the Responsys Account Admin must define a Preferences PET for the App Channel List associated with the mobile app. This Preferences PET captures and stores the mobile app user preferences in Responsys.
NOTES:
- When creating the preferences fields in the App Channel List Preferences PET, the Responsys Account Admin must prefix the preferences field names with
PR_. For example, if you have a preference key name ofFAVORITE_TEAMdefined in your mobile app, then its corresponding field in the PET must be namedPR_FAVORITE_TEAM. - Coordinate with the Responsys Account Admin regarding field types (Boolean, String, or Number), so that the Responsys Account Admin can set up the correct data mapping in Responsys for the preferences fields.
- Use unique, uppercase names for the preference key names. Responsys treats the preference key names as all uppercase; for example, it would treat
musicandMUSICas being the same preference key.
For platform-specific information about supporting notification preferences in your mobile app:
Interactive Notifications
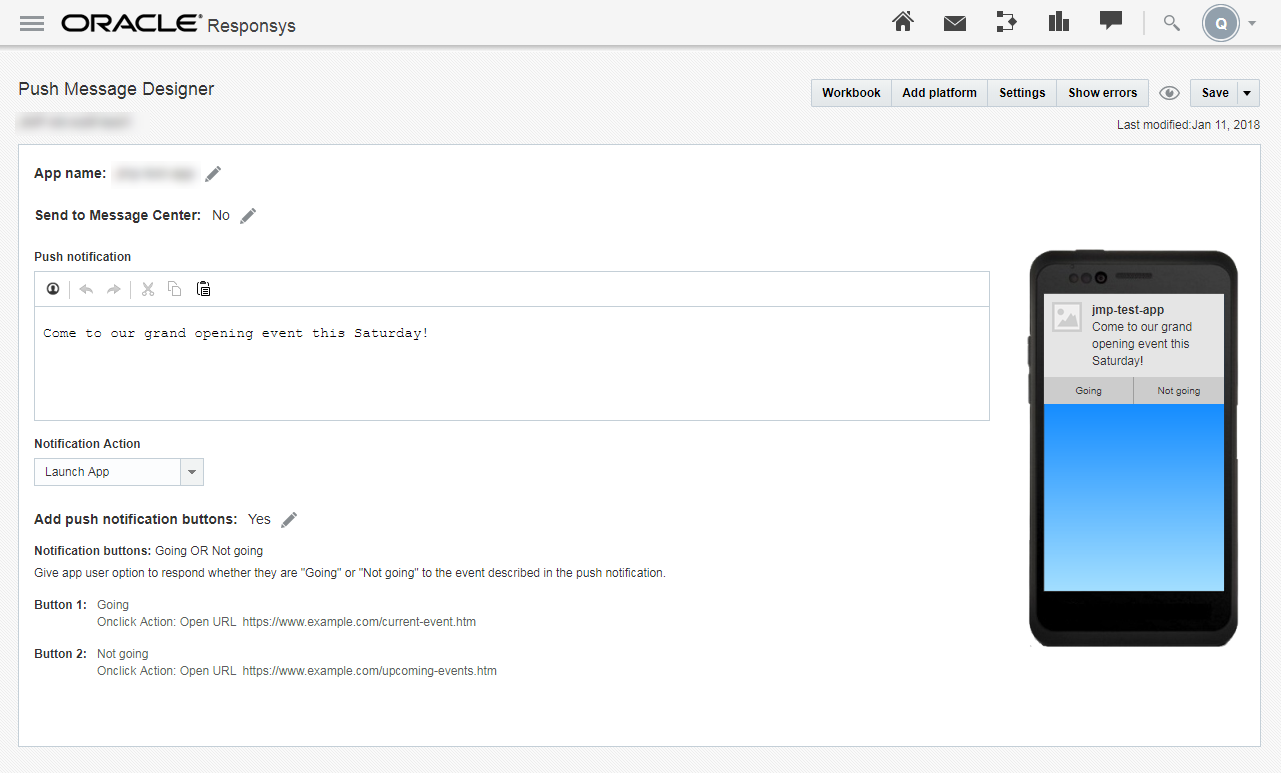
When Marketers design Push Campaigns in Responsys, they now have an option to add greater interactivity to their Push Notifications through Interactive Notifications. Interactive Notifications enable Marketers to add actionable buttons to their Push Notifications, and they allow mobile app users to interact with Push notifications.
About Interactive Notifications
Marketers can add interactive notifications to their Push Campaigns. Responsys supports a pre-defined set of 23 Standard Interactive Notifications, which only require that your mobile app be built with the supporting SDK. If you need buttons other than those provided in the Standard Interactive Notifications, Responsys supports adding Custom Interactive Notifications for mobile apps. Mobile app developers must define Custom Interactive Notifications in their mobile app code using the Mobile App SDK and must configure them for the app using the Mobile App Developer Console.
How Interactive Notifications Work
When Marketers choose and set up an interactive notification button for a Push campaign, the mobile app user will see the button(s) displayed with the Push notification they receive. When the mobile app user clicks an Interactive Notification button, the resulting action depends on how the button is defined:
-
Launch a URL (defined by the Marketer), which could go to a deep link within the mobile app or to a web page outside of the mobile app.
-
Dismiss the Push notification without taking further action.
About the Standard Interactive Notifications
Responsys supports the following Standard Interactive Notification buttons:
-
Accept OR Decline: Gives the recipient the option to accept or decline a choice described in the notification. A click on Accept opens a link. A click on Decline dismisses the notification. (Available with SDK 6.35 and later.)
-
Accept OR Decline (Decline Opens URL): Gives the recipient the option to accept or decline a choice described in the notification. A click on either choice opens a link. (Available with SDK 6.38 and later.)
-
Add to Cart: Adds the product or offer to the recipient's cart. A click opens a link. (Available with SDK 6.38 and later.)
-
Add to Cart OR Add to Wishlist: Gives the recipient the option of adding the product or offer to their cart or to their Wishlist. A click on either choice opens a link. (Available with SDK 6.38 and later.)
-
Add to Cart OR More Like This: Gives the recipient the option of adding the product or offer to their cart, or lets them view more products or offers like the one shown in the notification. A click on either choice opens a link. (Available with SDK 6.38 and later.)
-
Add to Cart OR Share: Gives the recipient the option of adding the product or offer to their cart, or lets them share the product or offer with friends. A click on either choice opens a link. (Available with SDK 6.38 and later.)
-
Add to Wishlist: Adds the product or offer to the recipient's Wishlist. A click opens a link. (Available with SDK 6.35 and later.)
-
Add to Wishlist OR More Like This: Gives the recipient the option of adding the product or offer to the Wishlist, or lets them view more products or offers like the one shown in the notification. A click on either choice opens a link. (Available with SDK 6.38 and later.)
-
Add to Wishlist OR Share: Gives the recipient the option of adding the product or offer to the Wishlist, or lets them share the product or offer with friends. A click on either choice opens a link. (Available with SDK 6.38 and later.)
-
Buy Now: Adds the product or offer to the recipient's cart and starts the checkout flow. A click opens a link. (Available with SDK 6.35 and later.)
-
Buy Now OR Add to Wishlist: Gives the recipient the option of starting their purchase, or adds the product or offer to the Wishlist. A click on either choice opens a link. (Available with SDK 6.35 and later.)
-
Buy Now OR More Like This: Gives the recipient the option of starting their purchase, or lets them view more products or offers like the one shown in the notification. A click on either choice opens a link. (Available with SDK 6.38 and later.)
-
Buy Now OR Share: Gives the recipient the option of starting their purchase, or lets them share the product or offer with friends. A click on either choice opens a link. (Available with SDK 6.38 and later.)
-
Follow: Allows the recipient to follow this brand (or other category, such as News). A click opens a link. (Available with SDK 6.38 and later.)
-
Go To Storefront: Allows the recipient to go to the storefront for this brand. A click opens a link. (Available with SDK 6.38 and later.)
-
Go To Storefront OR Follow: Gives the recipient the option of going to the storefront for this brand or following this brand. A click on either choice opens a link. (Available with SDK 6.38 and later.)
-
More Like This: Allows the recipient to view more products or offers like the one promoted in the notification. A click opens a link. (Available with SDK 6.38 and later.)
-
Opt In OR Opt Out: Gives the recipient the option to opt in or opt out of an offer. A click on Yes opens a link. A click on No dismisses the notification. (Available with SDK 6.38 and later.)
-
Opt In OR Opt Out (Opt Out Opens URL): Gives the recipient the option to opt in or opt out of an offer. A click on either choice opens a link. (Available with SDK 6.38 and later.)
-
Rate: Enables the recipient to rate the brand, product, offer, or the like within the mobile app. A click opens a link. (Available with SDK 6.35 and later.)
-
Share: Allows the recipient to share the product or offer with their friends. A click opens a link. (Available with SDK 6.38 and later.)
-
Yes OR No: Gives the recipient the option to indicate Yes or No in response to the notification. A click on Yes opens a link. A click on No dismisses the notification. (Available with SDK 6.35 and later.)
-
Yes OR No (No Opens URL): Gives the recipient the option to indicate Yes or No in response to the notification. A click on either choice opens a link. (Available with SDK 6.38 and later.)
Enabling Interactive Notifications
To enable Standard Interactive Notifications:
-
Request access to the Interactive Notifications feature by contacting your Customer Success Manager or logging in to My Oracle Support and creating a service request. This feature is currently released under our Controlled Availability program.
-
Obtain and build your mobile app with the Mobile App SDK for your supported platform. You must build your mobile app with the Mobile App SDK version 6.35 or greater for the buttons available in the Responsys 18B Update, or with the 6.38 SDK (when available) for the buttons available in Responsys 18C Update. The Mobile App SDK supports several default Interactive Notification buttons and categories, and your mobile app requires no additional configuration to use the defaults.
To implement Custom Interactive Notifications:
Do the enablement steps above, and then work with your Marketing team to define requirements. For more information about how Marketers use this feature, see the Mobile App Channel Configuration Guide.
There are two parts to implementing Custom Interactive Notifications:
-
Define the Custom Interactive Notification buttons for your mobile app by using the Mobile App Developer Console. For instructions, see the topic Manage Notification button settings.
-
Implement the Custom Interactive Notifications in your mobile app code. For platform-specific information about how to do this, see the following topics:
- iOS
NOTES:
-
Interactive Notifications currently supported for only two Notification Actions: Launch App, Open URL.
-
Interactive Notifications are not supported for the Rich Push format.
Customized UX for destination URLs
When Responsys Link Tracking is used on calls-to-action in Rich Push and In-app message creatives, mobile app users are bounced off the browser and taken to the destination URL when they click the calls-to-action. This results in a poor user experience for the mobile app users.
The new feature "Customized User Experience for Links and Calls-to-action in Rich Push, In-app Messages" gives Mobile App Developers more control of how these links are handled. For example, if you want these links (including HTTP web links) to all be displayed within the mobile app, you can now do so. You can also fix the user experience of being bounced off a browser before being taken to a destination URL.
Mobile App Developers and Marketers should coordinate regarding the desired user experience. This optional feature is implemented by Mobile App Developers using the Mobile App SDK for your supported platform. You will need the Mobile App SDK version 6.35 (when available) or greater. There are no steps for the Marketers to take in Responsys for this feature.
For platform-specific information about implementing this feature in your mobile app: