Export Event Feed Data
You can export behavioral and other data from Connect events from instance-wide and message-specific response activities to third party programs and reports. Use the data for:
- Audit tracking
- Scrubbing data
- Downloading to external programs
- Message and campaign analysis using your designated file system or analytics software
To create an Export Feed Data job:
- Click
 from any page in Responsys Express.
 -
Use the search to find the Connect option, or click Connect from the menu.
- Click Create Job on the Manage Connect page.
- Select Export Feed Data from the drop-down list and provide a name and description of the export job.
A job name cannot be longer than 100 characters and can include only the following characters: A-Z a-z 0-9 space ! - = @ _ [ ] { }
- Click Done.
The Export Feed Data page opens. You may complete the steps in any order, and you can save your changes and continue at a later time.

- Complete the steps:
- After configuring all the steps, click Activate to make the job active.
Important: The Export Feed Data job is set to Never expires by default. You can change the expiration date by clicking Edit next to Expiration. If you give the job an expiration date, then the job will be deleted when it expires. Learn more about managing the expiration date.
After you finish:
- After you save your job, you can use the Manage Connect page to manage the job. Learn more about managing jobs.
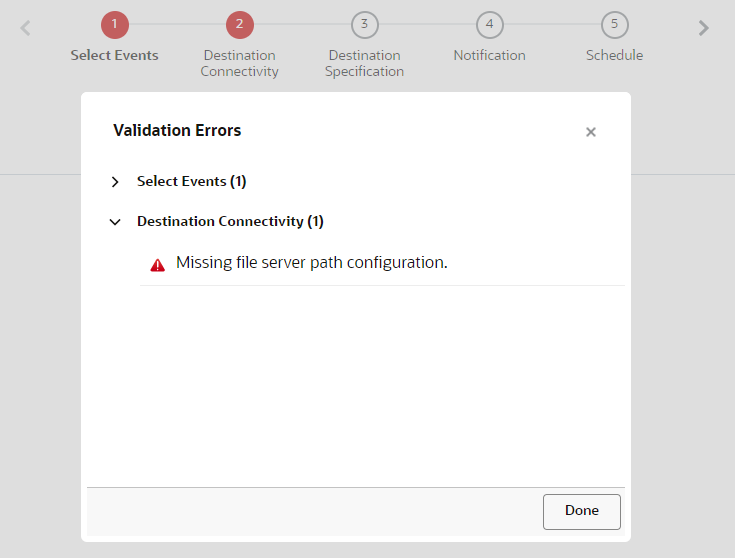
- When you save your job, Connect may return errors. Click Show Errors to review the errors and quickly jump to the page that needs fixing. You must resolve all errors before you can activate the job.

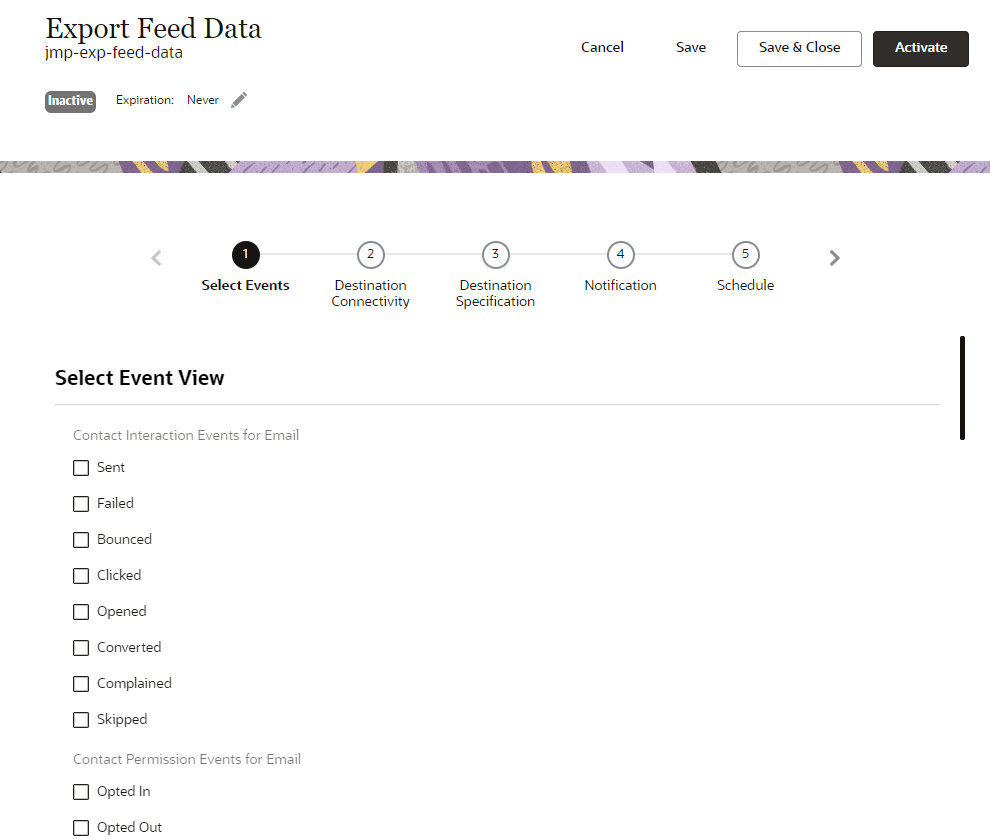
Step 1: Select Events
In this step, you select the events to export. We recommend that, at a minimum, you select these events for output:
- Launch State
- Opted In
- Opted Out
- Complained
- Bounced
The following sections describe the events that you can select for the event data feed files.
Contact Interaction Events for Email
- Sent: Messages by recipient by campaign launch that were successfully sent to the target mail server
- Failed: A Failed event per recipient per campaign launch
- Bounced: Soft and hard bounces
- Clicked: Tracked links. Includes the device Operating System, Operating System Vendor, Browser, Browser Type, Device Type, and User Agent String (if enabled for your account).
- Opened: Tracking individual recipients who opened campaign messages. Includes the device Operating System, Operating System Vendor, Browser, Browser Type, Device Type, and User Agent String (if enabled for your account).
- Converted: Conversions that are registered using the Conversion Tracking functionality (includes Purchase events). Includes the device Operating System, Operating System Vendor, Browser, Browser Type, Device Type, and User Agent String (if enabled for your account).
- Complained: Spam complaints as reported by ISPs through feedback loops
- Skipped: Suppressions
Contact Permission Events for Email
- Opted In: Any individual change to permission status value
- Opted Out: Any individual change to permission status value
Launch, Campaign, Form Audit Events
- Campaign Entered/Exited: Information about campaign entry and campaign exit events
- Campaign State: Information about when a campaign is published or unpublished
- Launch State: Data about when a campaign launch starts, pauses, resumes and stops, plus the campaign type
Step 2: Destination Connectivity
In this step, you specify where to send the export file. You can export to the Responsys file server or to an SSH File Transfer Protocol (SFTP) server. You can send the export file to up to 3 locations
Use the following to help complete this step:
- Oracle File Server
By default, Connect imports data via your Responsys SCP (Secure Copy Protocol) account file server. This account includes three directories: upload, download, and archive. You can choose the directory to place files in.
IMPORTANT: If not already established, Oracle Responsys Support and your IT team will need to work together to generate an SSH-2 public/private key pair. This ensures secure access to your SCP account via an SSH/SCP client. You may also create your own directories using an SSH (Secure Shell) client.
- External server by SFTP
If you select this option, provide the following information:
- Hostname: Select the hostname from the drop-down list.
- Directory Path: Enter the pathname of the associated directory.
- Username: Enter the username for accessing your SFTP connection.
- Authentication: Depending on the way your server is set up, select either Password or Key.
If this is your first job using key authorization, click Access or Generate Key Information, and enter the email address to receive the public key and instructions for adding the key to your SFTP account. After installing the public key, click Test Connection to confirm that your SFTP connection configuration is valid.
TIP: For information about key authentication, see Selecting, Importing, or Generating Public Keys.
Step 3: Destination Specification
In this step, you specify settings for the destination file.
- File to be created: The full name and file extension of the file to create. You can add the file creation date as a prefix and/or suffix. To do this, select a date format from the Prefix or Suffix list.
When the file is created, the jobID and executionID are automatically added as a prefix to the file name. This means that you must include the jobID and execution ID when referring to the file.
- Character set: The character set of the file.
- Field delimiter: The delimiter that divides the fields (columns) in the file.
- Field enclosure: Specify whether text columns and values are enclosed in single or double quotation marks.
Note: For accounts configured to do so, the system will replace delimiters with spaces in all text fields of exported event feed data when NONE is chosen as the enclosing character. For example, if you set up an export event feed data job using a Responsys account configured for this behavior, and then choose NONE as the field enclosure and the tab character as the field delimiter, Responsys will replace all tab characters within text fields with spaces.
- Insert column header as first line: Select this checkbox if the first line in the file contains field names.
- Encryption/compression: Select whether to compress your job as a .ZIP or .GZ file and/or to encrypt it. If you choose the option to compress and encrypt the file with PGP/GPG key, click the Select or import key button to select one or more public keys from the list or import a new public key.
- Insert column header as first line: Select this checkbox if the first line of the exported file contains column headers.
- Additional ready file at completion of download: A ready file is used for validation after the file is exported.
- Select Create empty file to validate the completion of your download process.
- Select Create file with record count to compare simple record counts to verify that all expected record counts were transferred.
For either option, the ready file will have the same name as your export job.
Step 4: Notification
In this step, you specify whether to send email notifications about successful or failed jobs.
Step 5: Schedule
In this step, you schedule the job. The job can run once per day or multiple times per day.
About Contact Event Data output files
Each selected event data feed type is exported as an individual comma-separated values (CSV) file to the file server you specified. The file names and contents of the files depend on the type of events you choose. Additionally, if your instance administrator has added any custom feed columns, those are also included.
See the Contact Event Data (CED) reference in the Responsys Help Center for a list of fields and their descriptions for the event data feed files.
Due to terminology differences between non-Express editions of Oracle Responsys and Responsys Express, the following column names in the feed files will differ.
| Responsys Express | Non-Express Responsys Editions |
|---|---|
| CAMPAIGN_ID | PROGRAM_ID |
| CAMPAIGN_NAME | PROGRAM_NAME |
| CAMPAIGN_VERSION | PROGRAM_VERSION |
| CAMPAIGN_DESCRIPTION | PROGRAM_DESCRIPTION |
| MESSAGE_ID | CAMPAIGN_ ID |
| MESSAGE_VERSION_ID | CAMPAIGN_VERSION_ID |
| EXTERNAL_MESSAGE_ID | EXTERNAL_CAMPAIGN_ID |
| SF_MESSAGE_ID | SF_CAMPAIGN_ID |
| MESSAGE_NAME | CAMPAIGN_NAME |
For example, if you select the Launch State event for export, column name differences would be as follows:
| Responsys Express | Non-Express Responsys Editions |
|---|---|
| MESSAGE_ID | CAMPAIGN_ID |
| EXTERNAL_MESSAGE_ID | EXTERNAL_CAMPAIGN_ID |
| SF_MESSAGE_ID | SF_CAMPAIGN_ID |
| MESSAGE_NAME | CAMPAIGN_NAME |
| CAMPAIGN_ID | PROGRAM_ID |