Exporting data from Responsys to Magento
Important: This feature is currently released under our Controlled Availability program. To request access to this feature, please log in to My Oracle Support and create a service request.
Exports are jobs that transfer customer contact email preferences data (opt in/opt out) from Oracle Responsys profile lists to Contacts in Magento.
Before you begin:
-
Ensure that the Magento app shows "Enabled" as its status on the Applications page.
-
Ensure that you have set up at least one connection in the Magento app.
Important: The steps in this section must be done by a user enabled with either the Account Administrator or CX Apps Director role.
To access the Exports page:
- Log in to Oracle Responsys as an Account Administrator or a CX Apps Director user.
-
Click the navigation menu
 and then click Account.
- On the Account page, locate and click App Management. The Applications page is displayed.
- Locate your Magento app and click
 .
. -
From the Magento app page, click Exports.
To create an export:
-
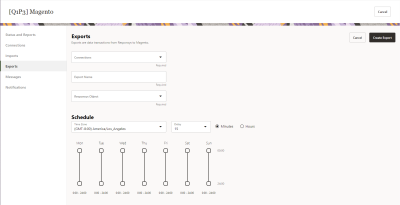
From the Exports page, click Create Export.
-
Select the Connection. This corresponds to the Magento shop domain to which you'll be sending data.
-
Enter an Export Name.
-
For Responsys Object, select a profile list.
Responsys profile lists contain email preferences data (opt in/opt out) for customer contacts. Destination in Magento is always the Contacts, and it is automatically mapped.
- Set the Schedule for the export.
-
When you are finished, click Create Export. The Exports page displays your newly created export.

The newly created export won't run until you enable it.
To enable an export:
-
Locate your export on the page.
-
Click
 and select Enable.
To perform other actions with an export:
-
Locate your export on the page.
-
Click
and select one of the following actions: -
Edit: Opens the edit page for an export. Make your changes and click Save Export.
-
Run Now: Runs the export to bring the Magento data in to Responsys. The export must be enabled before you can use this action.
-
Enable or Disable: Toggles the status of the export to Enabled or Disabled.
-
Duplicate: Opens a copy of the export into a create page. Make your changes and click Create Export. The export is added to the exports page.
-
View Reports: View a chart and table showing successful and failed runs of the export.
-
Delete: Deletes the export. The export must be disabled before you can use this action.