Making User Settings Available for Mapping (User Imports Only)
You can import user information for your employees using Integration Manager. In addition to the employee information stored in the user table, you can import user settings, including user preferences and user privileges that are stored in the switch table.
To make a user setting available for mapping:
-
On the Field Mapping window for user imports, click Switch.
Note:For steps to go to the Field Mapping window, see Mapping OpenAir Fields to CSV Columns.
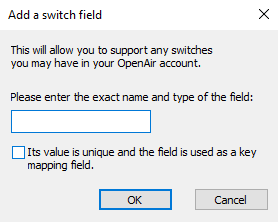
The Add a switch field dialog windows.
-
Enter the setting name exactly as used in the OpenAir
switchtable. The setting name display name that is used on forms and list views in the OpenAir UI in addition to the unique field name that is used to reference the custom field.To verify the setting name in OpenAir, go to Administration > Global Settings > Users > Employees > [Select an employee] then use the developer tools in your browser to inspect the label for the setting. The Inspector pane or window shows the HTML code for the page you are viewing with the element you are inspecting highlighted. The element should read as follows, with the setting name showing in between quotation marks.
<label for="setting_name">Setting label</label>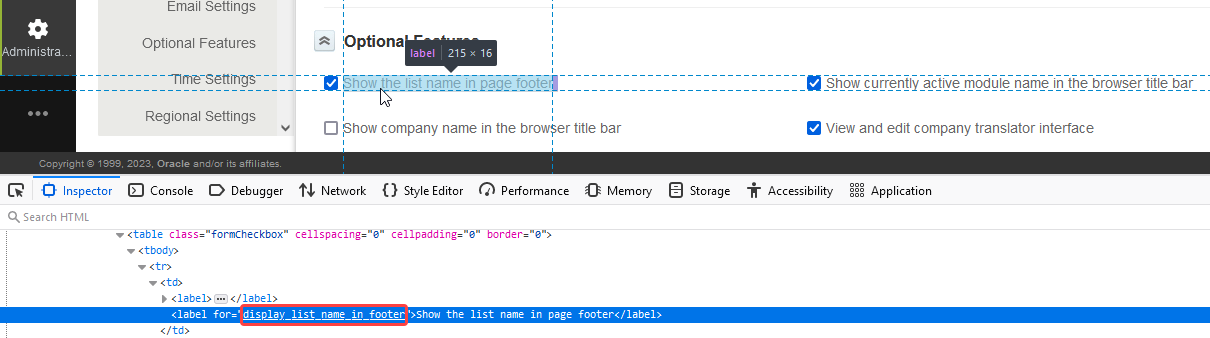 Note:
Note:Make sure you use the setting name and not the label displayed on the form. The setting name is used to reference the setting in the OpenAir software and contains only alphanumeric or underscore characters.
-
Click OK to return to the Field Mapping window.
-
Click OK to save the field mapping settings and return to the main Integration Manager window.
Examples of Standard User Settings
|
Setting Name |
Privilege / Preference |
Accepted values |
|---|---|---|
|
ta_module_off |
Access to Timesheets module |
|
|
te_module_off |
Access to Expenses module |
|
|
pm_module_off |
Access to Projects module |
|
|
rm_module_off |
Access to Resources module |
|
|
ma_module_off |
Access to My account module |
|
|
tb_module_off |
Access to Invoices module |
|
|
km_module_off |
Access to Worspaces module |
|
|
po_module_off |
Access to Purchases module |
|
|
om_module_off |
Access to Opportunities module |
|
|
enable_report_editor |
Enable the report management and editor interface |
|
|
sort_pt_dropdown_alpha |
Sort the task drop-downs by name and omit the ID number prefix |
|
|
ta_timesheet_required |
Timesheet required |
|
|
ta_length_user |
Timesheet duration |
|
|
ta_open_periods |
Timesheet open periods |
|
|
te_open_periods |
Expenses open periods |
|
|
ta_capture_time |
Enable start and end time entry on timesheets |
|
|
<allocation_ |
Allocation grid custom field |
Where |