Importing Data from a CSV File into SuiteProjects Pro
Integration Manager lets you import information from a comma separated values (CSV) file into SuiteProjects Pro. You can use this functionality to import information from a third-party software application in two steps, exporting information from that third-party application to a CSV file first, and then importing information from that CSV into SuiteProjects Pro.
You can use the Integration Manager import functionality to create new records or update existing records in SuiteProjects Pro. Integration Manager creates a new record if it determines that the record does not exist in SuiteProjects Pro. The rules determining if a record already exists in SuiteProjects Pro and if the record should be created or updated depend on the record type and whether the import is configured to look up any existing SuiteProjects Pro record with matching external ID. For more information, see Record Creation or Update Rules on Import.
You can select the columns in the CSV file containing the information you want to import into SuiteProjects Pro and map CSV columns to SuiteProjects Pro fields, include information you want to store in the custom fields specific to your SuiteProjects Pro account, look up related SuiteProjects Pro records by external ID, combine values from several CSV columns into one SuiteProjects Pro field, split values from a CSV column into several SuiteProjects Pro fields, import specific information only when the import creates a new record in SuiteProjects Pro. You can specify the format of date and time columns in the CSV file you import information from, and build in some simple logic to change a target field value in SuiteProjects Pro based on a test field value in your source CSV file. If you use Integration Manager to import user information for your employees, you can import user settings, including user preferences and user privileges that are stored in the switch table, in addition to the employee information stored in the user table.
Review the following guidelines:
-
Always use caution when importing information from a CSV file into SuiteProjects Pro. You should not use Integration Manager unless you have received the relevant training. You must have a good understanding of the SuiteProjects Pro application and how its database is structured, as well as knowledge of the Integration Manager application.
-
Integration Manager 6.6 or later version supports Unicode (UTF-8) characters - You can choose between ANSI (codepage 1252, Western Europe) or UTF-8 encoding. Previous versions of Integration Manager use ANSI (codepage 1252, Western Europe) encoding exclusively. When using ANSI encoding, for imports, only Western European characters are supported. Be sure that the source CSV file containing the information you import into SuiteProjects Pro uses the character encoding scheme selected in the Integration Manager application or shortcut bundle instance you are using to import the information.
-
Use only a decimal point to separate the integral part and decimal part of decimal number values imported to SuiteProjects Pro. Other decimal separators and thousands separators are not supported in integral numbers.
-
Most decimal numbers in SuiteProjects Pro have two-digit precision. To avoid rounding inconsistencies in SuiteProjects Pro, you should use the same precision in your source CSV file.
-
Conditional overrides may be used to modify the format of values following a regular expression pattern. For more information, see Setting Up Conditional Overrides and Regular Expressions Use Case Examples.
-
To verify the format and decimal precision of a SuiteProjects Pro field, refer to the SuiteProjects Pro Data Dictionary. See SuiteProjects Pro Data Dictionary.
To import data from a CSV file into SuiteProjects Pro:
-
Launch Integration Manager. To do so, do one of the following:
-
Double-click the shortcut icon on your desktop (if you opted to add the shortcut during installation).

-
Enter "SuiteProjects Pro Integration Manager" in the search box on the Windows task bar, then double-click SuiteProjects Pro Integration Manager.
-
-
Enter your SuiteProjects Pro account and sign-in details. See Connecting Integration Manager with your SuiteProjects Pro Account.
-
Select the character encoding scheme for CSV imports and exports. See CSV Character Encoding.
-
In Integration Manager, identify the type of record you want to import and configure the import. To do so:
-
Map SuiteProjects Pro fields to CSV columns. See Mapping SuiteProjects Pro Fields to CSV Columns.
The field mapping functionality lets you select the CSV columns you want to import into SuiteProjects Pro and map each CSV column to the corresponding SuiteProjects Pro field. You can also:
-
Import information into the custom fields specific to your SuiteProjects Pro account. See Making SuiteProjects Pro Custom Fields Available for Mapping.
-
Include additional information not already available in your source CSV file and import it into a SuiteProjects Pro field. See Making Additional Information Available for Mapping (Calculated Fields).
-
Combine values under several CSV columns and import them into one SuiteProjects Pro field, or split values under one CSV column and import them into separate SuiteProjects Pro fields. See Combining and Splitting Information.
-
When importing user information for your employees, import user settings, including user preferences and user privileges that are stored in the
switchtable, in addition to the employee information stored in theusertable. See Making User Settings Available for Mapping (User Imports Only). -
Look up related SuiteProjects Pro records by external ID. See SuiteProjects Pro Field Value Lookup (Export) and Record Lookup (Import).
Important:Integration Manager uses an import key field or a combination of import field key fields to determine if a matching record already exists in SuiteProjects Pro. If the record exists, Integration Manager updates the SuiteProjects Pro record with the corresponding information in the CSV file. If the record does not exist, Integration Manager adds a new record in SuiteProjects Pro.
Integration Manager determines which field to use as import key based on the field mapping configuration. For more information about rules determining record creation or update, see Record Creation or Update Rules on Import.
-
-
Set formatting options. See Formatting Information for Export and Import.
The formatting options let you:
-
Specify the format of values containing both date and time parts in your CSV file. See Setting the Date and Time Format Used in the CSV File.
-
Build in some simple logic using conditional overrides to change a target field value in SuiteProjects Pro based on a test field value in your source CSV file. See Setting Up Conditional Overrides.
-
-
-
Create an Integration Manager shortcut if you want to import records of this type on a regular basis manually without launching the Integration Manager application, or to schedule the import to run automatically. This may be useful to support an on-going integration, for example. The Integration Manager shortcut you create captures the field mapping, format and other settings you configured for this import. See Working with Export and Import Shortcuts and Working with Export and Import Shortcuts.
-
On the main Integration Manager window, select the row corresponding to the record type you want to import
 to a CSV file, then click Start to launch the import process.
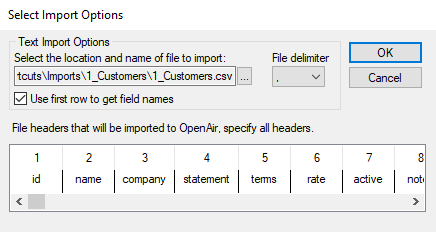
The Import From CSV File window appears.
-
Select the CSV file you want to import information from. To do so, click the Select icon
 , select the CSV file, then click Open.
The Import From CSV File window shows the file path.
-
Select the delimiter used in the CSV file from the Delimiter dropdown options.
-
Check the Column headers (field names) in first row box if the selected CSV file includes column headers (field names) in the first row. If the CSV file does not contain column headers in the first row, enter column headers in the bottom box. You can edit existing column headers if required.
Important:The name and sequence of column headers in the CSV file must be the same as in the CSV file you used to configure the import.
-
Click OK.
The Date/Time Format window appears.
-
Specify the format of values containing both date and time parts in your CSV file. See Setting the Date and Time Format Used in the CSV File.
-
Click OK.
A confirmation message appears.
Important:You are about to import data to your company's SuiteProjects Pro account. This action cannot be undone. By continuing with the import, you assume all liability pertaining to errors or omissions related to this data import.
-
Review the import information, and click Yes to continue with the import.
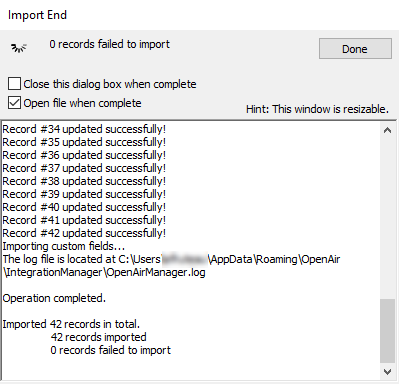
A progress status appears and shows the detailed progress of your export from start to completion.
 Note:
Note:To keep the import progress status window open after the import completes, clear the Close this dialog when completed box. This may be useful if you want to check the status of your import on completion without viewing the log file.
To open the imported CSV file in the default application associated with CSV files on your computer, check Open file when completed.