Making SuiteProjects Pro Custom Fields Available for Mapping
By default, only supported SuiteProjects Pro standard fields are available for mapping. You can add custom fields for a specific record type in SuiteProjects Pro and make these custom fields available for mapping in Integration Manager. You can then export and import information to and from SuiteProjects Pro custom fields in the same way as you import and export information to and from SuiteProjects Pro standard fields. You can rename, reorder, map, combine, or split into SuiteProjects Pro custom fields in the same way as you work with standard fields.
Each custom field in SuiteProjects Pro is associated with a specific record type. When you make a custom field available for mapping in Integration Manager, ensure that:
-
For export field mappings, the custom field is associated with either the record type selected for import, or a record type directly related with the record type selected for import.
-
For import field mappings, the custom field is associated with the record type selected for import.
For export field mappings, you can also look up SuiteProjects Pro custom field values for record types directly or indirectly related to the record type you selected for export. See SuiteProjects Pro Field Value Lookup (Export) and Record Lookup (Import).
After you make a custom field available for mapping, you can edit its properties or remove it at any time. See Editing the Properties of a Custom Field Available for Mapping and Removing a Custom Field Available for Mapping.
To make a SuiteProjects Pro custom field available for mapping:
-
On the Field Mapping window, click Custom Field.
Note:For steps to go to the Field Mapping window, see Mapping SuiteProjects Pro Fields to CSV Columns.
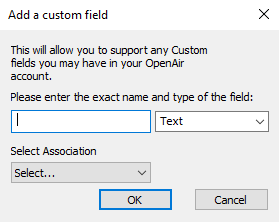
The Custom Field window appears.
-
Under Name and field type, enter the custom field name and select the custom field type exactly as defined in SuiteProjects Pro.
Note:To verify the name and type of custom fields in SuiteProjects Pro, go to Administration > Global Settings > Custom Fields.
Custom fields may have an optional display name that is used on forms and lists in the SuiteProjects Pro UI in addition to the unique field name that is used to reference the custom field. This field name may contain only alphanumeric and underscore characters. For more information about custom fields, see Custom Fields.
Not all custom field types are available for selection. For example, to import a URL custom field, select
Textinstead ofURLand ensure that the field values follow the expected format for import into SuiteProjects Pro. The expected format for URL custom field values is[Example of visible link text](https://www.example.com/example). -
(Export only) Select the record type for which this custom field is defined under Associated record type. Dropdown list options include the record type selected for export and other supported record types directly related to the record type selected for export.
-
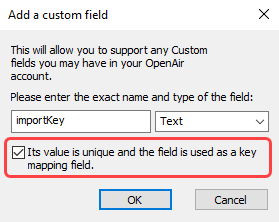
(Import only) To use a custom field as an import key, check the Use custom field as import key box. Integration Manager can use a custom import key to find and update the matching SuiteProjects Pro record, if it exists, or to create a new record in SuiteProjects Pro if there are no records with a matching record type and custom import key, if certain conditions are met. For more information about using custom import keys, see Record Creation or Update Rules on Import.
-
Click OK to return to the Field Mapping window.
-
Click OK to save the field mapping settings and return to the main Integration Manager window.
Editing the Properties of a Custom Field Available for Mapping
After you make a custom field available for mapping, you can edit its properties at any time.
To edit the properties of a custom field available for mapping:
-
On the Field Mapping window, locate and right-click the custom field you want to edit.
A context menu appears.
-
Click Initial Only / Lookup Options.
The Custom Field window appears.
-
Modify the properties as required. For more information, see Making SuiteProjects Pro Custom Fields Available for Mapping.
-
Click OK to return to the Field Mapping window.
-
Click OK to save the field mapping settings and return to the main Integration Manager window.
Removing a Custom Field Available for Mapping
After you make a custom field available for mapping, you can remove it at any time.
To remove a custom field available for mapping:
-
On the Field Mapping window, locate and click the custom field you want to edit.
-
Click Delete.
A confirmation window appears.
-
Click Yes.
-
Click OK to save the field mapping settings and return to the main Integration Manager window.