Mapping OpenAir Fields to CSV Columns
Integration Manager lets you map the OpenAir fields for each supported record type to columns in the CSV file you export information to or import information from. You can set the name and order of columns in the CSV file, combine multiple OpenAir fields into a single CSV column (export) or multiple CSV columns into a single OpenAir field (import), split a CSV column into multiple OpenAir fields (import), or include additional information such as custom fields or calculated fields.
Incorrect field mapping can result in corrupted data in OpenAir or third-party application you are integrating OpenAir with, including the creation of duplicate records. You must have a good understanding of OpenAir and its database structure before you create or modify field mappings, and you must proceed with caution.
To map OpenAir fields to CSV columns:
-
In Integration Manager, locate the row corresponding to the record type and the direction required from the table listing the record types available for import
 from and export
  to a CSV file.
 -
Do one of the following:
-
Click to select the row, then go to Options > Field Mapping.
-
Right-click the row, then click Field Mapping from the context menu.

Depending on the direction, the Field Mapping window appears (export
) or the Select Import Options window appear (import ). -
-
(Import only) When importing information from a CSV file into OpenAir, do the following in the Select Import Options window:
-
Click the More button
 and select the CSV file to import information from.
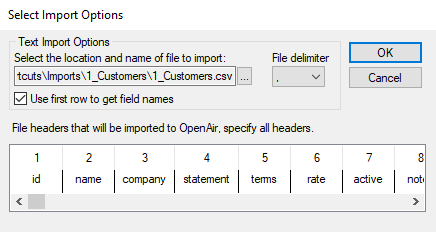
-
Select the File delimiter in the CSV file you want to import information from.
-
Check the Use first row to get field names box if the selected CSV file includes column headers (field names) in the first row. If the CSV file does not contain column headers on the first row, enter column headers in the bottom box. Each column must have a header. You can edit existing column headers if required.
-
Click OK.
A window appears.

-
Click Yes to save the mapping profile.
The Field Mapping window appears.
-
-
The Field Mapping window includes a table listing OpenAir fields and CSV column headers.
A green color arrow in the middle column indicates that the information in this OpenAir field or CSV column is included in the export or import.
-
For export field mappings, the CSV is noted as Destination. The middle column shows green color arrows for each row – all available OpenAir fields are included in the export by default.
-
For import field mappings, the CSV is denoted as Source. The middle column is empty – no information is included in the import by default. When the New serverside lookup by external_id box is checked, a red color arrow indicates the field used as an import key. OpenAir Integration manager uses the import key to determine if a matching record already exists. If the record exists, Integration Manager updates the OpenAir record with the corresponding information in the CSV file. If the record does not exist, Integration Manager adds a new record in OpenAir. Integration Manager automatically determines the import key. See Record Creation or Update Rules on Import.
Listed OpenAir fields include supported standard fields for the OpenAir record type you selected for export or import. If you select an OpenAir record type for export, the listed OpenAir fields also include supported standard fields for other record types directly related with the record type you selected for export. In this case, the field name appears in the list as
<record_type>_<field>, where<record_type>is the name of the associated record type and<field>is the field name. For example, when exporting project records,Customer_nameand other customer fields are also listed in the field mapping table.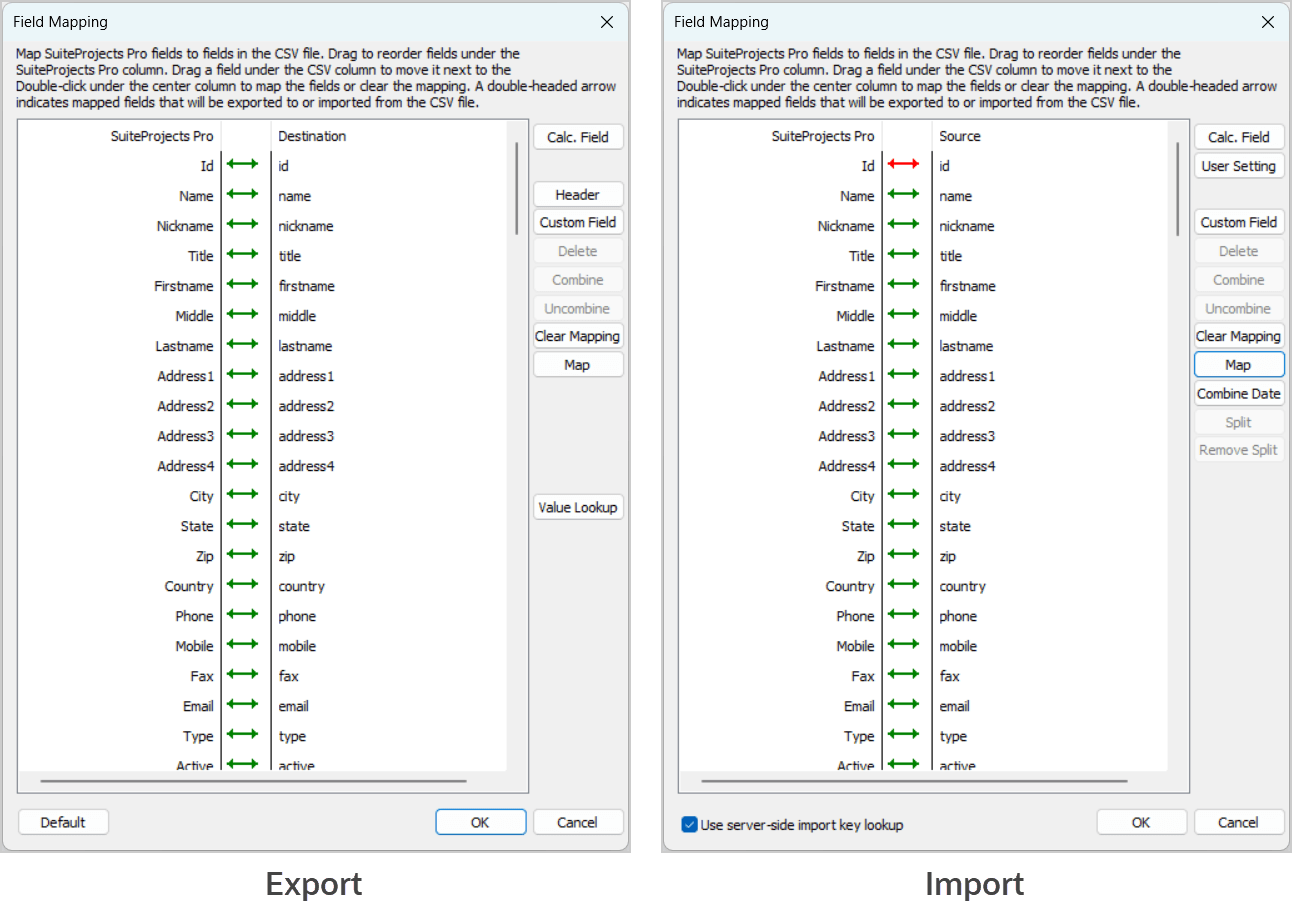
To map a CSV column with an OpenAir field, or change an existing field mapping, drag the CSV column name under the Source or Destination column to the corresponding field name under the OpenAir column.
(Export only) To change the order of the CSV columns, drag the OpenAir field to the new position.
(Export only) To change the name of a CSV column, double click the CSV column name and enter the new name.
To add or remove an OpenAir field or CSV column from the import or export, double-click the middle column on the corresponding row.
To add or remove several OpenAir fields or CSV columns from the import or export at the same time, use the Shift key or Ctrl key to select multiple rows and click Set Mapping or Clear Mapping.
(Export only) To set field level formatting for a specific OpenAir field to CSV column mapping, right-click the row then click Format. For more information about formatting, see Formatting Information for Export and Import and Validating Field Value Length and Range on Export.
You can:
-
Make custom fields defined for your OpenAir account available for mapping. See Making OpenAir Custom Fields Available for Mapping.
-
Make additional information not in your source data available for mapping. See Making Additional Information Available for Mapping (Calculated Fields).
-
Split a source field into two or more destination fields (Import only), combine source fields into a single destination field (Import and Export), or combine separate date and time fields in the source CSV file into a datetime field in OpenAir (Import only). See Combining and Splitting Information.
-
(Import only) Import specific information only when the import creates a new record in OpenAir. By default, the information is imported into all mapped fields both when the import creates a new record and when the import updates an existing record. You can specify the fields you do not want to be updated when the import updates a record. See Importing Field Values on Initial Import Only.
-
(Export only) Look up OpenAir standard or custom field values for record types directly or indirectly related to the record type you selected for export. See OpenAir Field Value Lookup (Export) and Record Lookup (Import).
-
(Import only) Look up OpenAir records associated with the records you import by name or external ID. See OpenAir Field Value Lookup (Export) and Record Lookup (Import).
-
(Export only) Add default header information to your exported CSV files. See Adding Header Information to Exported CSV Files.
-
(User import only) Make user settings, including privileges and preferences, available for mapping. See Making User Settings Available for Mapping (User Imports Only).
-
-
(Import only) The New serverside lookup by external_id box is checked by default. You should keep this box checked.
Note:When importing information into OpenAir, Integration Manager uses an import key to check if any of the records in your source CSV file already exist in OpenAir. If a record with a matching import key value exists in OpenAir, Integration Manager updates that record with the information in the CSV file. If Integration Manager does not find a matching import key value, it creates a new record in OpenAir.
The server-side lookup (when the box is checked) optimizes the import process. It is both faster and more robust than the alternative client-side method (when the box is cleared), which may result in the creation of duplicate records in OpenAir if the source CSV file contains several rows with the same import key field values.
For more information, see Record Creation or Update Rules on Import.
-
Click OK to save the field mapping settings and return to the main Integration Manager window.
Importing Field Values on Initial Import Only
You can set up Integration Manager to import specific information only during the initial import of a record (when the import creates a new record in OpenAir). By default, the information is imported into all mapped fields both when the import creates a new record and when the import updates an existing record. You can specify the fields you do not want to be updated when the import updates a record.
To import field values on initial import only:
-
On the Field Mapping window, right-click on a field mapping with a green arrow, and click Edit.
Note:For steps to go to the Field Mapping window, see Mapping OpenAir Fields to CSV Columns.
The Edit field mapping window appears. External ID is selected by default.

-
Check the Only map for records that are added box.
-
Click OK to return to the Field Mapping window.
-
Click OK to save the field mapping settings and return to the main Integration Manager window.