Validating Field Value Length and Range on Export
You can add length and range validation for field values exported from SuiteProjects Pro to a CSV file.
To validate field length and range on export:
-
On the Field Mapping window, right-click a SuiteProjects Pro field, and click Validation Rules.
Note:For steps to go to the Field Mapping window, see Mapping SuiteProjects Pro Fields to CSV Columns.
The Validation Rules window appears.
-
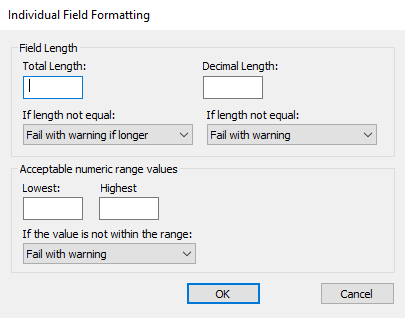
Length validation - To validate the length of the field value, do the following:
-
Enter the Length (maximum or expected number of characters or digits) for field values.
-
Select the Validation outcome from the dropdown options under Length. This determines what happens when the field value length is greater or less than the specified Length. The following options are available:
-
Fail with warning if longer - Integration Manager does not export a record and adds a log entry for the error if the field value length is greater than the specified Length for that record.
-
Truncate the end if longer - Integration Manager exports all records and shortens the field value to match the specified Length by removing digits or characters from the right of the field value.
-
Truncate the beginning if longer - Integration Manager exports all records and shortens the field value to match the specified Length by removing digits or characters from the left of the field value.
-
Pad left with spaces - Integration Manager exports all records and lengthens the field value to match the specified Length by adding spaces to the left of the field value.
-
Pad right with spaces - Integration Manager exports all records and lengthens the field value to match the specified Length by adding spaces to the right of the field value.
-
Pad left with zeros - Integration Manager exports all records and lengthens the field value to match the specified Length by adding zeros to the left of the field value.
-
-
Enter the Maximum decimal precision (maximum number of digits in the decimal part) for field values.
-
Select the Validation outcome from the dropdown options under Maximum decimal precision. This determines what happens when the field value length is greater or less than the specified Length. The following options are available:
-
Fail with warning - Integration Manager does not export a record and adds a log entry for the error if the length of the field value decimal part is greater than the specified Maximum decimal precision for that record.
-
Truncate - Integration Manager exports all records and shortens the decimal part of the field value to match the specified Maximum decimal precision by removing digits from the left of the decimal part.
-
-
-
Range validation - To validate the range of the field value, do the following:
-
Enter the minimum value under Lower limit.
-
Enter the maximum value under Upper limit.
-
Select the Validation outcome from the dropdown options. This determines what happens when the field value is outside the range (less than the specified Lower limit value, or greater than the specified Upper limit value). The following options are available:
-
Fail with warning - Integration Manager does not export a record and adds a log entry for the error if the field value is outside the specified range for that record.
-
Set to closest range - Integration Manager exports all records and changes the field value either to the minimum value (Lower limit) if less than that value, or to the maximum value (Upper limit) if greater.
-
-
-
Click OK to return to the Field Mapping window.
-
Click OK to save the field mapping settings and return to the main Integration Manager window.