Advanced Filters
Advanced filters are accessible from the list toolbar and let you refine your list using filter conditions to show exactly the data you need.
Use advanced filters to reduce your list data and only include the data directly relevant to your task. This will help your lists load faster and in some cases may restore full functionality to your lists. See List Data.
Click the Filter icon ![]() in the list toolbar or press
in the list toolbar or press ![]() on your keyboard to show or hide the advanced filters panel under the list toolbar. If an advanced filter is currently applied to your list, the Filter icon is displayed in green color
on your keyboard to show or hide the advanced filters panel under the list toolbar. If an advanced filter is currently applied to your list, the Filter icon is displayed in green color ![]() .
.
Currently, two versions of the advanced filters user interface are available. Both have similar functionality but different layouts.
-
Default Advanced Filters UI - The default advanced filters user interface lists filter conditions vertically (one filter condition per line). For complex filters. You select and apply a filter from the flyout panel and not from the toolbar.
-
Redesigned Advanced Filters (Optional Feature) - The Redesigned Advanced Filters optional feature changes the user interface for advanced filters on redesigned lists. The redesigned advanced filters panel is compact and lists filter conditions horizontally instead of vertically. It lets you select and apply saved filters directly from the list toolbar instead of the flyout panel. The new layout brings better usability and takes less of your canvas space.
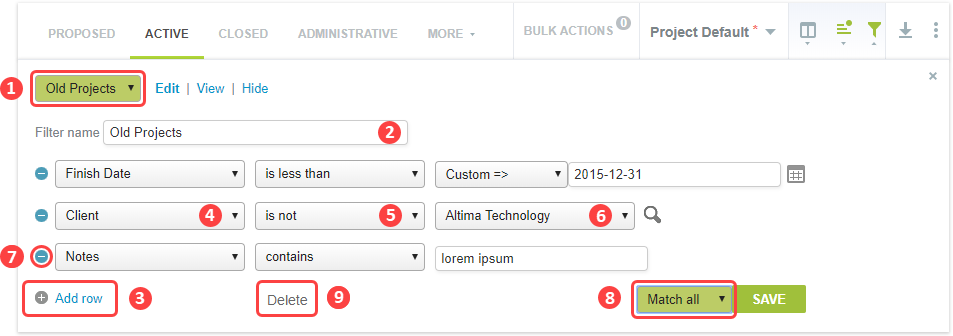
Default Advanced Filters UI
The default advanced filters user interface lists filter conditions vertically (one filter condition per line). For complex filters. You select and apply a filter from the flyout panel and not from the toolbar.
|
1 |
Click the dropdown to select one of your saved Advanced Filters or create a new one. Click Edit to modify the filter settings, View to display the filter criteria or Hide to display only the filter name. Select All from the dropdown to disable any Advanced filter currently applied to your list. |
|
2 |
Give your advanced filters a descriptive name so you can re-use them in future. After you have set or modified the filter condition, click Save to validate your changes and return to your list. |
|
3 |
Click Add row to add a new filter condition. |
|
4 |
Click the dropdown box further left in the filter condition row to select a field. |
|
5 |
Click the middle dropdown box to select a comparison operator from the available options. |
|
6 |
Depending on the chosen field and comparison operator, define a value or a range of values by either typing, selecting a value or range from predefined dropdown options, or setting a custom value. |
|
7 |
Click the Delete row icon |
|
8 |
Click the dropdown field and select Match all if the results must match all specified filter conditions (AND logical operator) or select Match any if the results must meet at least one of the specified filter conditions (OR logical operator).
Note:
The default logical operator for list advanced filters is Match all. Whenever possible, set advanced filters to match all specified filter conditions for optimum list performance. |
|
9 |
Click Delete to delete the saved advanced filter. The deleted advanced filter will no longer be available for selection. |
Redesigned Advanced Filters (Optional Feature)
The Redesigned Advanced Filters optional feature changes the user interface for advanced filters on redesigned lists. The redesigned advanced filters panel is compact and lists filter conditions horizontally instead of vertically. It lets you select and apply saved filters directly from the list toolbar instead of the flyout panel. The new layout brings better usability and takes less of your canvas space.

-
Click the caret icon
 and select an option to save, save as, rename or delete the filter.
 -
The filter selector in the list toolbar shows the name of the filter that is currently applied to your list, or All if no filters are applied.
The filter selector includes a search bar. To search for a specific filter, type a few characters of the filter names in the search bar. The dropdown list is refined as you type to show only the saved filters with names list matching your search string.
-
The default name for new filters is "Unsaved filter".
-
A red asterisk
 next to the filter name indicates there are unsaved changes.
 -
Click the filter name to select and apply one of your saved filter, or to clear advanced filters and show All data. To search for a specific filter, type a few characters of the filter names in the search bar. The dropdown list is refined as you type to show only the saved filters with names list matching your search string.

-
-
The logical operator is shown in light blue color background. Click the logical operator to change it. Select Match all if the results must match all specified filter conditions (AND logical operator) or select Match any if the results must meet at least one of the specified filter conditions (OR logical operator).
Note:The default logical operator for list advanced filters is Match all. Whenever possible, set advanced filters to match all specified filter conditions for optimum list performance.
-
Each filter condition shows the field name, the comparison operator and the value in a simple sentence structure. If multiple values are selected, the filter conditions shows a number
 indicating the number of values selected instead of the value.
Click a filter condition to modify it, or click the clear icon
 to remove a filter condition.Note:
The filter panel shows a maximum of three rows of filter conditions when you first open it. A + <n> button indicates there are
<n>more additional filter conditions defined for this filter. Click + <n> to expand the filter panel and show all filter conditions.To add a new filter condition:
-
Click the add icon in the advanced filter panel.
-
Enter a field name. A list of matching available field names appears and is updated as you type, with exact and closest match at the top of the list. Select the relevant field.
-
Select a comparison operator.
-
(Optional) Select one or more values, or a range from predefined dropdown options, or enter a custom value, depending on the field type and comparison operator.
You can press the Esc key to close the value dropdown and press it again to close the filter condition setup panel. You can also click outside the value dropdown and filter condition setup panel to close both. If the value dropdown allows you to select multiple values, all the selected values remain selected.
 Note:
Note:Review the following guidelines:
-
You must add at least one filter condition before you can save the filter.
-
It is not necessary to select or enter a value for each filter condition you define. The filter condition will be ignored if the value is not specified. This may be helpful if you want to configure saved filter templates, which you can then can adapt by selecting relevant values for each filter condition.

-
The customer dropdown list in the Redesigned Advanced Filters feature shows additional customers information in addition to the customer Name, depending on your account configuration. See Customer Display Options.
-
The resource or employee dropdown list in the Redesigned Advanced Filters feature lets you search and select both active and inactive employees as values in your filter conditions depending on your account configuration. See Resources Other Settings.
-
-
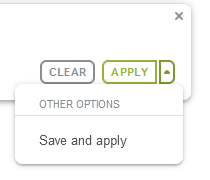
Click Apply to preview the advanced filter results before saving the changes you made to the filter. The list shows the items matching all filter conditions in the filter panel including any unsaved changes you made to the filter conditions. You can then click the caret next to Apply, and click Save to save the changes you made to the filter.
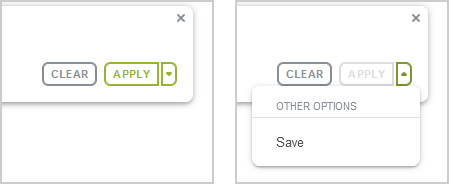
Alternatively, click the caret next to Apply, then click Save and Apply to save the changes you made to the filter before viewing the advanced filter results.
-
Click Clear to clear all filter conditions.