List Data
List data is presented in a tabular form according to the Column configuration, Sorting, Filtering and other List options you have specified. Lists let you have an overview of a specific set of data and let you select and go to the particular item you want to work on.
From the list you can:
|
1 |
Go to one of the listed records - Click the name of the record to display the record page. |
|
2 |
Monitor the progress of your projects at a glance. |
|
3 |
Some lists include a Bulk actions column. The Bulk actions column is always the first column on the left, when present, and cannot be moved. Select records and run bulk actions on the selected records. See Bulk Actions |
|
4 |
Some lists include an Actions column. The Actions column is always the first or second column on the left, when present, and cannot be moved. Depending on the list, the following actions may be available:
|
|
5 |
Cell tips - List cells include an information icon if contextual tips are available. Click the information icon |
|
6 |
Expand / Collapse - The workspace documents and saved reports lists let you expand and collapse folders by clicking the expand icon |

Lists with fewer rows load faster. To reduce the number of row, use advanced filters.
A tip appears at the top of the list column headers if the list contains more than 500 rows:

Some list features, such as Sorting the List Data, are disabled if the list contains more than a threshold number of rows. The threshold depends on the configuration of your company's SuiteProjects Pro account. A message appears at the top of the list column headers if the number of rows exceeds that threshold:

Reduce the number of rows using advanced filters to load lists faster or restore full functionality. See Advanced Filters.
Some of the list features depend on your account configuration:
-
The following optional features change some of the list behavior and functionality:
-
The following optional features extend the capabilities of the list data beyond an overview and navigation tool:
-
Project Center - See Working with the Project Center View
To check whether these features are enabled in your company's account, contact your account administrators.
Rendering Rows of Data as You Scroll
SuiteProjects Pro renders rows of data as you scroll the list if the number of rows per page is set to 100 or higher. If this is the case, SuiteProjects Pro prepares the rows that will be visible on your screen as well as extra rows of data up and down the list for display. Additional rows are rendered progressively as you scroll up and down. This reduces the demands on your browser and let your lists load faster.
You can only search the rendered rows using the browser 'Find in page' feature (Ctrl +F). You cannot search through all 100 or 1000 rows in a page using Ctrl + F.
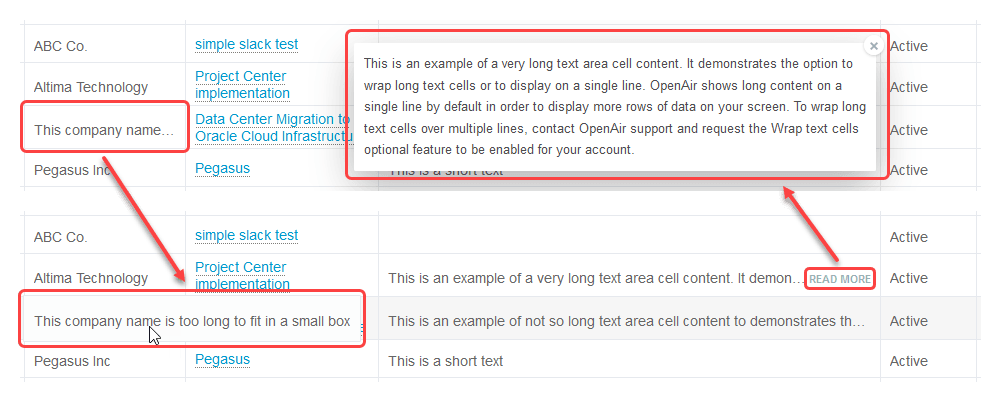
Display Options for Long Text Cells in Lists
Depending on your account configurations, lists display long text cells differently. Account administrators can select to wrap long text and text area field values on multiple lines in list cells or display it in truncated form on a single line.
-
Single line (Default) - By default, redesigned lists display text and text area field values on a single line by default. Line feeds are removed to show more information. Lists are more compact. If the entire text does not fit the cell, only part of the text is displayed with ellipses to indicate the text is truncated. To view the full text, point to the cell or click Read more inside the cell (for longer text content).
-
Wrap text - If the Wrap Text in List Cells feature is enabled for your account, SuiteProjects Pro wraps long text and text area field values on multiple lines in list cells. Lists are less compact. For longer text content, only part of the text is displayed with ellipses to indicate the text is truncated. To view the full text, click Read more inside the cell.

Longer text area cell content is truncated whether the wrap text option is enabled or disabled. To view the full text, click Read more. The full text appears in a popup box. Click the close icon ![]() , press the Esc key or click outside the box to close the popup box and return to the list.
, press the Esc key or click outside the box to close the popup box and return to the list.
These display options do not apply to the description column in the following lists. The entire cell content is always shown and line feeds are supported.
-
Projects > [Select a Project] > Financials > Billing > Rules
-
Projects > [Select a Project] > Financials > Recognition > Rules