Working with the Project Center View
The following optional features must be enabled to use the project center: Inline-Editing in Lists and Project Center.
You must have the “View Project Center” role permission to access the project center.
Contact your account administrators to check whether these features are enabled in your company's account and to check your role permissions.
The Project Center optional feature aims to provide you with the tools to manage key project activities from a single page.
The Project Center lets you:
-
Create and modify your project plans — See Managing Project Plans in the Project Center.
-
Create and manage resource bookings from within the project center — See Managing Resource Bookings in the Project Center.
-
Track hours worked in past periods and view the planned resource costs and time charges — Viewing Hours, Time Costs, or Time Charges in the Project Center
Account administrators control who can access the project center by role permission.
Account administrators control project center options for all account users, including whether the project center show project sequence information only or project sequence information and resource booking information. See Project Center Options.
To access the project center for a specific project, go to Projects > Projects > [Select a project] > Project Center.
The project center view looks similar to a list and supports several list features including inline-editing. A label above the column headers indicates whether the project center view is editable or read-only, depending on the access control settings for the project you are viewing and your permissions. For more information about inline-editing, see Inline-Editing in Lists.

Depending on your role, you may not be able to edit all information in the project center view even if the view itself is editable.
Form permissions and form rules are applied. Form scripts associated with the booking form will be triggered when updating a booking record directly from the project center.
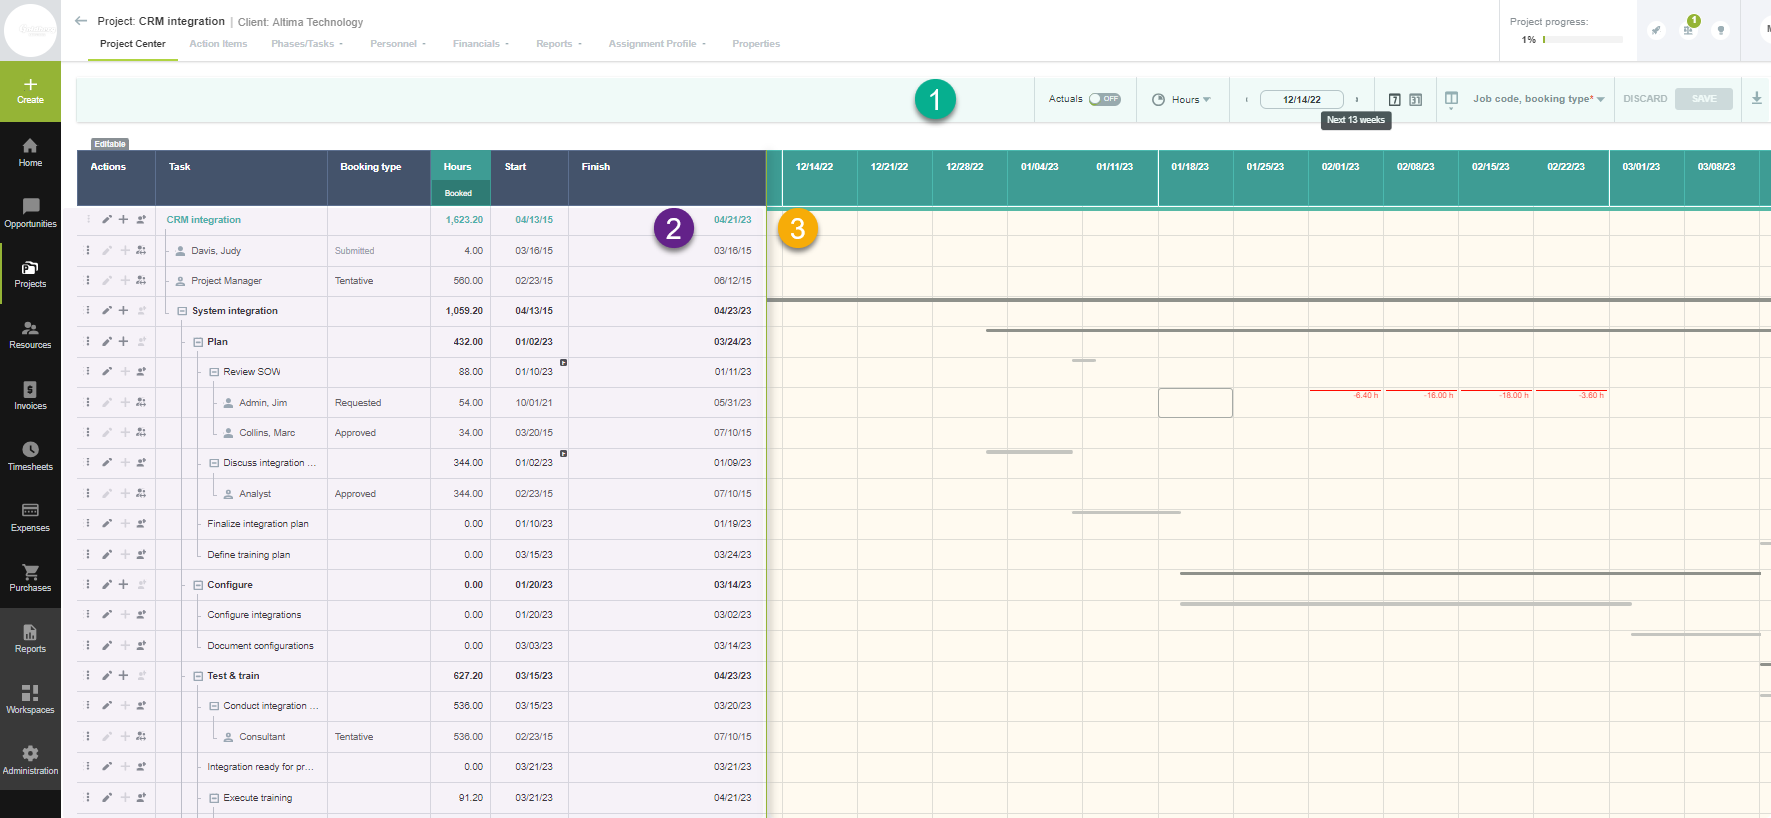
The project center includes the following components:
|
1 |
Toolbar — The project center toolbar includes the column selection and download tools available for lists throughout SuiteProjects Pro as well as functionality specific to the project center view. See Project Center Toolbar. |
|
2 |
Project outline — The project outline occupies only the left section of the canvas and shows your project sequence and, depending on the project center options configured for your account, resources booked to your project.
Relationship lines show a clear overview of the project structure and relationships between phases, tasks, bookings and milestones in the project. You can expand and collapse each node in the project tree to show or hide all phases, tasks, bookings, and milestones nested under that node. The project schedule information (calculated task, phase and project Start dates and Finish dates, and Planned hours) is updated automatically when you make a relevant change in the project center. When the calculation is in progress, information in the Start, Finish and Planned hours columns cannot be edited and loading spinners are visible in the column headers. See Project Schedule Calculation in the Project Center. |
|
3 |
Booking grid — The Project Center view shows a booking grid alongside the project outline. Depending on the selected granularity, the booking grid shows a week-by week or month-by-month schedule. Each column corresponds to a week or month and the column header shows the first day of the week or month. See Date Navigation in the Project Center.The number of columns in the grid depends on the size of your browser window. It is calculated automatically when you first load the page or when you refresh it.
Horizontal bars in the booking grid give a visual representation of the duration of the project, each phase and task based on the Start and Finish dates. Each bar is located at the top of the row and is color-coded: green color for the project, dark gray color for each phase, light gray color for each task. Availability indicators show the availability of the resource for each week as you make changes, and warning indicators show out of schedule bookings and potential overutilization of resources.
Important:
Review the following guidelines:
|
The following list functionality is not available in the project center:
-
Filtering and sorting options — The project center page is designed to show the full project outline and all resource bookings in the project sequence.
-
Rows per page — You can collapse and expand nodes in the project trees to show or hide phase, task, booking and milestone rows nested under the node. This functionality would not be supported with a limited number of rows per page.
-
Column lock — The project center uses a fixed column lock to separate the project outline and the booking grid in the same view.
-
Bulk actions — Not currently supported.
Lazy Loading
The project center page uses lazy loading, or loading “on demand” to load only the data you see on the page as you interact with the tool.
The project outline and the booking grid are loaded progressively. SuiteProjects Pro loads only enough data to fit the available canvas space when you go to the project center. It then loads data as you scroll, as you expand or collapse nodes in your project tree, or as you change the period visible in the booking grid. This ensures a smooth experience when viewing or editing large project structures with a high number of bookings and achieves a good compromise between loading time and key project center functionality.
You can use the vertical scroll bar to go through all rows in the project center view even if the data is not loaded. This lets you scroll through the data of larger projects faster.
You can start your project where you left off with remembered vertical scrolling position, which is maintained when reloading the page or reopening a browser tab. This lets you go faster to any rows in the project center view, when working on large and complex projects.
The project center initially loads only the number of rows and columns that fit in your browser window. If you increase or decrease the size of the browser window, reload the page for optimum user experience.