Uploading Vendor Bills Into NetSuite
Use the following procedure to upload vendor bills into NetSuite. You can upload vendor bills by email or by drag and drop.
Uploaded bill files are stored in the File Cabinet in the User Documents folder. This folder is only visible when using the Administrator role in the following location: User Documents > User's Name > Scanned Vendor Bills. This folder structure is automatically created and used for both manual uploads and emailed files. It is not related to File Drag and Drop preferences.
To upload vendor bills into NetSuite:
-
Go to Transactions > Payables > Scanned Vendor Bills.
The Scanned Vendor Bills page displays all emailed and uploaded bill files. A Review option is available for files that have been emailed or uploaded but for which the NetSuite bill has not been created yet. These rows can be deleted. Rows with files that failed to upload can also be deleted. To delete rows, check the box next to one or more rows and select Delete. Deleting a row also deletes the file from the File Cabinet. After a bill has been created, a View option is available. These rows can't be deleted, but they can be hidden. For more information about hiding rows, see Bill Capture Preferences.
After uploading a file, a duplicate detection warning is displayed if a bill has already been created with a matching reference number. This helps you identify if you have uploaded a duplicate bill.
User notes can be added to each uploaded file. They are carried over to the bill in the User Notes section of the Communication subtab. For information about permissions required to create and view user notes in Bill Capture, see Prerequisites for Bill Capture.
You can use upload date, source, vendor, and status filters to find an emailed or uploaded bill. All vendors are in the Vendor dropdown, regardless of whether bills for them have been received. This also applies to the Upload Source filter. Only emails from those who have previously emailed bills are in the Email Source filter.
-
Upload or email a vendor bill file. For information about supported file formats and sizes, see Bill Capture Considerations.
-
Upload - Use the File Uploader to select or drag and drop a file, then click Upload File. Upload a maximum of 50 files at a time for best performance.
-
Email - Email the attached bill file to the NetSuite email address for the account. An email notification is sent to the sender to confirm the vendor bills were successfully processed. If there are errors encountered after sending vendor bills, an email notification about the error is sent to the vendor or NetSuite employee who sent the bill. The Bill Capture email feature is implemented through the Transaction Email Capture SuiteApp. For more information, see Transaction Email Capture SuiteApp.
A Review Bill option appears after the file is processed and ready to be reviewed.
-
-
Locate the file and click Review.
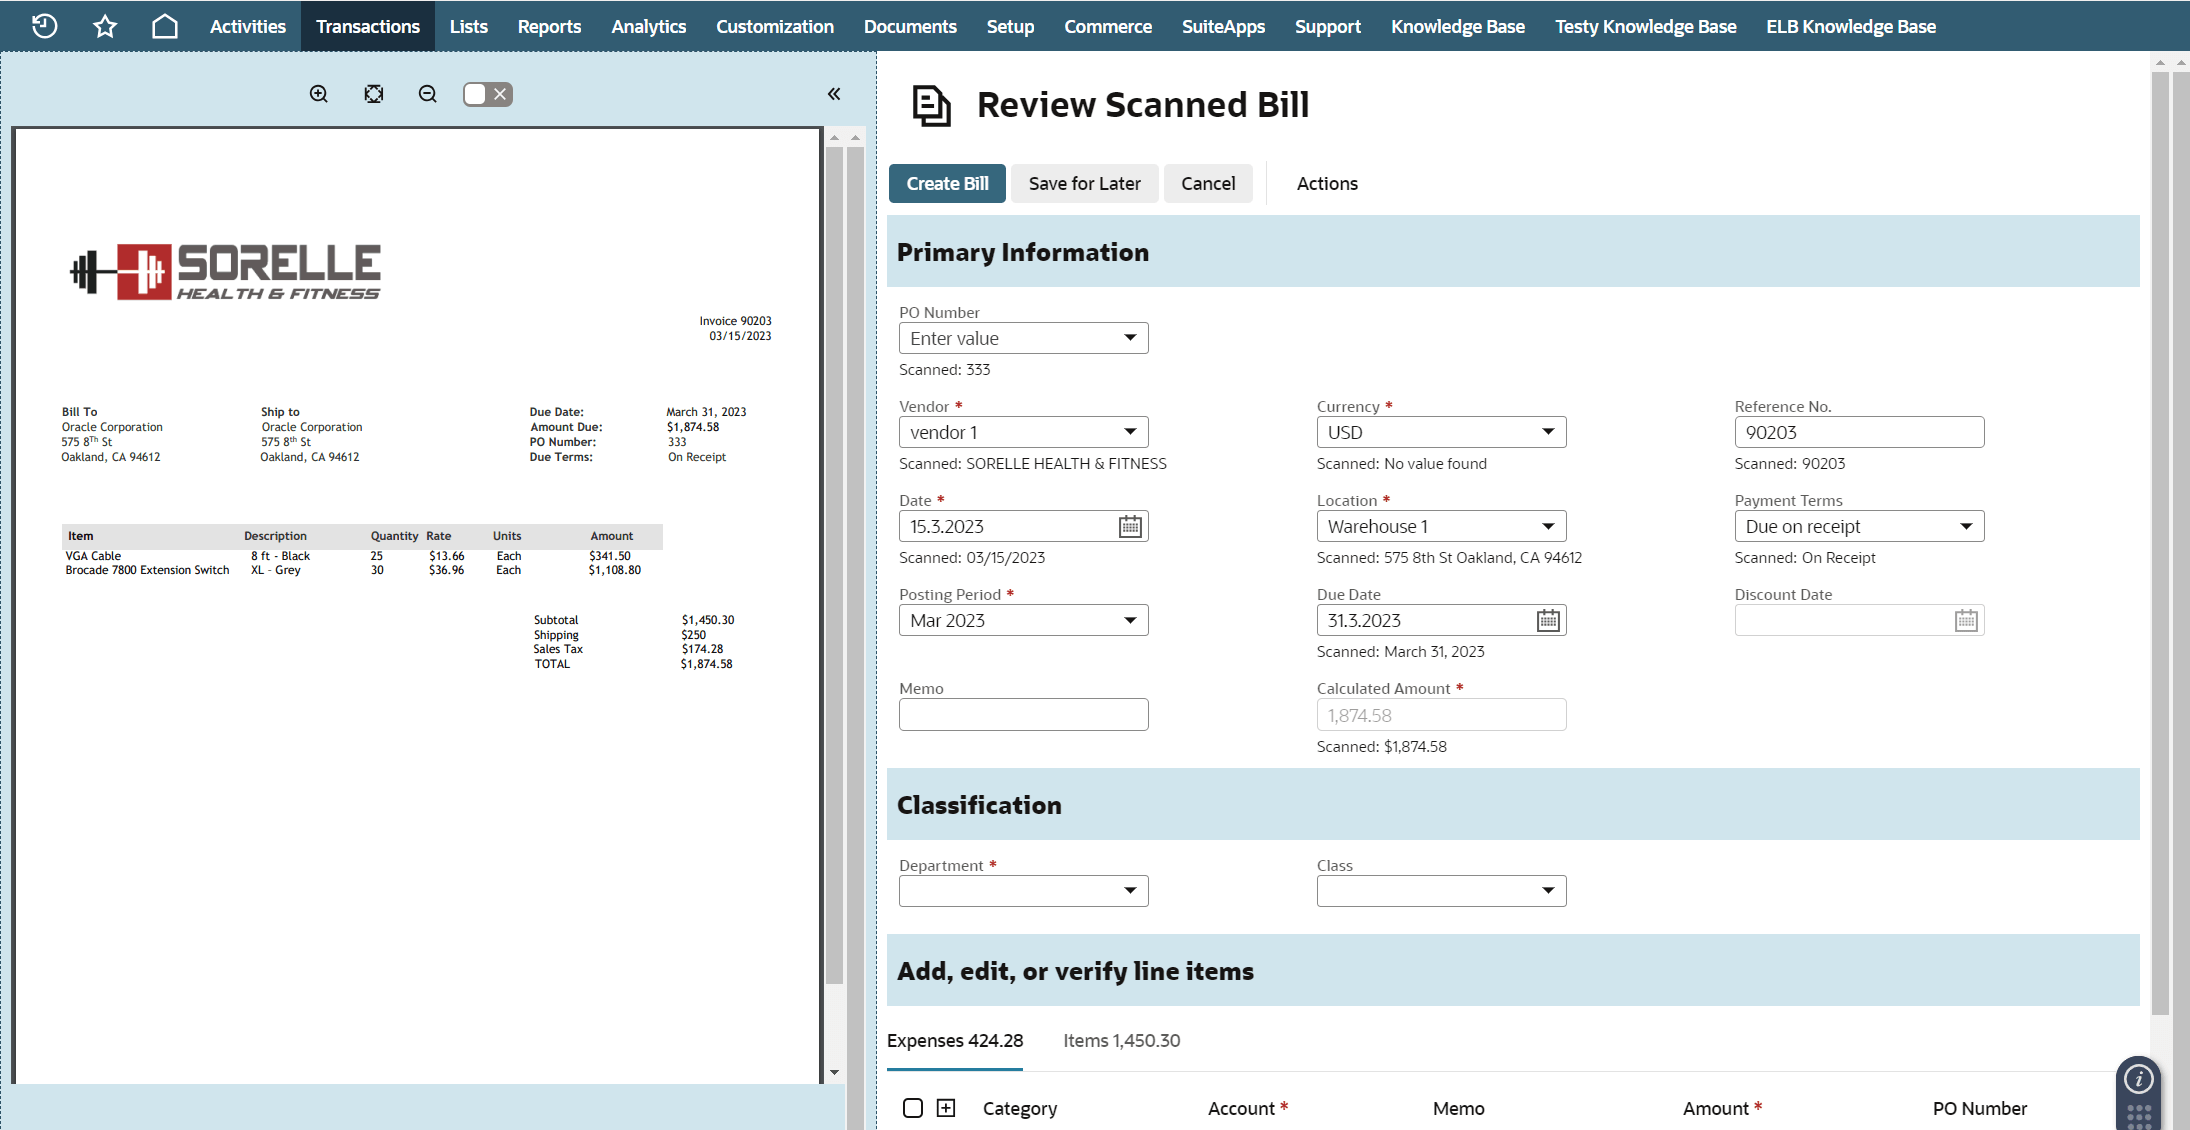
The Review Scanned Bill page displays a split view with the scanned file on the left side and the potential vendor bill on the right side. You can zoom in and out on the scanned bill. Download the file by selecting the download icon on the left side of the split view. You can also collapse the scanned pane to focus on the potential vendor bill on the right side. Cross-reference highlighting is available. Select any field on the potential vendor bill on the right, to highlight the corresponding field in the scanned file on the left of the split view. When highlighting is disabled, information can be copied from the file and pasted in the potential vendor bill on the right.
Bill Capture provides suggestions that need to be verified before creating the bill. If no information was scanned for a field or no match was found in NetSuite, the field is left empty.
Important:If a PO is linked, the information on the Review Scanned Bill page can be sourced from the PO. Depending on your preferences, the bill can be automatically created if a PO is linked. To manage this preference, go to Setup > Accounting > Bill Capture Preferences > Review Page Field Sourcing.
-
Review the Primary Information section.
-
PO Number - Updating this value in the Primary Information section will update the PO number in all lines. If the PO number is updated, fields that are sourced from the PO are remapped.
Tip:Always verify the PO number before continuing the review. Fields that are sourced from the PO will be remapped if the PO is updated.
-
Subsidiary - If you have access to multiple subsidiaries, Bill Capture attempts to select the correct subsidiary. If an incorrect subsidiary is suggested, you can manually update it. If the subsidiary is updated, NetSuite remaps the remaining fields in case those related to the subsidiary choice, such as vendor, need to be corrected. Bill Capture only supports subsidiaries in the United States. Do not select subsidiaries outside of the United States.
-
Vendor - To populate the vendor, the system compares the scanned bill's vendor name, vendor logo, and vendor address recipient with the vendor names found in NetSuite (company or individual).
-
Currency - The currency populated either from the scanned file or from the vendor's primary currency, based on your Bill Capture preferences.
-
Reference No. - The invoice reference number from the scanned file. Reference numbers can be validated to check if they have already been used for the vendor. For more information, see Duplicate Record Detection and Duplicate Number Warnings.
-
Date - The invoice posting date from the scanned file.
-
Location - The Location field is used to select the location for all line items at the same time. The Location can also be changed individually for each line item.
-
Payment Terms - The invoice payment terms from the scanned file or the vendor's default, based on your Bill Capture preferences.
-
Posting Period - This date is used to post transactions in the General Ledger.
-
Due Date - The invoice due date from the scanned file or calculated from the Payment Terms and Date fields, based on your Bill Capture preferences.
-
Discount Date - This field is calculated based on the payment terms for the bill.
-
Memo - The Memo field reduces the need for editing the bill post creation.
-
Calculated Amount - This field is calculated from the sum of the expenses and items. This lets you verify that the sum of all the generated lines equals the total amount of the scanned bill.
-
Payment Hold - Check this box to apply a payment hold on a disputed bill. For more information about payment holds, see Manage Payment Holds.
-
Tax Amount - The tax amount calculated using SuiteTax Engine. This field is only available when NetSuite SuiteTax Engine is enabled. For more information, see SuiteTax Engine.
-
-
Review the Classification section.
-
Department - This field is populated based on the matching PO.
-
Class - This field is populated based on the matching PO.
-
Custom Segments - Custom segments are used to create custom classification fields, similar to class, department, and location. You can now use custom segments in Bill Capture to classify vendor bills more accurately. For more information about custom segments, see Custom Segment.
-
-
Review Items, Expenses, and Tax Details.
The Tax Details subtab is available when NetSuite SuiteTax Engine is enabled. For more information, see SuiteTax Engine.
Note:The Total Tax Bill Capture preference lets you decide how to record taxes scanned from the file. If the SuiteTax Engine is enabled, this preference should be left blank. View the preference at Setup > Accounting > Bill Capture Preferences > Review Page Field Sourcing > Total Tax > Save Tax As.
Items and expenses are matched based on the purchase order and fields are populated accordingly. If no purchase order is matched, historical transactions are considered to categorize lines as items or expenses. This takes into account multiple similarities when examining previous bills from your matched vendor. A warning is displayed if PO and Review Scanned Bill page amounts do not match. If needed, you can remove multiple item lines and expense lines at the same time.
The Purchase Order popup, where you can link a PO to a specific line, includes the Ordered Quantity, Received Quantity, and Billed Quantity. Clicking a PO number in the popup opens the PO record.
Use the Billable box to classify whether an item or expense is billable or not. When this option is selected, the item or expense is ready to be billed when bill creation is complete.
-
Items - The system compares the uploaded bill's item name, description, and product code (if any) with item names, vendor codes, and manufacturer part numbers found in NetSuite. The closest match is suggested. If there is no match, the field is left blank. Item rates are carried from the item record if there is no PO linked or scanned value found.
-
Expenses - If expense accounts are to be sourced from the vendor record, the system automatically populates the default expense account of the matched vendor. For more information see Bill Capture Preferences. Otherwise, the system associates each memo with the expense account or category entered. The next time such memo is scanned, the account or category is automatically populated. The closest match is suggested. If there is no match, the field is left blank.
Note:On the Items subtab, the number of records in the Item list is dependent on your account's "Maximum Entries in Dropdowns' preference, located at Setup > Company > General Preferences.
If a line was identified as an item when it should have been under the Expenses subtab, or the inverse occurs, you can use the swapping tabs capabilities to move the line to the correct subtab. NetSuite learns from these corrections and will implement them the next time a bill is created.
Tip:The Bill Capture Preferences page lets you select how taxes and shipping costs are saved in vendor bills when using Bill Capture. For more information, see Bill Capture Preferences.
-
-
When you have completed your verification and updates, click Create Bill to create a NetSuite vendor bill record.
You are redirected to the Bill page, where you can make further changes or process this bill as you would any NetSuite vendor bill.
You can save your progress and create the bill later, or you can cancel this bill creation process.
After a vendor bill is created, the uploaded bill remains on the Scanned Vendor Bills page. The action for this uploaded file is now View, instead of Review Bill.
Bill Capture learns from corrections you make to fields. After one correction for a field, any time the same value is scanned, the learned value is automatically populated for that field. For the most accurate data, the system learns when:
-
Clicking Save For Later - the system learns any corrections you made (fields that were manually changed).
-
Clicking Create Bill - the system learns from all fields, whether they were manually corrected or not.
-
Clicking Create Bill > Create Bill & Template - the system creates a template for the specific vendor and subsidiary combination. For more information about templates, see Working with Bill Capture Templates.