createRecord()
The createRecord() function (server-side) creates a record or updates an existing one. You can also use it to update the Pricing sublist- also called the pricing matrix-on item records.
Working with the Pricing Sublist
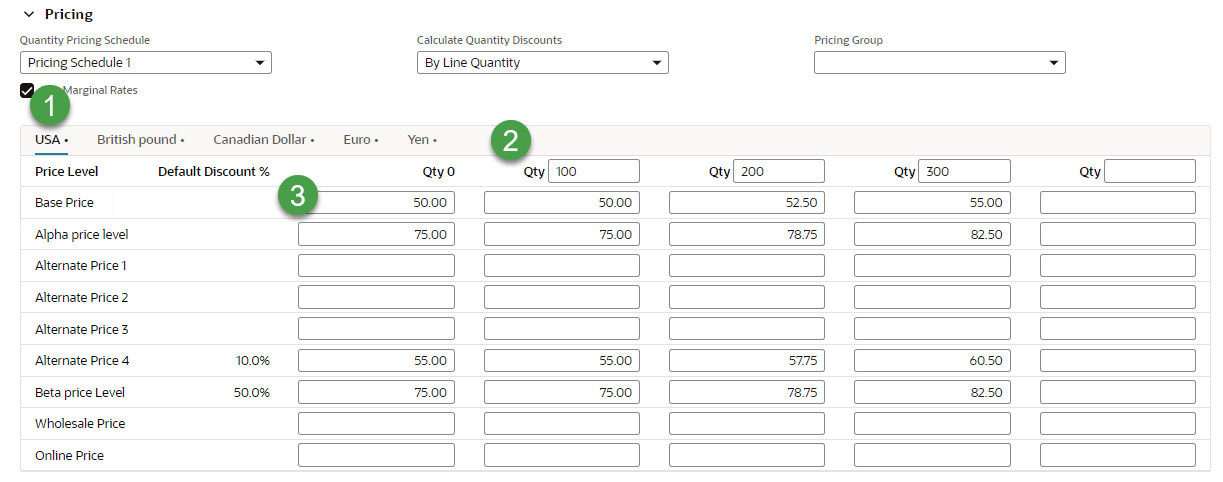
With the create record function, you can work with the NetSuite pricing structure, which includes multiple price levels, quantity-based pricing, and multicurrency pricing. The image below shows the Pricing sublist on the item record:
-
Currencies
-
Quantity ranges
-
Base Line prices
If the Multiple Currencies feature is enabled, you can find the price matrix for each currency using price. This is the base ID of the pricing sublist, and you can combine it with the internal ID of the currency. For example, if the U.S. Dollar ID is 1, the corresponding sublist ID is price1. Similarly, if the British Pound ID is 2, the associated sublist ID is price2, and so on.
To set quantity ranges, append the quantity ID to the price matrix ID for each currency. There are five quantity ranges-the default one and four custom ranges. For example, if you want to set the quantity ranges for the U.S. Dollar, you'd use these keys: price1quantity2, price1quantity3, price1quantity4, and price1quantity5.
If you update the prices for an existing item, quantity ranges are optional.
You can set the price values for the Base Price line. The price levels for the each quantity range are indicated as follows:
-
price_1_- Price for the first quantity range. -
price_2_- Price for the second quantity range. -
price_3_- Price for the third quantity range. -
price_4_- Price for the fourth quantity range. -
price_5_- Price for the fifth quantity range.
The price sublist is static. Use the :set suffix to set price fields in the sublists property.
Syntax
Use this syntax for the createRecord() function:
            createRecord({
    type: 'recordType',
    async: true | false,
    id: recordId,
    fields: {
        fieldId1: 'value1',
        fieldId2: 'value2',
        // Additional fields
    },
    sublists: {
        sublistId1: [
            {
                sublistFieldId1: 'value1',
                sublistFieldId2: 'value2',
                // Additional fields
            },
            // Additional sublist lines
        ],
        sublistId2: [
            {
                sublistFieldId1: 'value1',
                sublistFieldId2: 'value2',
                // Additional fields
            },
            // Additional sublist lines
        ],
        // Additional sublists
    }
}).done(callback);
Return Value
The createRecord() function returns a promise that resolves to an object containing the internal ID of the created or updated record. The object returned contains the following information:
            {
    "id": number
}
Parameters
The type property is required. When creating a record, the fields property is also required. If you update an existing record, include also the id.
The createRecord() function accepts a single object as a parameter. The object includes the following properties:
-
type(string) - Specifies the ID of the record type you want to create or update, for example,salesorderorinventoryitem. -
async- Determines whether the record is created or updated synchronously or asynchronously. It defaults totrue. -
id(number) - Specifies the internal ID of the record to be updated. -
fields(object) - Lists key-value pairs representing the field IDs to be set or updated. -
sublists(object) - Lists key-value pairs where each key is a sublist ID, and each value is an array of objects representing the sublist lines. Each sublist line object contains key-value pairs for the sublist field IDs and their values.Note:By default, the function will try to add new lines to the sublist. However, static sublists can't have lines added or removed. Add the
:setsuffix to the sublist ID to set values for static sublists. Using this suffix, the script will overwrite existing lines starting from the first line, unless you use empty objects as array elements. -
dynamic- Determines whether the new record is created or updated in standard or dynamic mode. This property defaults tofalse. For more information about standard and dynamic modes, see SuiteScript 2.x Standard and Dynamic Modes.Note:This function works in standard mode by default. Use dynamic mode only if you experience issues when copying records in standard mode.
Examples
The following examples show how to use the createRecord() function.
Creating a Record
In this example, a new inventory item is created with the specified itemid, displayname, and includechildren fields. After creating the record, the function returns the internal ID of the new record, which can be used for further tasks.
              createRecord({
    type: 'inventoryitem',
    fields: {
        itemid: 'DESK-LAMP-DL01',
        displayname: 'Desk Lamp DL01 Series A1000',
        includechildren: 'T',
        taxschedule: '1'
    }
}).done(function(data) {
    console.log(data);
});
Updating a Record
This examples updates an existing inventory item by changing the value of the Display Name/Code field.
              createRecord({
    type: 'inventoryitem',
    id: 1211,
    fields: {
        displayname: 'Desk Lamp DL01 Series A1000 - New Version'
    }
}).done(function(data) {
    console.log(data);
});
Creating a Record with Sublists
The example creates a new assembly item with two components specified in the member sublist. In the console, the function returns the internal ID of the created item.
              createRecord({
    type: 'assemblyitem',
    fields: {
        itemid: "DESK-A1000-AB01",
        displayname: "Office Desk OD01 Series A1000",
        includechildren: 'T',
        taxschedule: '1'
    },
    sublists: {
        member: [
            {
                item: 1115,
                quantity: 2
            },
            {
                item: 1211,
                quantity: 1
            }
        ]
    }
}).done(function(data) {
    console.log(data);
});
Adding New Data to a Sublist
This examples adds one more component to the assembly item 1233. Because an existing item is updated, the fields property is optional.
              createRecord({
    type: 'assemblyitem',
    id: 1233,
    sublists: {
        member: [
            {
                item: 1133,
                quantity: 1
            }
        ]
    }
}).done(function(data) {
    console.log(data);
});
Updating Existing Sublist Data
In this example, the quantities of the first and third components in the member sublist are updated.
              createRecord({
    type: 'assemblyitem',
    id: 1233,
    sublists: {
        'member:set': [
            {
                quantity: 3
            },
            {},
            {
                quantity: 4
            }
        ]
    }
}).done(function(data) {
    console.log(data);
});
Overwriting Sublist Data
To clear all sublist items and add new ones, add the :clear suffix to the sublist ID. This example clears the existing member sublist items and adds new ones.
              createRecord({
    type: 'assemblyitem',
    id: 1212,
    sublists: {
        'member:clear': [
            {
                item: 1133,
                quantity: 5
            },
            {
                item: 1115,
                quantity: 5
            }
        ]
    }
}).done(function(data) {
    console.log(data);
});
Setting Data for Static Sublists
You can't add or remove lines in static sublists; you can only update existing lines. An example of a static sublist is Locations on the item record, found under the Purchase/Inventory subtab. To update data in static sublists, append the :set suffix to the sublist name.
Ensure that the number of objects in the array matches the number of lines in the sublist. Each object corresponds to a line in the sublist, and the fields within the object represent the fields to be updated for that line.
              createRecord({
    type: "inventoryitem",
    id: 1211,
    sublists: {
        'locations:set': [{
                safetystocklevel: 8
            },
            {
                safetystocklevel: 16
            }
        ]
    }
}).done(function(data) {
    console.log(data);
});
Creating Required Records in Synchronous Mode
When creating an assembly item, it must be associated with a Bill of Materials (BOM). The BOM defines the components and the quantities required to produce the assembly item. If the BOM doesn't already exist, it must be created before the assembly item.
Suppose that the Advance Bill of Material feature is enabled on your account. You use the addBreakoutItem() function to create an assembly item. However, the related BOM record must be created first. The example shows how to create a BOM record synchronously to ensure that it's available before proceeding with the assembly item creation. The record will be created when the action that contains the function runs.
After the BOM is created, you can also use the async: false property to create a revision for this BOM synchronously.
              createRecord({
  type: 'bom',
  async: false,
  fields: {
    name: 'Custom BOM 03',
    memo: 'BOM03',
    availableforalllocations: 'T',
    availableforallassemblies: 'T',
    includechildren: 'T'
  }
}).done(function(data) {
  console.log('Done', data);
});
Pricing Examples
See pricing examples for the createRecord() function.
Setting Pricing Data
This example sets pricing data for an inventory item, defines quantity ranges, and sets prices for each range. For example, price1quantity2 sets the second quantity range to 10 units.
                createRecord({
    type: 'inventoryitem',
    id: 1211,
    fields: {
        'price1quantity2': '10',
        'price1quantity3': '50'
    },
    sublists: {
        'price1:set': [
            {
                price_1_: '100',
                price_2_: '95',
                price_3_: '90'
            }
        ]
    }
}).done(function(data) {
    console.log(data);
});
When creating a record, make sure you set prices for all defined quantity ranges or you'll get an error.
Updating Prices
This example shows how to update prices for multiple currencies without modifying quantity ranges.
                createRecord({
    type: 'inventoryitem',
    id: 1211,
    sublists: {
        'price1:set': [
            {
                price_1_: '100',
                price_2_: '90',
                price_3_: '85'
            }
        ],
        'price2:set': [
            {
                price_1_: '85',
                price_2_: '80',
                price_3_: '75'
            }
        ],
        'price3:set': [
            {
                price_1_: '130',
                price_2_: '110',
                price_3_: '105'
            }
        ]
    }
}).done(function(data) {
    console.log(data);
});
Setting Price Levels
You can set prices only for the levels that you can edit manually. To set prices for an eligible price level, specify the price level ID. For example, 1 corresponds to the Base Price level. Price levels that are automatically calculated can't be edited.
                createRecord({
  type: 'inventoryitem',
  id: 1211,
  sublists: {
    price1: {
      key: "pricelevel",
      items: {
        1: { "price_1_": "10", "price_2_": "8" },
        7: { "price_1_": "6", "price_2_": "4.50" }
      }
    },
    price2: {
      key: "pricelevel",
      items: {
        1: { "price_1_": "9", "price_2_": "10" },
        7: { "price_1_": "7", "price_2_": "50.50" }
      }
    }
  }
}).done(function(data) {
  console.log(data);
});