Working With a Conventional Work Order Tablet
The NetSuite Advanced Manufacturing interface supports conventional work orders. The tablet work queue and data entry forms offer the following functionality:
-
Available work orders appear in a list
-
Assembly and Work Order details display in collapsible headers
-
Color coded progress bar
-
Smart component list
To log in to the tablet:
-
Go to Advanced Manufacturing > Tablet Data Entry > Tablet.
-
Enter your NetSuite Email address and Password.
-
Tap Login.
The conventional work order and routing work order tablet interface Settings sections contain the same features. For more information, see Entering Tablet Data
-
In the Work Queue, to display conventional work orders, enter the Work Center name and then press Enter.
Alternatively, you can click List and then select a work center.
-
To choose a Start Date, tap Select to open the date picker.
-
To choose an End Date, tap Select to open the date picker.
-
To display specific information in the work queue, enter a search phrase in the Quick Search field.
Clear the search field to display all available work queue operations that might match the work center and date filters.
-
Tap Save.
The search results display Work Order Details and Item Details in collapsible headers:
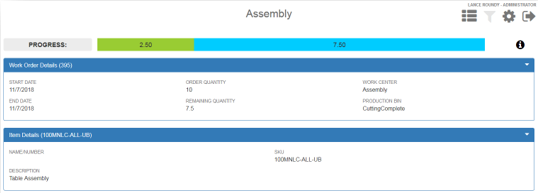
The Progress Bar
The conventional work order progress bar is color coded to help you identify your assembly work order status.
-
A Green bar displays the number of work order items recorded as built.
Conventional work orders don't use intermediate records. After you submit production counts, the build transaction immediately displays in the tablet showing the number of units built across all transactions.
-
The Blue bar displays the number of assemblies available to be built, based on bin and lot/serial number plugins.
-
The Red bar appears when there are not enough materials in the bins to produce the remaining assemblies.
For example, your assembly is scheduled to build 10 bicycles. Currently, 2.5 bikes have been built, so the progress bar highlights 2.5 in green. The 7.5 bicycles expected to be built are highlighted blue. If the required materials (BOM components) are not staged to the appropriate bin for manufacturing, the amount is highlighted red.
Work Order Details
The work order details pane is displayed in a collapsible header. They contain work order information such as Start and End Dates, order quantities, work center, and production bin details.
Item Details
The item details pane is also displayed in a collapsible header. Item details can be item name or number, a description of the item, SKU, or other item details.
The Component List
The Component List enables you to track and report material consumption against the work order.
-
To record production, beside Quantity Produced, click Select to open the keypad.
-
Enter the quantity to be produced in the Quantity Produced field.
The Bill of Material (BOM) for the assembly item displays the expected number of units for BOM components. The units are based on per unit usage numbers, and then establish the number needed. These figures adjust in response to the amount entered in the Quantity Produced field.
-
The Available column displays the quantity of material based on bin and lot/serial plugins.
-
The Expected column displays the quantity required to produce several assemblies based on the Bill of Materials.
-
The Actual column defaults to the quantity that plugins are capable of locating to apply to the build.
The operator can override this quantity to reflect the amount used in production.
-
If the Actual quantity is less than the Expected quantity, a red line appears in the Actual column and the Record button is disabled.
-
If the Actual quantity is over or under allocated, but are still within the available quantity, the line remains red. However, the Record button is enabled.
-
-
Inventory Details
The Inventory Details columns displays NetSuite icons to indicate whether the all inventory details are provided  or partial inventory details were provided
  .
.
For example, if the expected and Actual column figures agree, the inventory detail displays the all details icon . But if the quantity produced figure doesn't match the Lot/Serial figure, the no/partial detail icon appears.
In-line Editing
If your assembly consumption figures are incorrect and are highlighted red, click the partial detail icon to open the in-line editing window. The inline editing window displays the number of inventory detail lines found by the plugins. This window lets you adjust the record to make it ready to submit. For more information, see Mobile Devices.