Preventing the Accidental Capture of Sensitive Information in Windows 10
Apply these procedures on registers running NetSuite Point of Sale (NSPOS) to help prevent Windows 10 from temporarily retaining or reporting information that might be considered "sensitive" or "personally identifiable information (PII)."
The overall steps are:
1. Disable System Restore
This Windows 10 procedure stops Windows from creating restore files that may contain sensitive information.
To disable System Restore in Windows 10:
-
Open File Explorer.
-
Right-click This PC and select Properties.

-
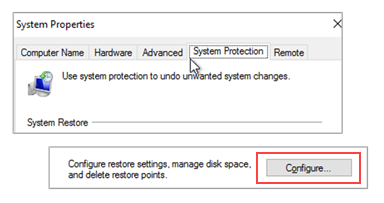
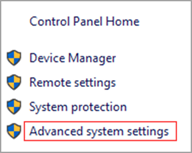
Select From the System menu, open the Advanced System Settings tab.
-
Open the System Protection tab.
-
If you have more than one drive, select the drive that contains the NSPOS app and database.
-
Click Configure.
-
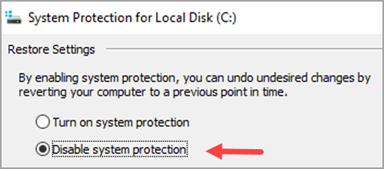
Select Disable system protection.
-
Click Apply and OK to close the System Protection window.
-
Click OK to close the System Properties window.
-
Restart the computer.
2. Optionally Enable No paging file
By default, Windows 10 creates a "paging file" to hold information when the installed RAM (random access memory) hardware is full. The file is stored in the computer's virtual memory.
-
If you use an SSD (solid state drive) for disk storage, SSD manufacturers often document that you should disable the paging file feature.
-
If you use a traditional drive for disk storage, disabling the paging file feature is considered to be optional. If you do not want to disable the paging file feature, go to 3. Next Steps - Is No paging file Enabled?.
The paging file feature is "disabled" by enabling No paging file.
Per SSD (solid state drive) hardware manufacturers, computers using an SSD should enable the No paging file setting to prevent Windows from holding information in virtual memory.
To enable No paging file:
-
Open File Explorer.
-
Right-click This PC and select Properties.
-
From the System menu, select Advanced System Settings.
-
Open the Advanced tab.
-
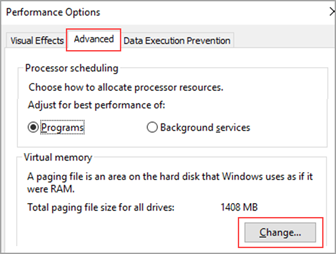
Under Performance, click Settings.

-
Open the Advanced tab.
-
Under Virtual memory, click Change.
-
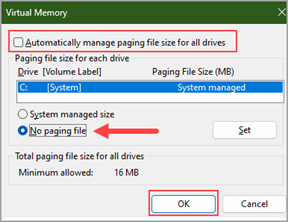
Clear the Automatically manage paging file size for all drives box.
-
Select No paging file and click OK.
3. Next Steps - Is No paging file Enabled?
The next Windows 10 procedures are based on whether you enabled "No paging file."
-
If you enabled "No paging file," skip PageFile.sys procedures 3A through 3C.
Instead, go to: 4. Disable Windows Error Reporting.
-
If you did not enable "No paging file," complete the PageFile.sys procedures in steps 3A through 3C and then go to step 4.
3A. Encrypt PageFile.sys
These steps cause Windows 10 to encrypt temporary data that might be held in PageFile.sys. The procedure requires your hard drive to have been formatted using NTFS.
Perform these steps only if you didn't enable "No paging file."
Per SSD (solid state drive) hardware manufacturers, computers using an SSD should enable the No paging file setting to prevent Windows from holding information in virtual memory. See 2. Optionally Enable No paging file.
To encrypt PageFile.sys'
-
Enter cmd in the Windows Start search field.
-
Right-click Command Prompt and select Run as Administrator.
-
Enter the following command to verify the current configuration:
fsutil behavior query EncryptPagingFile
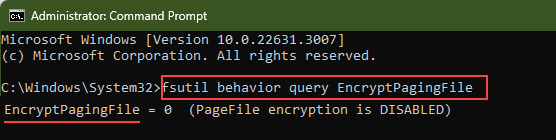
The result is the current status for PageFile encryption:
-
EncryptPagingFile = 1 means that encryption is enabled
-
EncryptPagingFile = 0 means that encryption is disabled
-
-
If EncryptPagingFile = 0, enter this command to enable encryption:
fsutil behavior query EncryptPagingFile 1
Tip:If you later need to disable PageFile.sys encryption, enter:
fsutil behavior query EncryptPagingFile 0
-
Enter exit to close the command prompt window.
3B. Clear PageFile.sys upon Shutdown
Windows 10 can automatically remove the contents of PageFile.sys when you shutdown the computer. Enabling this setting will cause shutdown to purge all temporary data held in PageFile.sys. Temporary data can include system and application passwords, cardholder data (PAN/Track), and other sensitive information.
Note that setting Windows to automatically clear PageFile.sys can increase the time needed to complete the shutdown process.
Perform these steps only if you didn't enable "No paging file."
Per SSD (solid state drive) hardware manufacturers, computers using an SSD should enable the No paging file setting to prevent Windows from holding information in virtual memory. See 2. Optionally Enable No paging file.
To enable clear PageFile.sys upon shutdown:
-
Enter regedit in the Windows Start search field.
-
Right-click regedit.exe (Registry Editor) and select Run as Administrator.
-
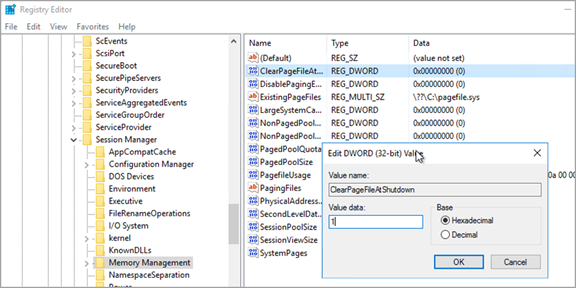
Go to HKLM > System > CurrentControlSet > Control > Session Manager > Memory Management.
-
For ClearPageFileAtShutdown DWORD, change the value from 0 to 1.
Note:If the value name, value type, and value do not exist, add the following:
-
Value Name: ClearPageFileAtShutdown
-
Value Type: REG_DWORD
-
Value: 1
-
-
Click OK and close the Registry Editor.
3C. Disable System Management for PageFile.sys
This procedure disables Windows 10 management of PageFile.sys.
Perform these steps only if you didn't enable "No paging file."
If you use an SSD (solid state drive) for storage, the option No paging file should be enabled. If so, you can skip this procedure.
To disable system management of PageFile.sys:
-
Open File Explorer.
-
Right-click This PC and select Properties.
-
From the System menu, select Advanced System Settings.
-
Open the Advanced tab.
-
Under Performance, click Settings.
-
Open the Advanced tab.
-
Under Virtual Memory, click Change.
-
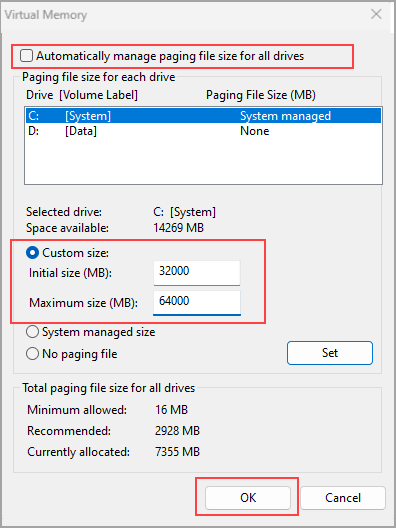
Clear the box for Automatically manage page file size for all drives.
-
Select Custom Size.
-
Enter the following:
-
Initial Size: Size should equal the memory installed on the computer
-
Maximum Size: Size should be equal to twice the memory installed
-
-
Click OK as needed to close the menus.
-
Restart the computer.
4. Disable Windows Error Reporting
Windows Error Reporting collects information about any hardware or application issues it might encounter. By default, the reports are sent to Microsoft for analysis. Follow these steps to disable this reporting feature.
To disable Windows Error Reporting:
-
Using your keyboard, press and hold the Windows key and enter the letter I.
-
Select Control Panel.
-
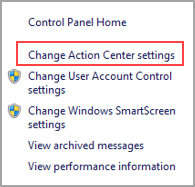
Open the Action Center.
-
Select Change Action Center Settings.
-
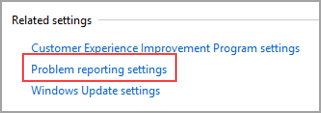
Select Problem reporting settings.
-
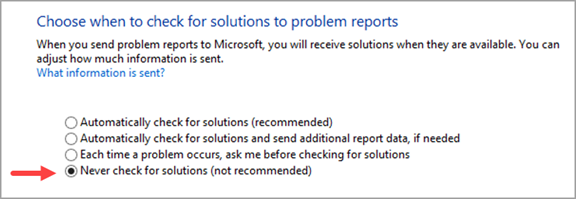
Choose Never check for solutions.
-
Click OK as needed to close the Action Center.