Creating and Deploying a Portlet Script
The following is a basic process flow for creating and deploying a portlet script, including a Dashboard SuiteApp portlet script:
-
Create a script file and upload the file to your File Cabinet.
For more information about this process, see SuiteScript 2.1 Script Creation Process.
-
Create a script record for your portlet script. Ensure that the Portlet Type field is set to the correct portlet type used in your script.
For more information about this process, see Creating a Script Record.
-
Create a script deployment record for your portlet script. For more information about the script deployment process, see Methods of Deploying a Script.
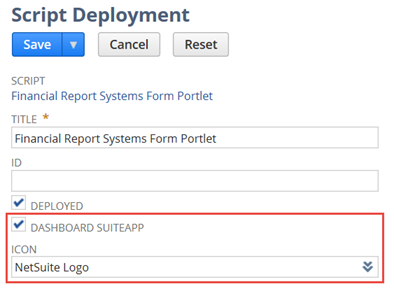
If you're creating a script to be used for a SuiteApp portlet, check the Dashboard SuiteApp box. This option will let you access the portlet from the SuiteApps tab of Personalize Dashboard.
Note:After you have saved the script, you will not be able to clear the Dashboard SuiteApp box and make the portlet accessible from the Standard Content tab.
When you check the Dashboard SuiteApp box you can upload an image to the File Cabinet that represents the SuiteApp icon shown for the portlet in the Personalize Dashboard window. Note that only SVG images are supported for the icon. SVG is a vector format, so it assures perfect image scalability. For more information about icon guidelines, see Guidelines for Creating a Dashboard SuiteApp Icon.
The following image indicates where the Dashboard fields are located:
It's best to avoid deleting script parameters for portlet scripts. Deleting these parameters can cause inconsistencies if the custom portlet is part of a published dashboard.