Add a Child View
A child view is simply a view within a parent view.
For example, ProductDetails.QuickView.View is a parent view of ProductDetails.Options.Selector.View.
You can add child views with short or verbose syntax, in extensions that modify functionality in the Product Details Page, Product List Page, Cart, Layout, or Checkout components using the Extensibility API. Use short or verbose syntax depending on where in the parent view that you want to place your child view.
This topic only shows how to add a new child view using the Extensibility API in an extension entry point. When you add a child view, you must also define the view and the template for the view. For more information about these tasks, see Views and Logic-less Templates and Handlebars.js.
In addition, if you add a child view to a view rendered as a Backbone.Collection, the same child view is added to all the views that belong to that collection.
Before You Begin
Before you add a child view, complete the following steps:
-
Choose Short or Verbose Syntax - you can use the
addChildView()(short) oraddChildViews()(verbose) methods to add a child view. -
Find the ID of the Placeholder - find the placeholder name for where you want to place the child view.
This placeholder can be either:
-
data-view- identifies where to add a child view. -
data-cms-area- identifies where to drop a CCT using Site Management Tools and also where to add a child view.
-
If adding a child view in a data-cms-area, add the prefix cms: to the value of the data-cms-area. For example:
pdp.addChildView('cms:header_banner_top', function() { ... });
Choose Short or Verbose Syntax
Use the Short Syntax to add your child view to the default view of the component and append the child view to the existing views inside of a specific placeholder. Use the Verbose Syntax to select the main view id of the component to which you want to add your view and set the order of the child views.
Short Syntax
Use this method to add your view to the default main view id for the component and append the view to the existing views inside if a specific placeholder.
With this method, you only need to specify the following information:
-
Component name.
-
ID of the placeholder. If your placeholder is a data-view, the ID is the value of that attribute. If the placeholder is a data-cms-area, the ID is the value of that attribute (with the prefix
cms:). -
Name of the constructor function.
To add a child view using the short syntax and the addChildView() method, use the following syntax:
                var <component variable> = container.getComponent(<component name>');
if(<component variable>)
{
  cart.addChildView('<placeholder ID>', function <constructor name>()
  {
    return new <view name>();
  });
}
The following list describes the variables in the syntax above:
-
<component variable>. This JavaScript variable that represents an instance of the component to which you want to add the view, for example,cart. -
<component name>. This is the name of the component to which you want to add the view. For example,Cart. -
<placeholder id>. This specifies the placeholder to which you want to append the child view. -
<constructor function>. This is the constructor function. -
<view name>. The is a reference to the view (defined in thedefineportion of the view).
Example
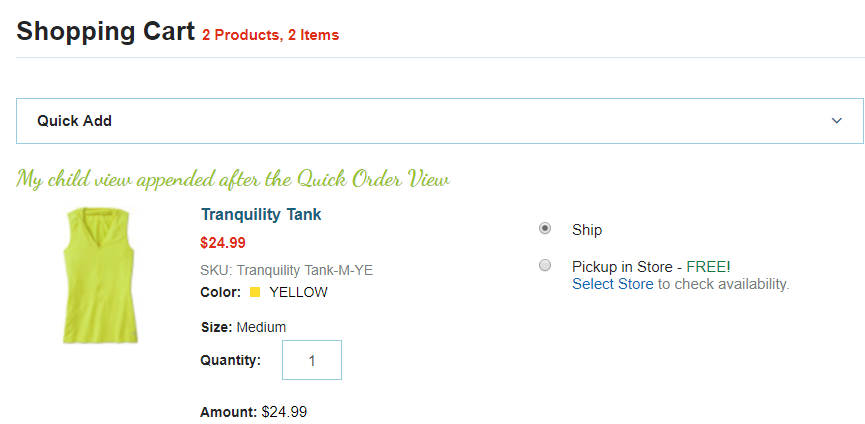
Using the short syntax, you want to append a view to a placeholder inside the default view of the Cart component. Using this syntax and filling in the variables for this example, the following snippet appends a child view to the Quick.Order placeholder in the Cart component:
                  var cart = container.getComponent('Cart');
if(cart)
{
  cart.addChildView('Quick.Order', function myViewConstructor()
  {
    return new ExtensionView();
  });
}
After Adding a Child View
The following image depicts the CartDetailedView after deploying your change:
Verbose Syntax
Use this method to select the main view id of the component that you want to add your view and the order that the new view appears inside the specific placeholder for the main view id.
With this method, you specify the following properties:
-
Main view id of the component to which you want to add the view
-
The id of the placeholder where you want to add your component
This placeholder can be either:
-
data-view- identifies where to add a child view. -
data-cms-area- identifies where to drop a CCT using Site Management Tools and also where to add a child view.
-
-
The index that specifies the order to add the view inside the placeholder
-
An ID for the child view
To add a child view using the verbose syntax with the addChildViews() method, use the following syntax:
                var <component variable> = container.getComponent('<component name>');
if(<component variable>)
{
  cart.addChildViews(
    <main view id>,
    {
      '<placeholder id>': {
        '<new view id>': {
          childViewIndex: <index>
        ,   childViewConstructor: function ()
          {
            return new <constructor method>();
          }
        }
      }
    }
  );
}
The following list describes the variables in the above syntax:
-
<component variable>. This JavaScript variable that represents an instance of the component to which you want to add the view, for example,cart. -
<component name>. This specifies the name of the component to which you want to add the view. For example,Cart. -
<main view ID>. This is the main view id for the component to which you want to add the view. For example,cart.CART_MINI_VIEW. -
<placeholder id>. This specifies the placeholder ID to where you want to add a child view. -
<index>. This specifies the indicator for the location to add the view. Use one of the following values:-
Use a value of less than
10to add the view before the placeholder. For example,5. -
Greater than
10. Add the view after the placeholder.
-
childViewConstructor is a constructor function that returns a View.
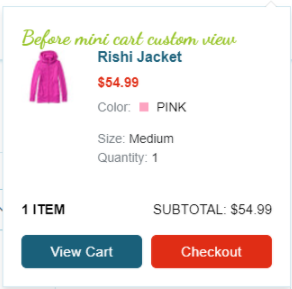
Example
Using the verbose syntax, you want to add a child view to the Product Details Quick View (PDP_QUICK_VIEW), but not in the Full View (PDP_FULL_VIEW).
                  var cart = container.getComponent('Cart');
if(cart)
{
  cart.addChildViews(
    cart.CART_MINI_VIEW,
    {
      'Header.MiniCartItemCell': {
        'MyCustomView': {
          childViewIndex: 5
        ,   childViewConstructor: function ()
          {
            return new ExtensionView();
          }
        }
      }
    }
  );
}
After Adding a Child View
The following image shows the new ExtensionView that appears before the default view inside the Header.MiniCartItemCell
Find the ID of the Placeholder
Find the placeholder ID where you want to place the view. The placeholder can be either:
-
data-view- identifies where to add a child view. Example:Facets.BrowseView -
data-cms-area- identifies where to add a Custom Content Type as a child view using Site Management Tools. Example:header_banner_top
Use one of the following procedures to find the placeholder ID:
the data-view and data-cms-area are both are properties of a div element.
Code from a Template Method
When you download the base theme before you start developing extensions, the gulp theme:fetch command creates the Extras/<theme name>/Modules directory inside the workspace development directory.
The Modules/ directory contains the templates and Sass files for each module in the application.
You can use these templates to find the correct data-view placeholder to which you want to add the child view.
For example, you want to add a child view to the Product Options area in the PDP Component. The following example is an excerpt from the product_details_full.tpl with a data-view named Product.Options. This file is located in the product_details module of the SuiteCommerce Base Theme source.
                // ...
<div class="product-details-full-main">
  {{#if isItemProperlyConfigured}}
    <form id="product-details-full-form" data-action="submit-form" method="POST">

      <section class="product-details-full-info">
        <div id="banner-summary-bottom" class="product-details-full-banner-summary-bottom"></div>
      </section>

      <section data-view="Product.Options"></section>

        <div data-view="Product.Sku"></div>
      // ...
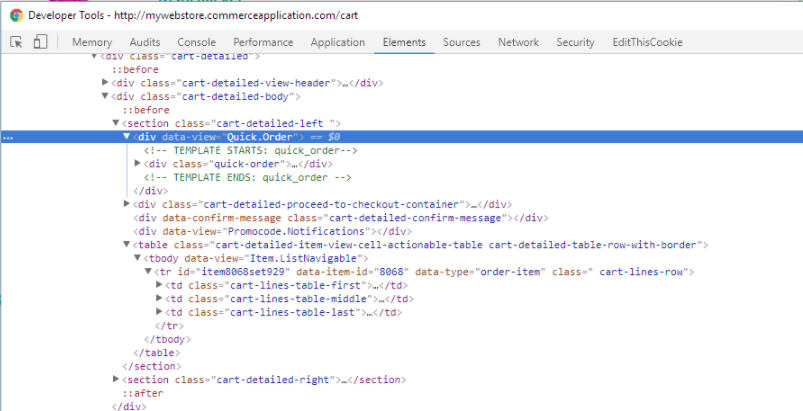
Browser Code Inspector Method
Use the code inspector in your browser to locate the data-view attribute in the area of the user interface to which you want to add the child view.
The following example shows the Google Chrome Developer Tools with the Quick-Order data-view attribute identified:
To add a child view in an extension:
-
Open the entry point file for the extension.
Although not always necessary, a common practice is to declare the child view in the
mountToApp()function in the entry point.Note:If you have not already done so, add the child view as a dependency.
-
Select the correct component and get an instance of the component.
For example, to add a child view in the Cart component, get an instance of the Cart component with the following code in your entry point file:
                return {
  mountToApp: function mountToApp (container)
  {
    var cart = container.getComponent('Cart');
  }
}
For more information about accessing a component, see Instantiating API Components.
-
Find the main view id for the component to which you want to add the view.
For example, you might want to only add the view into the Full View for the Product Details Page. The following table lists the available view IDs for each component:
Component
Main View ID
Name
Product Details Page (PDP)
PDP_FULL_VIEW(default)ProductDetails.Full.ViewPDP_QUICK_VIEWProductDetails.QuickView.ViewProduct List Page (PLP)
PLP_VIEWFacets.Browse.ViewCart
CART_VIEW(default)Cart.Detailed.ViewCART_MINI_VIEWHeader.MiniCart.ViewCheckout
WIZARD_VIEWWizard.ViewNote:To add a view into any other area of the user interface, use the
LayoutComponentcomponent. If you add a child view with theLayoutcomponent in a specific placeholder id, it will be shown every time when that placeholder id appears in any page. -
If you want to add the child view to the default main view id, add the child view with the Short Syntax. If you want to choose the main view id, add the child view with the Verbose Syntax.
Update JSON-LD After Adding or Modifying Views
If you have configured SuiteCommerce to use JSON-LD as your preferred structured data markup, you might need to update JSON-LD for the view. Data in the JSON-LD object, embedded in the <head> tag of a product details page, should be consistent with information displayed in the view. If your extension adds information to a view (or removes information), use the modifyViewJsonLd() method of the Visual component in the extensibility API to update the JSON-LD. See the extensibility API reference for details about modifyViewJsonLd().
For more information about configuring JSON-LD in SuiteCommerce, see Structured Data Markup.