Advanced Cash Drawer Management Setup for SCIS
The following instructions are for administrators using SuiteCommerce InStore (SCIS) with Advanced Cash Drawer Management.
To set up Advanced Cash Drawer Management:
-
Enable Advanced Cash Drawer Management on the SCIS Settings record.
-
Go to Commerce > InStore > Settings.
-
Click the Cash Drawer Management subtab.
-
Check the Advanced Cash Drawer Management box.
-
Select a Close Shift Receipt Template.
Note:If you need to view certain fields on the Close Shift Receipt Template, create a custom receipt template.
Because SuiteCommerce InStore is a managed SuiteApp, any changes to default receipt templates will be overwritten by automatic updates to SCIS. For more information, see Customizing a Receipt Template for SCIS.
-
(Optional) Check the Hide Expected Cash on Shift Close box. When it's checked, sales associates can't see the expected amount in the cash drawer when closing a shift.
-
(Optional) Check the Mandatory Open Shift box. When it's checked, sales associates can't enter an order unless they've entered the amount in the cash drawer and selected a register.
-
Click Save.
-
-
Create one or more bank accounts to track funds collected in cash drawers.
Tip:You'll use this bank account when you create an SCIS Cash Drawer record in a later step (Step 3a).
-
Go to Lists > Accounts > New.
-
Click New.
-
Enter a name (and number, if applicable) for the account.
-
If you use OneWorld, select a Subsidiary for the account.
-
(Required) In the Restrict to Location field, select the location to which this account is available.
Note:If you leave this field blank, the account isn't available for selection on the SCIS Cash Drawer record.
-
-
Create an SCIS Cash Drawer record for each cash drawer and printer combination.
-
Go to Customization > Lists, Records, & Fields > Record Types > SCIS Cash Drawer.
-
Name - Enter a name for the cash register or cash drawer.
-
Register Location - Select a location for the cash drawer. The options on the list are sourced from the list of locations set up in your NetSuite account.
-
Printer/Register- Enter the name of the printer associated with the cash drawer.
-
Register Account - Select the bank account you created in Step 2b. The options on the list are filtered by the Restrict to Location setting on the bank account record you created in Step 2.
-
-
Click Save.
-
-
Ensure the SCIS Clerk role has Edit-level permission for the SCIS Closing Drawer and SCIS Opening Drawer transactions.
Note:Role permission should be in place by default. For more information about the SCIS Clerk role and related permissions, see SCIS Clerk.
-
Assign the SCIS Store Manager role to an employee, and set it as an authorized role in SCIS permissions. For more information, see SCIS Store Manager.
When Advanced Cash Drawer Management is set up, the sales associate opens a shift by entering the amount in the cash drawer and selecting a register. They can't enter a sales transaction without selecting a cash drawer and register.
Selecting a cash drawer and register creates an SCIS Shift record automatically in NetSuite. The shift record shows opening and closing shift time, the register used, and includes links to the opening drawer and closing drawer transactions. For more information about Cash Drawer Management tracking, see SCIS Cash Drawer Management Workflows and Tracking.
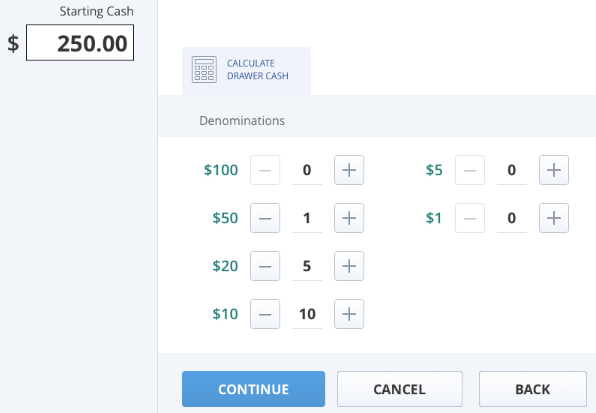
Advanced Cash Drawer Management Calculator
When you use Advanced Cash Drawer Management, the SCIS user interface includes a Calculator. Administrators must configure SCIS Quick Cash Denomination records for the calculator to be most useful. For more information, see Modifying Cash Payment Denominations.
If cash denominations haven't been configured, the calculator doesn't show any cash values. The calculator is useful for sales associates when they enter an opening drawer or closing drawer transaction, and when entering a cash drawer adjustment.