Performance Tips for using SCIS POS Devices
These SuiteCommerce InStore (SCIS) tips can help your sales associates reduce the time spent performing tasks on your point-of-sale (POS) devices. Some tips require configuration by the administrator.
Administrators and store managers should ensure that sales associates are aware of these tips. We also include tips in the SCIS User Guide.
Search using the Transaction History
Logging Into SCIS
These tasks and settings can reduce the time your sales associates need for setting up before they begin entering transactions.
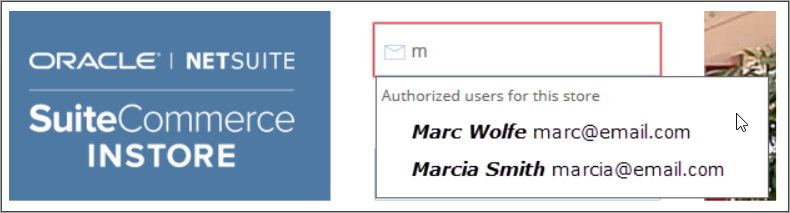
Use Autocomplete for fast Logins
This feature provides faster login for SCIS users. A sales associate can type the first few letters of their email address, and the login screen shows a list of email addresses that match. The feature works by location, so only email addresses registered to the sales associate's location appear in the list.
Sales associates' email addresses are stored on the device the first time they log in after the setting is enabled in NetSuite. After that, the sales associate can take advantage of autocomplete starting with the next time they log in.
To enable Autocomplete Login:
-
Log into NetSuite as an administrator.
-
Go to Customization > Lists, Records, & Fields > Record Types.
-
Locate the SCIS Settings record and click List.
-
Click Edit and open the General subtab.
-
Check the Use Autocomplete Login box.
-
Click Save.
Administrators cannot adjust the number of characters users must enter before autocomplete activates.
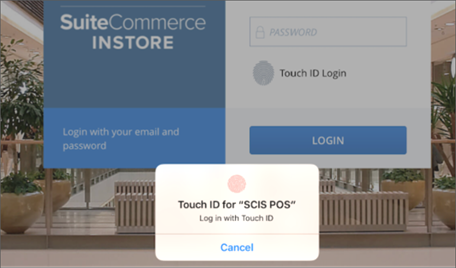
Enable Touch ID for faster logins on iOS devices
If your mobile device includes a fingerprint reader, your sales associates can log in with a touch. Touch ID for SuiteCommerce InStore (SCIS) must be configured on the mobile device first to enable it. The steps a sales associate can use to log in after Touch ID is configured are as follows.
To Login using Touch ID after setup:
-
Log into SCIS on the desired device.
-
Touch the fingerprint on the Touch ID for SCIS prompt.
-
If an associate has multiple roles, select the role under which to log in.
You must configure Touch ID before the first use.
The first time a sales associate logs in to SCIS on a device, they must enter their email address and password. SCIS saves their login credentials to the device. The associate can then use Touch ID the next time they log in.
For information about setting up and using SCIS touch ID, including turning the feature on or off and making updates for password changes, see Setting Up SCIS Touch ID for iOS.
Assign Default Sales Representatives
If your business requires selecting a sales representative to begin a shift, and it is common to have one sales representative per shift, you can set a Default Sales Rep for the current session or all sessions.
If during a session the default needs to be changed, you can change it for a particular transaction. When that transaction is complete, the next transaction will revert to using the Default Sales Rep.
To set a Default Sales Representative:
-
Log into SCIS on one of your store's devices.
-
Touch the menu icon.

-
Touch Set Default Sales Rep.
-
Touch to default for This Session or All Session.
-
Touch the sales representative.
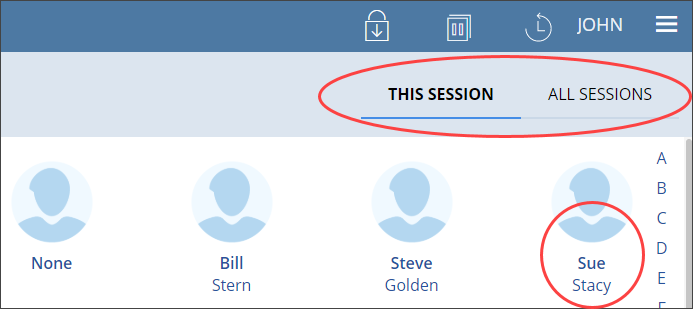
The cart displays to begin a transaction.
For more information, see SCIS User Settings.
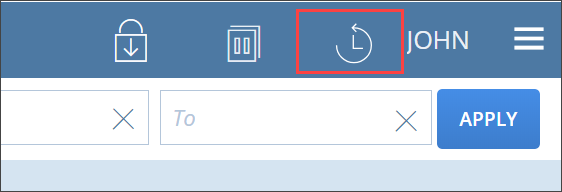
Search using the Transaction History
When looking up a past transaction, scrolling through the Transaction History can be faster than doing a search. Searches require entering criteria and then waiting for the device to query the NetSuite database. Scrolling allows you to visually move through the history.
Transaction history should be used for recent transactions or when the date is known and you will apply date filters.
To search using the Transaction History:
-
Log in to SCIS.
-
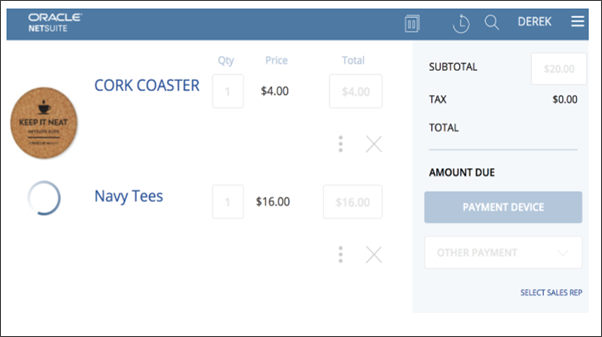
Touch the clock icon
 at the top of the screen.
 -
Scroll through the transaction history.
-
Touch the desired transaction to display the details.
To find a transaction for a specific customer, enter search criteria to find the customer and then use their timeline graph.
For information related to using the history, see Printing Receipts from the Transaction History.
Taking Orders
Use the suggestions in this section to ensure sales associates can complete transactions quickly and efficiently.
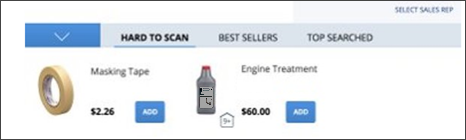
Use QuickAdd Bar Shortcuts
One way to use the QuickAdd Bar is as a shortcut to reduce the user time needed to locate items, scan items or navigate to an item's details page.
Use the QuickAdd Bar:
-
For frequently sold items.
-
For hard-to-scan items due to packaging or lack of a barcode.
-
To provide a variable-price miscellaneous item to sell in lieu of items you are not able to find by scanning or searching.
-
As a shortcut to the product details page for items that you frequently search for or navigate to.
You can set up a QuickAdd Group to create a separate tab on the bar, and then add items as QuickAdd Keys.
For information about setting up QuickAdd Groups and QuickAdd Keys for your QuickAdd Bar, see Configuring QuickAdd Keys.
Scan Items in bulk - Continue Scanning
SCIS allows scanning multiple items, one after the other. You do not need to wait for the previous item to display in the cart before scanning the next item. You should:
-
Scan in bulk, one item after the other.
-
Not wait for an item to display. Continue scanning or adding items.
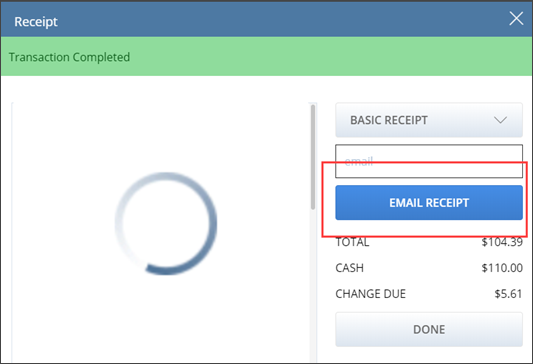
Act on Receipt options while Receipts are loading
It can take a few seconds to load a receipt image when a transaction is complete. However, the sales associate can tap or click the Email Receipt or Print Receipt options as soon as they appear.