Examples of Customizing Extensions Using the Override Method
This section details how to use the override method to replace the template and Sass files and get the styling you want for the Featured Product extension and the Featured Category extension. The focus is on these two extensions because they are a great way of adding content to your site. The Featured Product extension lets you highlight a product on your website and the Featured Category extension lets you highlight a commerce category on your website. For more information about these extensions, see Featured Product and Featured Category. Each of these extensions are Custom Content Types (CCTs), managed through Site Management Tools (SMT). For more information, see Site Management Tools Custom Content Type and Site Management Tools.
To learn more, see:
Overriding the Featured Product Extension
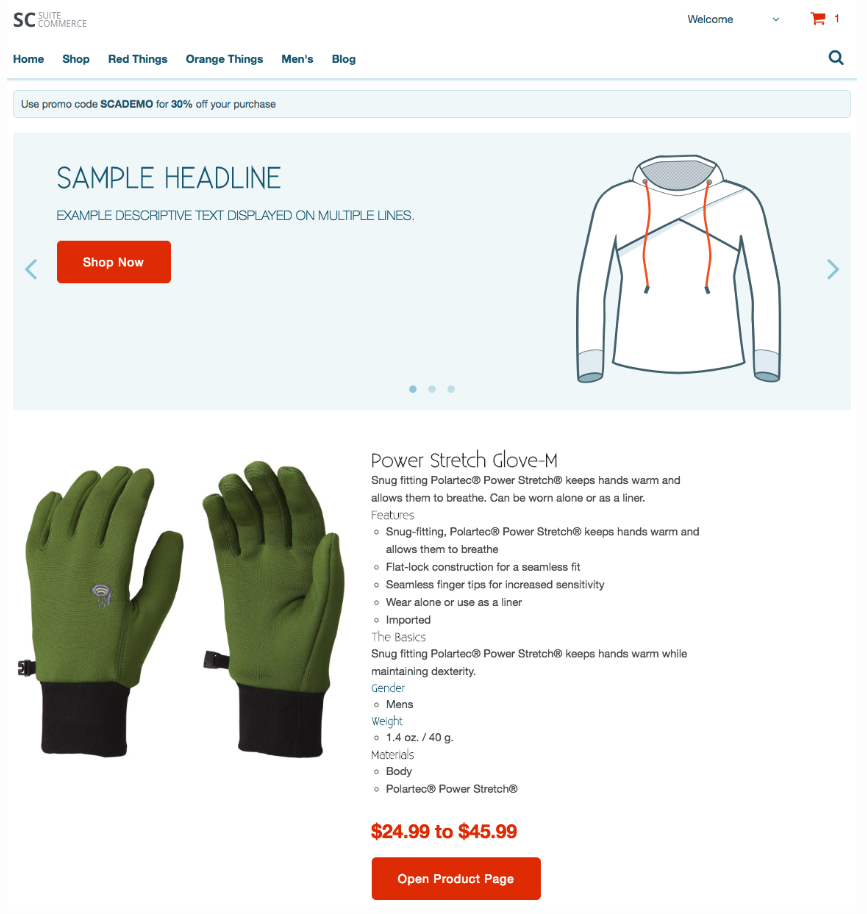
The Featured Product extension lets you select a product to display prominently in a CMS area. Standard configurable options include whether to display a products price and availability, adding text over an image, adding button text, and displaying an alternative image. For complex changes, you must edit the template and Sass files. The following image shows the default styling. Note that depending on your site's data, your results may appear differently.
To customize the Featured Product extension using the override method:
Each instance of a featured product creates an HTTP call to the item's API. To avoid performance issues, do not use this method to add a large set of featured products. Instead, you can use the Featured Category extension. For details, see Featured Category and Overriding the Featured Category Extension.
-
Go to Workspace/Extras/Extensions/SuiteCommerce/FeaturedProduct/Modules/FeaturedProductCCT/Sass/_featuredproductcct.scss.
-
Copy the source file to your operating system's clipboard.
-
Paste a copy of the file in the corresponding location within the theme's Overrides directory. For example, Workspace/Theme/Overrides/SuiteCommerce/FeaturedProduct/Modules/FeaturedProductCCT/Sass/_featuredproductcct.scss.
Important:Do not rename these files. These files must have the same name for the override method to function correctly.
-
Open your new Sass file from your Overrides directory.
-
Run your local server using
gulp theme:local.Note:You must place the files in the correct locations before starting the local server, or they will not be watched for changes. You can find which overrides are being watched by looking at the log in your CLI.
-
With your server up and running, add the styles you want to the copy of your Sass file. To get you started, the following code shows you how to make the image smaller and how to change the default product details to display a shorter description.
                  .home-page
.featureproductcct-layout {
    .pdp-features, .pdp-basics, .pdg-materials {
      display: none;
    }

    .product-image {
      max-height: 250px;
    }
}
The following image illustrates how the blog post appears after making these customizations. It also includes additional featured products and a different button style.

-
When you are ready, use the theme developer tools to test or deploy your theme. See Test and Deploy Your Theme for procedures on how to use these tools.
Overriding the Featured Category Extension
The Featured Category extension lets you highlight a commerce category on your website. Clicking on an item takes users to the Product Detail page. This extension is useful when you want to display several items. It reduces the number of API calls to one per category, and gives you control over the items and presentation. The following image depicts the initial configuration. Two lines of items are displayed before linking to the Category Landing page. Standard configurable options include setting the title and button text. You can use the override method to customize how it appears on your site.
To customize the Featured Category extension using the override method:
-
Go to Workspace/Extras/Extensions/NetSuite/FeaturedCategory/Modules/Item/Templates/sc_featuredcategory_item.tpl.
-
Copy the source file to your operating system's clipboard.
-
Paste a copy of the file in the corresponding location within the theme's Overrides directory. For example, Workspace/Theme/Overrides/NetSuite/FeaturedCategory/Modules/Item/Templates/sc_featuredcategory_item.tpl.
Important:Do not rename these files. These files must have the same name for the override method to function correctly.
-
Open your new template file from your Overrides directory.
-
Run your local server using
gulp theme:local.Note:You must place the files in the correct locations before starting the local server, or they will not be watched for changes. You can find which overrides are being watched by looking at the log in your CLI.
-
With your server up and running, add the styles you want to the copy of your template file. The following code shows you how to center and enlarge the item price. To remove the item's name, you can hide the line that renders the item's name or remove it entirely.
.home-page .featurecategorycct-item-price { text-align: center; font-size: $sc-font-size-xl; } -
When you are ready, use the theme developer tools to test or deploy your theme. See Test and Deploy Your Theme for procedures on how to use these tools.