Optional Settings in CustomConfiguration.js
SuiteCommerce InStore (SCIS) has several optional custom configurations. Each optional configuration is documented in the JavaScript configuration file. To learn about the options you can configure, see the CustomConfiguration.js file.
The following topics give you more information about optional configurations for SCIS:
Filters for Customer Search
You can customize the default filters used for searching customers in SCIS. To apply settings that make sense to sales associates in your organization, modify the following section of code in CustomConfiguration.js.
The settings that are commented are the default settings. You can change the default settings and then remove the comments around the code snippet.
          //   Customer options
   customer: {
      //   Internal ids for the fields used to search customers in the Search Modal.
      //   For example customer can be searched by: Internal Id (internalid), Last Name (lastname), Phome (phone), email (email), and
      //   Company Name (company name). These filters can be configured by adding or removing values. Take note that search won't work
      //   if an invalid internalid is issued here. If fullname is added to this list, the search will also be performed on the concatenation
      //   of firstname and lastname.
      //
      //    searchFilters:[
      //       'fullname'
      // ,   'firstname'
      // ,   'lastname'
      // ,   'phone'
      // ,   'email'
      // ,   'companyname'
      // ],
Switch the Sales Rep After Each Transaction
If you use commissions to compensate sales reps, you may want to customize the workflow for selecting the sales rep on an order. By default, the sales associate can select a sales rep after logging in to SuiteCommerce InStore. The sales rep selected remains in place on all subsequent orders until the sales associate changes it.
          //   Switch sales rep. after each transaction.
   //
   switchSalesRep: false,
Item Display in Cart
By default, each item added to the cart shows the item number as the subtitle under the item name. You can configure the subtitle shown below the item name by adding a line to the CustomConfiguration.js file.
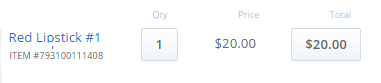
For example, the following sample code will display the text, ITEM #, followed by the UPC code from the item record:
itemList: { subtitleLabel: 'ITEM #' , subtitleField: 'upccode' }
You must add the value for subtitleField to the list of Search Fields on the Web Site Setup page. For example, if you use SKU as the subtitle, you'll need to add it to the list of Search Fields before putting it in CustomConfiguration.js.
Customize Location Display
SuiteCommerce InStore includes information about physical store locations where products are in stock and available for pickup. This information is sourced from location settings on item records in NetSuite. You can customize how location information is displayed in SCIS. First, create a saved search to display the location information you want to share, and then edit the CustomConfiguration.js file to define the saved search you want to use.
If you choose to change the SCIS Inventory Locations saved search, ensure that the Make Inventory Available field is included on the Results tab of your custom saved search. If you don't include this field, the inventory count on the Product Detail Page will show 0.
For more information about creating the saved search, see Modifying Included Saved Searches.
-
Create a new Location Search with criteria that filters the locations displayed in SCIS. You can also specify how they're sorted. Replace the default values for
locationSearchandinventoryLocationSearchwith the ID of your custom saved search.location: { // Id of the search for displaying locations in Nearby stores and in Pick up locations locationSearch: 'customsearch_ns_pos_locations', // Id of the search for searching the inventory of an item by location inventoryLocationSearch: 'customsearch_ns_pos_inventory_locations', -
In the nearby stores tab, exclude stores that don't have stock available. Set
nearbyStoresRemoveNoStock: true.// Remove locations without stock on that item nearbyStoresRemoveNoStock: false, -
Sort Nearby Stores and Store Pickup locations by distance to the current SCIS user's location. If you choose not to sort by location distance, then search results sort order is used. You can set the sort parameters for Nearby Stores and Store Pickup, and set a limit to the number of stores in the list.
                      // Extra order to put in the order screen. Possible values are
        //     'none'             use saved search order
        //     'nearby:desc'    sort by nearby stores, near last
        //     'nearby:asc'    sort by nearby stores, near first
        nearbyStoresExtraSort: 'none',

        // How many locations displayed in all locations
        // 0 means no limit.
        nearbyStoresLimit: 0,

        // Extra order to put in store pickup tab. Possible values are
        //     'none'             use saved search order
        //     'nearby:desc'    sort by nearby stores, near last
        //     'nearby:asc'    sort by nearby stores, near first
        storePickupExtraSort: 'none',

        // How many locations displayed in the store pickup tab
        // 0 means no limit.
        storePickupLimit: 0,
    }