Creating a Milestone Billing Schedule
If you use both the Project Management and Advanced Billing features, you can use milestone billing to bill customers in increments when project milestones are reached. For more information, see Billing Customers Using Milestone Billing.
To enable the features required to use milestone billing, see Enabling Project Features.
To use milestone billing, you must create a milestone billing schedule from inside the project. The schedule identifies the amount to bill as milestones are completed. Each milestone billing project has its own Fixed Bid, Milestone billing schedule.
Milestone billing schedules can't be made public.
To create a milestone billing schedule:
-
Go to Lists > Relationships > Projects. Click Edit next to the project you want to create a schedule for.
-
Click the Financial subtab.
-
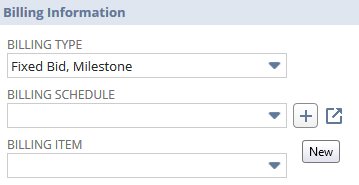
On the Financial subtab, select Fixed Bid, Milestone in the Billing Type field.
-
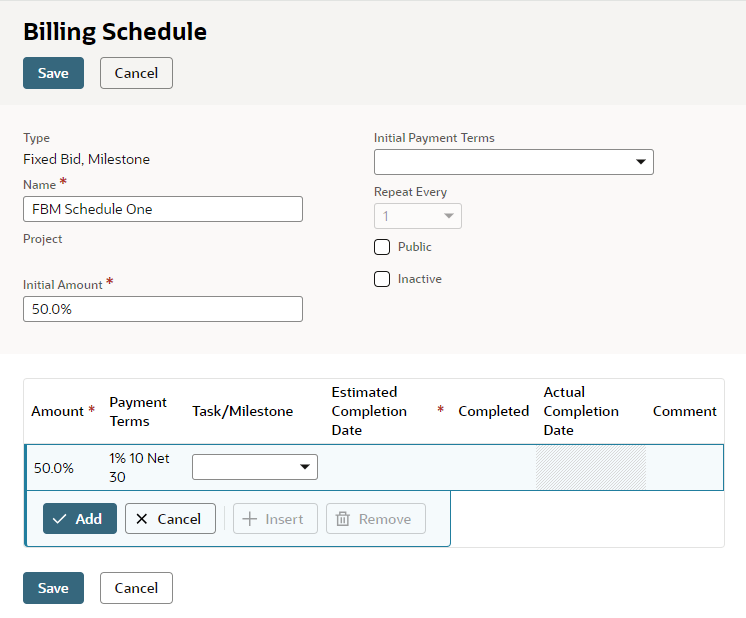
On the billing schedule form, enter a name for this billing schedule.
-
NetSuite fills in the Initial Amount and updates it automatically as you add billing milestones. If the total percentage amount for all milestones is less than 100%, then the remaining percentage is the initial amount to be billed.
-
In the Initial Payment Terms field, select the terms to be used on the first invoice to be created from the sales order.
To add new payment terms, go to Setup > Accounting > Accounting Lists > New. Select Term.
-
Add a line for each milestone to be billed by this schedule.
-
In the Amount field, enter the percentage of the total project amount to be billed when the milestone is reached.
-
Optionally select payment terms to apply to this milestone.
-
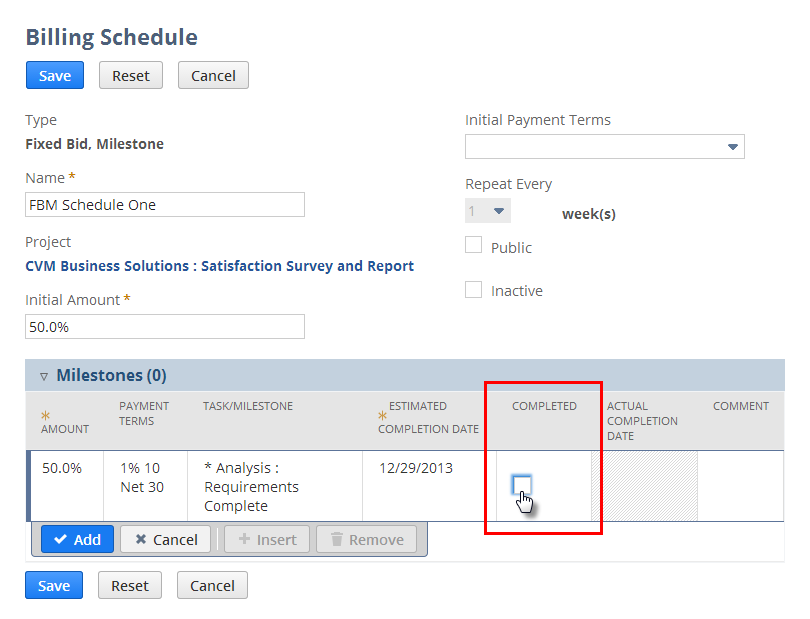
Optionally, in the Task field, select the task that must be completed for this milestone.
-
In the Estimated Completion date, enter the date when you expect to reach this milestone. This is used for forecasting calculations.
If you entered an estimated completion date when you created the project task, that date shows here.
-
If you don't identify a project task for a milestone, then check the Completed box only when this milestone is completed and ready to be billed.
If you specify a project task for a milestone, then NetSuite will automatically mark the milestone complete when the task is finished.
Important:Milestones can't be billed unless they're marked as complete. If you don't specify a project task for the milestone, then you must check the Completed box manually.
-
Optionally add comments about this milestone.
-
Click Add.
-
-
Repeat step 8 for each milestone you want to add to this schedule.
-
Click Save.
Each milestone billing schedule you create is private, applies only to one project, and can be viewed only from the project record. Upon completion of each milestone task, that portion of the project becomes eligible for billing.