Customizing Transaction Form PDF Layouts
A transaction form PDF layout defines the arrangement of fields on printed standard and classic PDF transaction documents in NetSuite. You can customize transaction form PDF layouts by customizing borders and content position, repositioning and resizing fields, or by changing the fonts and colors used.
Basic layouts will be deprecated in a future release. We encourage you to use Advanced PDF/HTML Templates instead because new features are added exclusively to advanced printing. For information, see Advanced PDF/HTML Templates.
Custom transaction form PDF layouts are available only when you print your forms in PDF. If you print using HTML, a custom layout doesn't affect the look of your form. To print using PDF, go to Home > Set Preferences> Transactions subtab. Clear the Print Using HTML box, and click Save.
To customize a PDF layout, you first set up the color of text and backgrounds on the form and set the page height and width of printed forms. Then you use the Form Editor to change the size and orientation of elements of the form.
You can enter your measurements in inches or in centimeters by setting the Form Size Measurements preference at Setup > Company > Preferences > Printing & Fax Preferences on the Printing subtab.
Advanced PDF/HTML templates provide an alternative model for customizing printed and emailed records. They support more customization capabilities than transaction form layouts. Also, transaction form layouts let you use up to 100 custom elements, whereas the Advanced PDF/HTML Templates feature permits more customization capabilities. For more information, see Advanced PDF/HTML Templates.
To customize a transaction form PDF layout:
-
Go to Customization > Forms > Transaction Form PDF Layouts.
-
Click Customize next to the layout you want to customize.
Note:You can't customize a transaction form PDF layout for check vouchers.
To create a new custom layout based on an existing custom layout, click Edit next the layout. Then enter a name for the new layout, and click Save As.
-
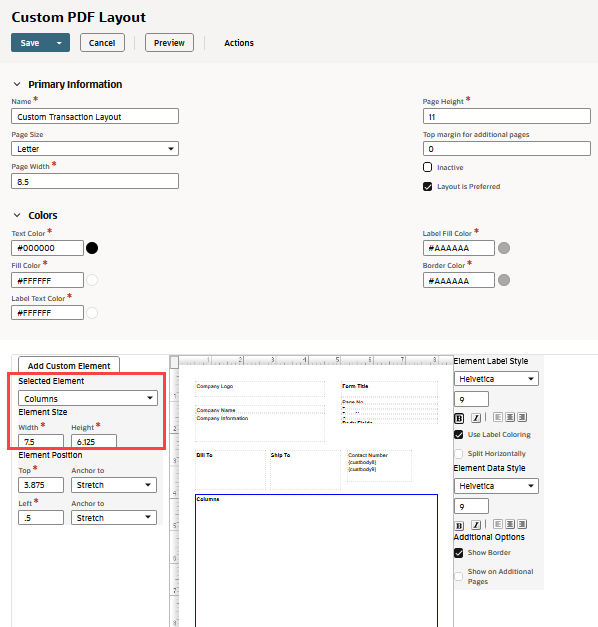
On the Custom PDF Layout page, enter a name for your custom layout.
-
If needed, edit the width and height properties for your page.
-
Check the Layout is Preferred box to make this layout your preferred layout for this type of transaction.
-
Set the following colors for your form layout:
-
Text Color - Controls the color of the text in the form.
-
Fill Color - Sets the background color in the sections of the form.
-
Label Text Color - Controls the color of the text at the top of the main section of the form.
-
Label Fill Color - Determines the background color of the label for the main section of the form.
-
Border Color - Sets the border color for each section of the form.
You can click the color palette to choose a color or enter the hexadecimal code for the color you want to set.
While you make changes to the colors, you'll see the changes in the preview at the bottom of the page.
-
-
Click an element of the form that you want to customize. You can also select an element using the Selected Element list. If you want to add a custom element to the form, click Add Custom Element.
Note:You can only define custom elements for packing slips, picking tickets, and transaction form PDF layouts. For more information about custom elements, see Defining Custom Elements.
You can do any of the following to each form element:
-
Resize a section by clicking and dragging the handle in the lower right corner. Note that the cursor doesn't change to indicate that you can resize the item.

You can't remove an element, but you can hide it by clicking the handle in the lower right corner and dragging it to the top left corner.
-
Click and drag an element to change the orientation of the PDF layout.

-
Under the Selected Element heading, select the element, and if needed, determine the element's width and height.
-
Under the Element Position heading, determine the element's position on the form. You can anchor the element to the top or bottom edge of the page with a fixed size (the size you specify under the Selected Element heading), or align the element to the specified top position and stretch it to fit the height of the page (within the margins).
Note:You can place one element on top of another, but those elements will be stacked when the form is printed and results may not appear as expected.
-
Under the Element Label Style heading, determine the font and style of the element's label.
Check the Use Label Coloring box if you want the color set in the Label Text Color field to be used for the label of a form section.
Check the Split Horizontally box if you want the text beside the label. Keep this box clear if you want the text beneath the label.
-
Under the Element Data Style heading, choose the font and style of the text in the form section.
-
Check the Show Border box if you want to add a border to the section.
Note:To change the size of the area where the columns appear, select Columns as the Selected Element in the editor and modify the width and height values as needed. To change the width of the individual columns, use the Printing Fields subtab on the transaction form. For more information, see Configuring Printing Fields.
-
-
Click Preview to see how this PDF layout will look when printed.
For any element that continues on an additional page, make sure there's enough space at the bottom for line items to print below it. For example, a logo element on a PDF layout can't be set to be the whole page.
-
Click Save.
When the PDF opens and you click the Print button, the Print window opens. In the Page Handling section of the Print window, verify that Page Scaling is set to None, and the boxes beneath it aren't checked. Automatic scaling can cause difficulties with printing checks.
If you have text overlapping a footer or missing from a printout, ensure that any long content is enclosed in an element that will split across pages.
See the following topics.