Defining Custom Elements
Custom elements are blocks of static or dynamic text that you can add to and position on PDF transaction layouts. You can define up to 100 custom elements per layout. Images aren't supported. Custom elements are text only.
Custom elements can be defined only for the following types of transaction form PDF layouts:
-
packing slip
-
picking ticket
-
transaction
For example, you can follow these steps to add the Bill To element to a packing slip:
-
Go to Customization > Forms > Transaction Form PDF Layouts.
-
Click Customize next to your picking ticket form.
-
Click Add Custom Element.
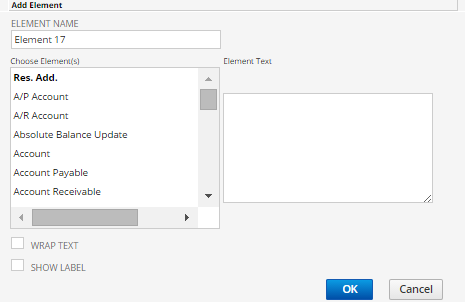
The Add Element window opens.
-
In the Element Name field, enter a name for the element, such as Bill To.
-
In the Choose Element(s) list on the left side of the window, scroll down and click Bill To.
-
Click OK.
-
The Bill To box appears in the top left corner of the layout.
-
Click the Bill To element to drag it to the appropriate place on the form.
-
Complete additional changes to the element as necessary.
-
Click Save.
Now when you use this custom form, the form shows the Bill To address.
To remove a custom element, select the element and then click the X in the upper right corner. You can't remove other elements, but you can hide them by clicking the handle in the lower right corner and dragging it to the top left corner.
For each custom element, define the properties as described in the following table. After an element is added, click Save & Edit. The custom element shows up on the other tabs and you can edit it like any other element on the form.
|
Property |
Description |
|---|---|
|
Element Name |
This identifies the custom element on the Border & Placement, Label Text, and Data Text tabs, and may be printed in the label for the element field. This field is required for each custom element where Enable is checked.
Important:
When you create a Label and save the Custom Element, the element is automatically available in the Borders and Placement tab with the coordinates defaulted to 0,0,0,0. To view the Label, you must edit these coordinates to display the label in the preferred position. |
|
Show Label |
If checked, the Label for this custom element is printed on transaction forms using this layout, using the same formatting as other element labels as defined on the Label Text tab (see Formatting Label Text). The element doesn't appear on the Label Text tab if Show Label isn't checked. |
|
Element Text |
Text entered here is displayed in the element field when printed. The text is formatted the same as other element text as defined on the Data Text tab (see Formatting Data Text. You can use NetSuite tags to dynamically retrieve and display text associated with a specific instance of a form field. To construct a tag enter the field name and enclose it in braces - {entity}. The fields available are the same body fields as those available in custom code. Refer to Custom Code Names for a complete list of available fields.
Note:
These tags are similar to those used on HTML Transaction Layouts, using {} instead of <> and dropping NL from the beginning of the tag. For Example: <NLENTITY> in HTML Layouts would be {entity} in PDF Custom Elements. |
|
Wrap Text |
If checked, the text in the element field wraps. |
If you want to add personalized text, click Add Custom Element and instead of selecting an element, enter your text in the Element Text field and click OK.