Manage OTBI Folders
You can manage OTBI folders by following these guidelines.
Oracle might deliver new, updated content as a part of upgrade or patching process. When you audit, disregard the last modified date and owner information on all the seeded content. The seeded content is solely owned by Oracle and displays "System Account" or an internal patching user name as the owner. The timestamps correspond to the patching, upgrade, or provisioning dates.
Create OTBI Folders
You manage OTBI analyses and reports in the catalog, where you create folders to organize them.
Bear the following in mind as you manage folders:
- Regularly back up content in the
My FoldersandShared Folders/Customfolders. - Use care when renaming or deleting any folder under
the
Shared Folders/Customfolder. - Don’t rename or delete the
Shared
                                                Folders/Custom
folder. - Don’t store analyses and
reports in the predefined folders in
My Folders/TemporMy Folders/Draft. Oracle Analytics Publisher uses these folders and purges them automatically every 24 hours.
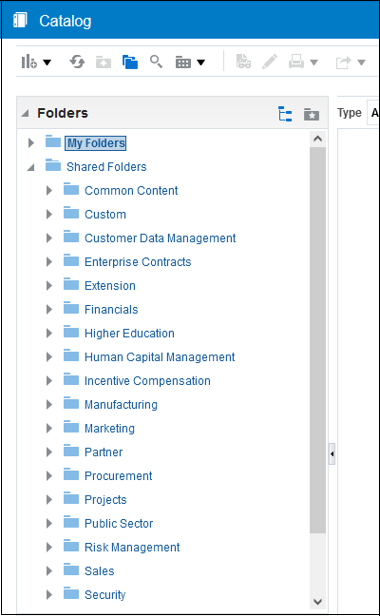
- Click Catalog to display the catalog.
- In the Folders pane, navigate to a folder location (such as
Shared Folders/Custom) where you want to create the folder. - Click New and then click Folder.
- Enter a name for the folder and click OK to create the folder.
Set Folder Properties
You can access the properties of user objects or the Custom folder and any of its subfolders in the catalog to set folder permissions and other attributes.
You can view system information, and change attributes or ownership. Other users can access and modify the properties of only the objects that they create or own.
Set Folder Permissions
You can set permissions or change ownership for any catalog object or folder. Non-administrative users can access and modify the permissions of the objects that they create or own.
About Duty Role Access to Seeded Shared Folders
Each seeded shared folder in the catalog is secured using a specific reporting role.
All authenticated users inherit a Custom BI Webcat Reporting Duty role, CUSTOM_BI_WEBCAT_REPORTING_DUTY. The Custom BI Webcat Reporting Duty role inherits all of the seeded folder reporting roles.
This table lists the mapping between shared seeded folders and folder reporting roles.
| Folder Path | Duty Role | Duty Role Name |
|---|---|---|
| /shared/Common Content | BI_COMMON_CONTENT_REPORTING_DUTY | Common Content Folder Reporting Duty |
| /shared/Customer Data Management | BI_CDM_REPORTING_DUTY | Customer Data Management Folder Reporting Duty |
| /shared/Enterprise Contracts | BI_OKC_REPORTING_DUTY | Enterprise Contracts Folder Reporting Duty |
| /shared/Extension | BI_EXT_REPORTING_DUTY | Extension Folder Reporting Duty |
| /shared/Financials | BI_FIN_REPORTING_DUTY | Financials Folder Reporting Duty |
| /shared/Higher Education | BI_HED_REPORTING_DUTY | Higher Education Folder Reporting Duty |
| /shared/Human Capital Management | BI_HCM_REPORTING_DUTY | Human Capital Management Folder Reporting Duty |
| /shared/Incentive Compensation | BI_IC_REPORTING_DUTY | Incentive Compensation Folder Reporting Duty |
| /shared/Loyalty | BI_LOY_REPORTING_DUTY | Loyalty Folder Reporting Duty |
| /shared/Manufacturing | BI_MFG_REPORTING_DUTY | Manufacturing Folder Reporting Duty |
| /shared/Marketing | BI_MKT_REPORTING_DUTY | Marketing Folder Reporting Duty |
| /shared/Partner | BI_ZPM_REPORTING_DUTY | Partner Folder Reporting Duty |
| /shared/Procurement | BI_PRC_REPORTING_DUTY | Procurement Folder Reporting Duty |
| /shared/Projects | BI_PRJ_REPORTING_DUTY | Projects Folder Reporting Duty |
| /shared/Public Sector | BI_PSC_REPORTING_DUTY | Public Sector Folder Reporting Duty |
| /shared/Risk Management | BI_GRC_REPORTING_DUTY | Risk Management Folder Reporting Duty |
| /shared/Sales | BI_ZBS_REPORTING_DUTY | Sales Folder Reporting Duty |
| /shared/Service | BI_SVC_REPORTING_DUTY | Service Folder Reporting Duty |
| /shared/Subscription Management | BI_OSS_REPORTING_DUTY | Subscription Management Folder Reporting Duty |
| /shared/Supply Chain Management | BI_SCM_REPORTING_DUTY | Supply Chain Management Folder Reporting Duty |
| /shared/Functional Setup | BI_FSM_REPORTING_DUTY | Functional Setups Folder Reporting Duty *Not inherited by Custom BI Webcat Reporting Duty |
| /shared/Security | FBI_SECURITY_TRANSACTION_ANALYSIS_DUTY | Security Transaction Analysis Duty *Not inherited by Custom BI Webcat Reporting Duty |
Hide Seeded Folders and Their Content
You can hide seeded folders and their content from users by removing associated folder reporting roles from the Custom BI Webcat Reporting Duty role.
For example, if your users are managers or HR employees, you might want them to only see the HCM folders, or if their primary job function is in dealing with Supply Chain, then you might only want them to see the Supply Chain folders. There are many seeded folders, so hiding the content that a user sees, focuses their attention toward only the content they need.


