Creating an Application
Follow these steps to create an application.
- If you purchased Oracle Fusion Cloud EPM before June 4, 2019,
log in and click Start under
Finance, click Planning and
Budgeting, and then select Enterprise.
If you purchased Enterprise Performance Management Standard Cloud Service or Enterprise Performance Management Enterprise Cloud Service after June 4, 2019, log in and click Select under Planning, click Start to create a Planning business process. For more information, see Creating a Cloud EPM Service Application in Administering Planning .
- Enter an application name and description, select Modules for Application Type, and then click Next.
- Specify this information, noting that only monthly planning is supported.
-
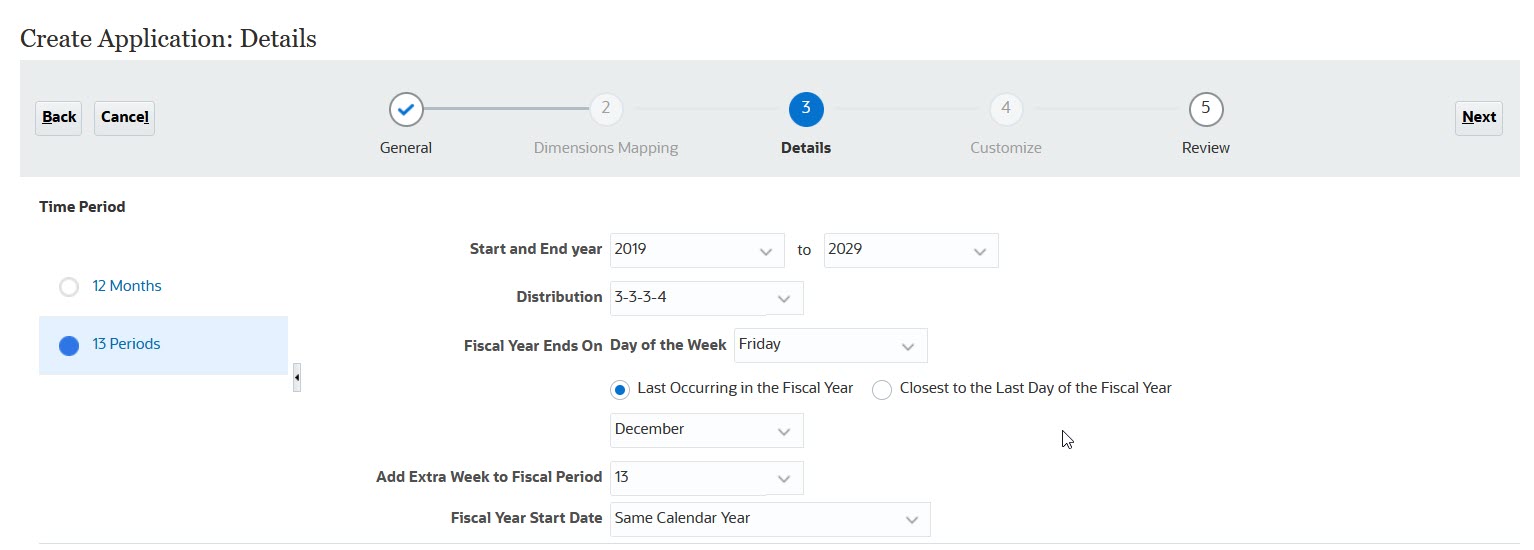
Time Period—Select whether to set up the calendar for 12 month or 13 period planning. For information about planning with 13 periods, see About 13-Period Calendars.
-
Start and End Year—Years to include in the application. Make sure to include the year that contains the historic actuals required for planning and analysis. For example, for an application beginning in 2020, select 2019 as the start year so that the latest actuals are available for trending and reporting purposes.
Note:
Do not change the storage properties of the Year dimension members to Dynamic Calc. - For 12 month calendars, select these options:
-
First Month of Fiscal Year—Month in which your fiscal year begins.
If you create an application with a first month other than January, you must also select the Fiscal Year Start Date (Same Calendar Year or Previous Calendar Year). The selection of this parameter is critical for the correct creation of the Years dimension and the underlying calculations for periods. For more information, see About the Calendar.
-
Weekly distribution—Sets the monthly distribution pattern, based on the number of fiscal weeks in a month.
-
- For 13-period calendars, select these options:
- Distribution—Define the distribution of
periods within quarters, indicating which quarter has four
periods. (In a 13-period calendar, three quarters have three
periods and one quarter has four periods.)
For example, if you select 3-3-3-4, the additional period is added into the 4th quarter.
- Fiscal Year Ends On— Define the end of the fiscal year by selecting the Day of the Week, and whether the end of the fiscal year is Last Occurring in the Fiscal Year or Closest to the Last Day of the Fiscal Year in the selected month.
- Add Extra Week to Fiscal Period—Select which period should have five weeks. (With 13-period planning, each period is exactly four weeks long (except every five or six years, when one period has five weeks.)
- Fiscal Year Start Date—Select whether the fiscal year starts in the Same Calendar Year or Previous Calendar Year. The selection of this parameter is critical for the correct creation of the Years dimension and the underlying calculations for periods. For more information, see About the Calendar.
These options determine in which year the 53rd week occurs and how system member formulas are calculated.
For example, if you define the end of the fiscal year as Friday, Last Occurring in the Fiscal Year, in December, and select 13 for Add Extra Week to Fiscal Period, the calendar is created with December 27 2019, which is the last Friday of December in 2019, as the last day of the fiscal year. Based on this date, subsequent year calendars are set up based on a 13 period calendar, adding the extra week that occurs every few years to the 13th period.

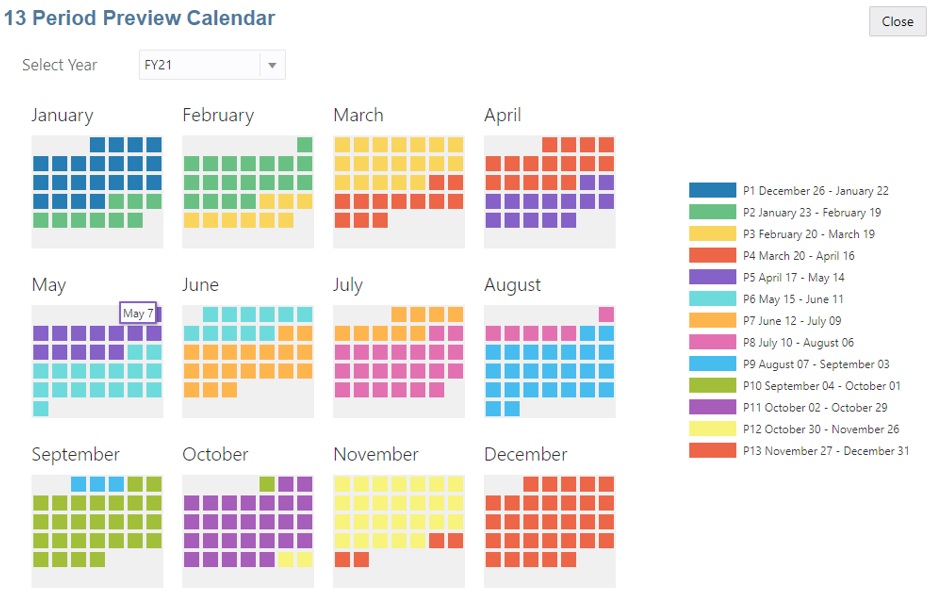
Based on the selections in this example, FY19 has 52 weeks—13 periods with four weeks each. FY20 also has only 52 weeks—13 periods with four weeks each. FY21 has 53 weeks. Because we selected to add the extra week to period 13, the fifth week is in the last period (November 27 to December 31).
After you create the application, you can preview the calendar and see each period's dates. To do so, on the Home page, click Application, then Overview, then Actions, and then 13 Period Preview Calendar. At the top, you can select the year's calendar to preview. Here is the calendar for FY21 for the example described. Note the fifth week in P13 (November 27 to December 31):

- Distribution—Define the distribution of
periods within quarters, indicating which quarter has four
periods. (In a 13-period calendar, three quarters have three
periods and one quarter has four periods.)
- Task Flow Type—Choose a Task Flow
Type for the application:
-
Task List—Task lists are a classic feature which guides users through the planning process by listing tasks, instructions, and end dates.
For more information about task lists, see Administering Task Lists in Administering Planning.
-
EPM Task Manager—This is the default option for new applications. EPM Task Manager provides centralized monitoring of all tasks and provides a visible, automated, repeatable system of record for running a application.
For more information about EPM Task Manager, see Administering Tasks with Task Manager in Administering Planning.
Note:
There is no migration from existing Task Lists to the EPM Task Manager. If you want to continue using classic Task Lists, select the Task List option during application creation.
-
-
Main Currency—For a multicurrency application, this is the default reporting currency and the currency against which exchange rates are loaded.
-
Multicurrency—Multicurrency support is provided by the Currency dimension, and enables planning in different currencies.
If you select Multicurrency, a member called No <Member> (for example: No Entity, No Period, No Version) is added to all dimensions to store currency information. You can’t edit or delete this member.
For more information, see About Simplified Multicurrency.
- Prefix—For 13-period applications, define the prefix for time periods. The default is TP. If you keep the default, time periods are named TP1, TP2, and so on.
- Name of Input Cube—Name for data entry (block storage) cube. You can’t later change the cube name.
-
Name of Reporting Cube—Name for the reporting (aggregate storage) cube. You can’t later change the cube name.
- Sandboxes—When you create an application, a block storage cube is
created, which you can enable for sandboxes by selecting the
Sandboxes option.
If you create a custom block storage cube in the application, you can use sandboxes in that cube. When creating the custom cube, select Enable Sandboxes. (Sandboxes aren't supported in the cubes created by default for the modules.) To learn more about setting up and using sandboxes, see Administering Planning and Working with Planning.
-
- Strategic Modeling—Enable Strategic Modeling.
- Click Next and then click Create.
Note:
Planning Modules applications are not always able to receive artifacts with partial uploads or with partial migrations.
Table 3-1 Video
| Your Goal | Watch This Video |
|---|---|
|
Learn about setting up multiple currencies. |
|