Example: Creating a Chart to Display Plan versus Actual End Date
This example visualizes Tasks planned vs actual completion over time - allowing you to see if your schedules are running ahead or behind schedule. The chart shows all of the tasks end dates that fall on or after a certain date. This will show a large number of tasks within the beginning of the schedule and gradually go down until the final task in the schedule.
The generated chart is displayed below. Click any area within the chart to drill down and view of the individual records that comprise that aggregated area.

To create this chart:
- From the Home page, click Tasks, and then click Schedule Tasks to display the Task List.
- From the View Selector at the top-right of the page, select Chart
View.
The Chart view appears with a default chart displayed.
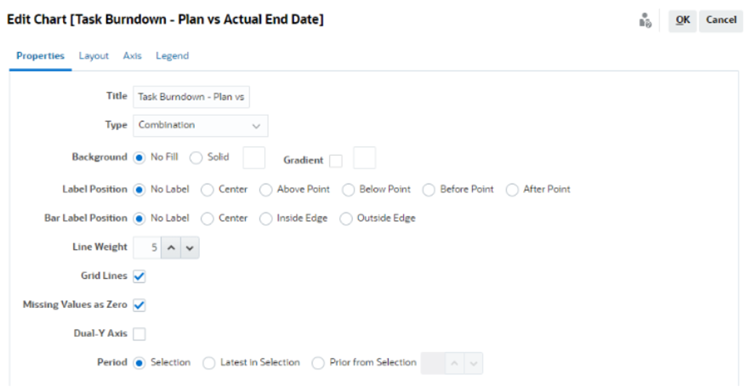
- Click the Edit icon at the top-right to display the Edit Chart dialog.
- In the Properties tab, specify the following:

- In Type, select Combination.
- In Background, select No Fill.
- In Label Position, select No Label.
- In Bar Label Position, select No Label.
- Select Line Weight as 5.
- Select Grid Lines.
- Deselect Dual Y Axis.
- In Period, select Selection.
-
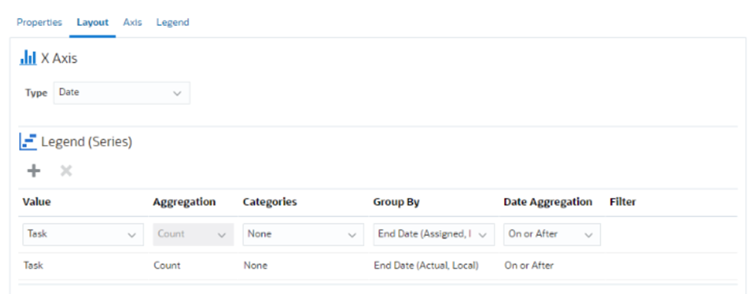
In the Layout tab, specify the following:

- In the X-Axis section, for Type, select Date.
- In the Legend (Series) section, enter 2 values:
For the first entry:
- In Value, select Task.
- In Categories, select None.
- In Group By, select End Date (Assigned)
- In Date Aggregation, select On or After.
For the second entry:
- In Value, select Task.
- In Categories, select None.
- In Group By, select End Date (Actual, Local)
- In Date Aggregation, select On or After.
- In the Axis tab, leave the default settings as is.
- In the Legend tab, specify the following:
- In Legend Position, select Right.
- In Palette, select Redwood.
- Click OK.